Friday, March 28, 2014

Glitter Nails

I bought some iridescent white glitter when we made snowglobes for Christmas, and while we were working with the glitter I kept thinking, "I want to coat my nails in this!" I finally got around to using it and the results were very pretty!

Glitter Nails

A long time ago I coated my nails with micro-fine glitter & it was a cinch ~ paint on some clear top coat, dip your nail in the glitter, and brush off the excess. It was a little harder to work with this larger hex glitter, but still a pretty quick manicure.

First I painted one nail with a shimmery silver glitter that I thought would match nicely to fill in the gaps, then dipped my nail like before. This left glitter hanging off in all directions, so I knocked off the loose glitter with my fingers, then wet my thumb and worked on pressing down all the glitter on the nail as smooth as possible. If you end up with a bald spot I found that it was better to use a nail dotter or toothpick, dab a little polish on the spot, then place the hexes on as needed. (Don't just brush the spot with some polish & dip it again or you will get a noticeable 2nd layer of glitter sticking up. These were the only places my nails felt rough.) Finish off with a few layers of top coat & you are done!

This was a lovely manicure, but not too long lasting. The brittle glitter chipped pretty badly, but could also be touched up easily. I'm sure I'll try it again!

Monday, March 24, 2014

DIY Stain Magic

A while back I bookmarked a link on Pinterest about removing stains from the armpits of shirts. My husband's undershirts often get a bit yellow there & I thought I might try it out one day. Then I noticed one of my favorite shirts was getting embarrassingly dark on the armpits! So I pulled up the link, mixed up the recipe, and gave tried it out on one side.

It's not as obvious in the pic as it was in real life, but you can see the dark area on the left side. I used the concoction on the right side and it removed it completely!

Armpit stain (before & after)

I've seen a few different ratios floating around, but I like to use:

1 Tbsp. baking soda
1 Tbsp. hydrogen peroxide
1 tsp. blue Dawn detergent


I mix up a triple batch (3 Tbsp. + 3 Tbsp. + 1 Tbsp.) and store it in a 1/2 cup tupperware. Be warned ~ the mixture does need a while to breathe, so do not put the top on for several hours or it will pop the top & you will have a soapy mess dripping down the side. Before using, stir it up well with an old toothbrush and scrub it on the stain. I like to let it sit an hour before washing but don't know if that really makes a difference or not.

DIY Stain Magic

After that success I decided to Google a cure for my big laundry foe ~ grease spots. My old strategy was to treat the area with stain remover and re-wash, hoping it would come out the 2nd time, but I had a few shirts that just would not get clean & were close to getting tossed. My husband had a particularly bad one ~

Shirt stain, before

I found several suggestions & ran some experiments. First I tried baking soda, and while it does mask the stain temporarily (you could probably hide a spot on clothing you want to wear right away), once it went through the wash the stain returned. Then I tried rubbing the stains with chalk ~ no luck. Finally I read to use a combination of baking soda and blue Dawn. I gave the armpit mix a try and behold!!

Shirt stain, after

I could not believe my eyes!

Since then I have tried this on all kinds of stains and dubbed it my "Stain Magic". I don't bother pre-treating anything, I just use it on anything that didn't come out in the wash. It has worked miracles around here & saved many pieces of clothing!

And if that fails...

The Stain Magic almost always works the first time, but occasionally I have to treat & wash something again. I did have some old baby clothes with some particularly stubborn yellowing that it did not fully remove, so I turned to my other powerful stain fighter ~ the sun!

Believe it or not, the sun is pretty awesome at removing stains and odors. We use cloth diapers and I learned to take any stained diapers, wet them down, and sun them to get them bright white again. I finally tried this with the stained baby clothes and it bleached the remaining yellow out in a day or two of sunning. Just make sure to wet them first, because it does not work nearly as well dry.

Wednesday, March 19, 2014

St. Patrick's Day Manicure & Green Dinner

I was painting my nails over the weekend & had to do something for the holiday! I was thinking of doing a gold base with rainbow glitter on a few nails, but then I remembered the gold glitter polish I got in my Christmas stocking. I'm not usually a big gold fan, so this was a great excuse to use some up.

St. Patrick's Day Nails, '14

Each nail was done with a base color of China Glaze "Agro", with Elf "Gold Star" glitter on the ring finger and thumb. On the other nails I used Kleancolor "Metallic Green" and a small nail dotter to draw on a stem, then used a large nail dotter to dab on the four circles of the clover. I used KBShimmer "Clearly on Top" topcoat over everything so I didn't have to worry about the dots smearing.


Last year I started a tradition of having a green dinner on St. Patrick's Day. I was having trouble finding something to cook this time, so I made up a recipe. I sauteed shredded Brussels sprouts and chopped mushrooms, then tossed them together with green pasta shells, shredded chicken, and a white cream sauce. It doesn't look too pretty, but it was very tasty & very green!

Green Dinner, '14

On the side we had some green punch. I scooped a little lime sherbet into the bottom of a pitcher, sprinkled about 1/2 of a pack of lemon lime Koolaid over that, then filled up the pitcher with a generic Mt. Dew. I also found a cute pack of green & white paper straws in the $1 Easter section at Target.


I'm a little nervous about the upcoming holidays. Easter won't be too bad ~ I've already started tucking away a few goodies for the baskets ~ but a few weeks later we've got a 1st birthday party to plan! We won't be doing anything big, but so far I am drawing a blank. Off to Pinterest, I suppose!

Monday, March 17, 2014

Bento #11: Sushi Shamrock

I'm skipping ahead on the bentos a bit to show you the simple sushi box I put together for St. Patrick's Day...

Bento #11: Sushi Shamrock

Bento #11: Sushi Shamrock

I rolled up some (imitation) crab and cucumber and sliced it like normal for the sushi. On four of the slices I pinched the side to form a point, then arranged them with the four points together to create a four leaf clover. I took one more slice and cut it in half, flattening it a bit to create a long triangle. I sealed the cut side with a scrap of nori, then curved it a bit and used it for the stem. And finally, I tucked a few cucumber slices around the stem to keep everything in place.

I used a new box for this one ~ did you notice? I bought two a little while ago & don't like the dimensions as much, but for this lunch it was a good fit. Of course my son wanted nothing to do with it, but a mom's got to try. We'll see how the green dinner goes tonight!


Supplies Used:


Wednesday, March 12, 2014

A Ton of New Recipes

I am a bit backlogged with pictures of new recipes that we tried recently (or a long time ago). So in an effort to clean out my folders a bit, let's just throw a bunch together in one post!

Pepperoni Pizza Puffs

Pepperoni Pizza Puffs ~

We've made these 3 times now, they are so good & easy to make! We buy the mini pepperonis for these (tiny & cute). I used a regular muffin tin & filled each up hallway, and don't forget to grease the pan because these do like to stick. They are way better dipped in spaghetti/marinara sauce, so the 3rd time I tried topping each with a little sauce and sprinkle of cheese. Those were good, but didn't puff up as much, so I'm not sure if I'll try that again or leave them as-is. Recipe here.


Green Bean Shira-ae

Green Bean Shira-ae ~

From my new favorite Japanese food blog, recipe here! I actually didn't have enough sesame seeds for this so I used half (seasoned) sunflower seeds and it was really good. Both the toddler & husband also enjoyed this one.


Tsukemen

Tsukemen (Dipping Noodles) ~

Another from that blog, found here. This was good, but a bit too similar to our Miso Ramen (which we like better). Dipping the noodles was not as exciting as it sounded, so the 2nd night we ended up mixing everything together as a soup.


Shredded Coconut Cabbage

Shredded Coconut Cabbage ~

I got inspiration from this and this recipe, hoping for something that would look as tasty as that 2nd link! I always have savoy cabbage on hand and have been looking for some ways to use up the leftovers. This was pretty good, I need to try it again. Here's how I made mine ~

Heat 1 Tbsp. oil in a non-stick skillet over medium heat. Saute 1/3 cup shredded coconut for 30 seconds. Add 1 thinly sliced onion and 1 Tbsp. grated ginger. Saute for 1-2 minutes, stirring constantly. Add 4 cups shredded savoy cabbage, 1 Tbsp. oil, and 1/2 tsp. salt. Cook on medium heat for about 7 minutes, stirring frequently until the cabbage is nicely browned. (I have a hard time imagining that I used 2 Tbsp. of oil, so that might be a typo.)


Peanut Butter & Choclate Brownies

Ooey Gooey Peanut Butter Chocolate Brownies ~

I've made these twice, but the first time was for a Father's Day gift & we only had a small taste. I made these later for a meeting and they were a big hit. From another favorite blog, found here.


Parmesan Hash Brown Cups

Parmesan Hash Brown Cups ~

We had some leftover hash browns in the freezer so I gave this recipe a try. I did not want mine to be as dark as hers so I baked them for 45 minutes (instead of 60-75) and they were golden brown and super crispy. They were a bit dry though, so I tried them again with a sprinkle of cheese on top. The cheese made the tops a little prettier & golden, but I think they need a little egg or cheese or something inside for moisture.


Meatball Bubble Biscuits

Meatball Bubble Biscuits ~

These were *really* good, and pretty easy to make, though I was getting tired of wrapping by the end (there are 20). I used whole meatballs and a pinch of shredded cheese and we both thought they would be even better with a dab of sauce inside. I would love something like BBQ in there, but my husband was rooting for spaghetti/marinara. They definitely lend themselves to lots of filling possibilities! Recipe here.

Monday, March 10, 2014

Catan Manicure

3 years ago I had a little Amazon money to spend and looked through my Wish List for something both my husband and I would like. I bought the board game The Settlers of Catan, which ended up being a bit different from board games we'd played before and was a *whole lot* of fun. Soon our friends and family were just as addicted to the game as we were! We quickly added the 5 and 6 Player Extension, and got the Cities and Knights Expansion (and extension) for our birthdays. (Some of our family & friends have bought the other expansions, but Cities & Knights is still our favorite way to play!)

At our last game night I finally got around to making the Catan manicure I planned long ago! You can see below that the board is created with different colored hexes (they are arranged randomly each time so your game board changes) and I thought it would be fun to copy it using hexagon shaped glitters. I bought this glitter set because it had all the right colors ~ two greens, yellow, tan, gray, and reddish brown. This picture shows the recommended board set-up for first time players, so I thought it would be fitting to create that on my nails!

Catan Nails, far

Unfortunately this is one of those manicures that was determined to fail from the start. I used Orly "It's Up To Blue" for the water and promptly bumped it as we were cleaning for guests. I tried to fix it and bumped it again! Then I laid out the hexes and realized they were wayyyy smaller than I had thought. I imagined the board starting on my ring finger and continuing onto the middle and ring finger a little, but the whole board barely covered one nail. And to make matters worse, the light green, yellow (gold), tan, and gray (silver) were just too close in color and all looked the same. I got out a nail dotter and some better nail polish colors and dabbed over them, which luckily was an easy fix. The results weren't terrible, but after all of that I was not too pleased with this "Catan-icure", especially when it started chipping right away. Grrr!

Catan Nails, close

Since we discovered Catan all of our get-togethers have turned into game nights and we've found several other games that are just as much fun. Some of our favorites are Munchkin, Castle Panic, Ticket To Ride, and our new obsession, 7 Wonders. If you haven't tried any of these yet you are missing out!!

Thursday, March 6, 2014

Sushi & Rice Balls

I have had sushi on the brain lately!

For Valentine's we picked up some sushi to enjoy after the kids went to bed, and while it was delicious, we both said "we are never buying sushi again!". It cost $40 just to buy a few rolls (we didn't even buy the pricier ones), and there was not much food to show for it. I could maybe understand those prices for exotic ingredients, but most of the rolls on our local menu were made with things I can easily buy like avacado, cucumber, and cooked shrimp or crab.

We've tried making sushi in the past with mixed results. The first time our nori was so fishy smelling that I quickly lost my appetite and couldn't bear to make or eat sushi for a long time. My friend sent me some soy wrappers and we had tried again. Here is a 7 year old photo, yikes! ~

Sesame wrapper sushi

Once we ran out of soy wrappers a long time passed before I decided that we must have just had a bad brand of nori, so I bought a new pack and we had no problems with it. It was always a little tricky rolling the sushi, but fun to try.

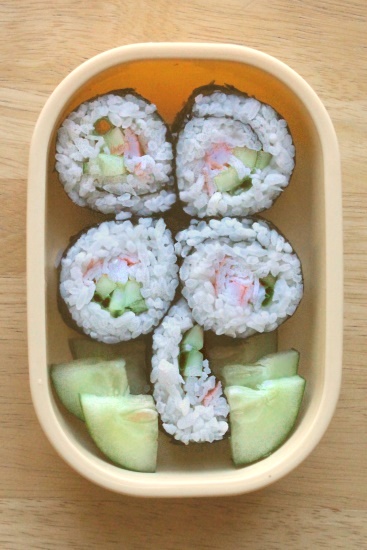
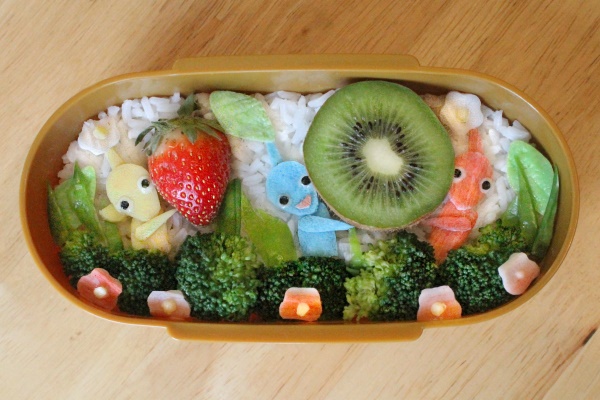
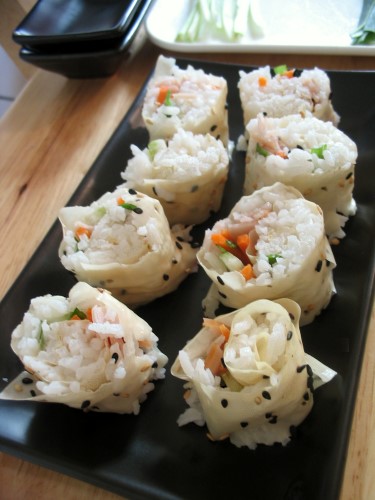
It has been years since our last attempt, but I bought some sushi rice recently to try making rice balls. A couple of days after the V-day sushi dinner I found myself with a block of free time and I realized I already had nori and crab sticks from making bentos. I grabbed some asparagus from the fridge, and feeling adventurous, I whipped these up along with some eel sauce ~

2-14 Sushi

The sushi was tasty & soooo much easier to roll this time! The things that really made a difference were ~

1) For each roll I measured out 1 cup of sushi rice and then mixed in 1/2 tsp. rice vinegar, 1/2 tsp. sugar, and a dash of salt. (I saw lots of different ratios used for sushi seasoning & tried a few, but this seemed like just the right touch of flavor) In the past Justin had problems with using too much rice, which made it hard to roll, so knowing exactly how much rice to use was a big help.

2) The rice is super sticky, and most directions will tell you to dip your fingers in a water & vinegar mix before spreading it on the nori, but it was always a mess. This time I saw some directions that mentioned using a spoon, and this worked *much* better for me. I dipped the spoon in water again & again and the rice barely stuck to it, and everything was easier to handle without sticky fingers.

3) I started the roll from the bottom, then folded the sushi mat back a few inches before continuing. In the past I never knew what to do with the mat half-way through, but this got it out of the way and it seemed much simpler to finish this way.

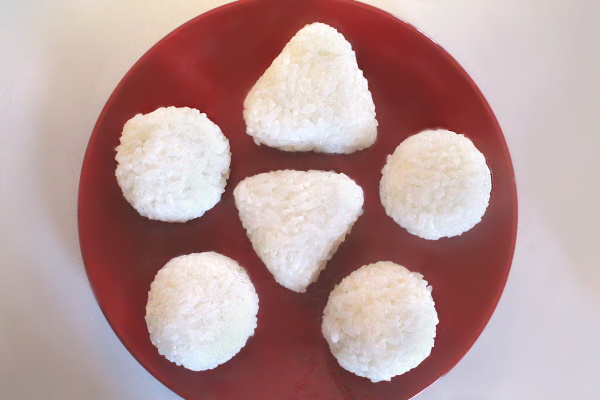
I made two rolls and they were quickly devoured by me and my 3 year old. He loves it! Then I used the rest of the rice to form some onigiri triangle and some rice balls. I wrapped the rice in plastic wrap before forming them to keep my hands from getting sticky. The top triangle was the recommended 1/3 cup, but I made the rest with 1/4. Orson was reluctant to try these, but loved them once he did.

2-14 Rice balls

Anyway, my sushi lunch experiment was so successful that I couldn't wait to make some for my husband for a dinner. I used the crab and asparagus again and each roll only took me about 5 minutes! There were even leftovers for lunch, and after all of that I needed another break from eating sushi, haha. I have been brimming with ideas for new rolls though! One day I'm sure we'll grab some sushi-grade fish at the Asian market, but for now I'm trying to think of things we can get at our local grocery store ~ cooked seafood, veggies, and a few crazy ingredients. ;)

Monday, March 3, 2014

Bento #7 & #9: Pikmin


In my ongoing effort to get Orson excited about silly lunches, I decided to make a bento based on something he really likes. Even at 3 his favorite thing in the world is video games, and I realized it would be really easy to make the Pikmin from a game he's been playing a lot lately (Pikmin 3). Even better, I could make all of the shapes with one set of cutters, so they are easy to create without a ton of tools.

Bento #7: Pikmin

Bento #7: Pikmin, 1

First I laid out a base of rice and squeezed some blanched broccoli along the bottom for bushes. In the game the Pikmin help you carry over-sized fruits, so I pushed in half a kiwi and a strawberry and then leveled out the rice around them. (I had planned on using three different fruit, but there was no room!)

Pikmin cutters

To create the Pikmin I used a fat and a long teardrop shape. I rounded the point of the fat teardrop to create the head. Then I cut the long teardrop in half and used the wider side for the body. I cut the tip in half again (lengthwise) and used half for the point on their head, then rounded off the corners on the other half to create the arms.

Bento #7: Pikmin, 2

I didn't have a good circle for the eyes, so I dabbed on some ranch dressing and dotted each with nori punched with a mini hole punch. The yellow Pikmin all have ears (circle cut in half), the blue ones have a mouth (trimmed from a scrap), and I ignored the red Pikmin's pointy nose.

Bento #7: Pikmin, 3

The red Pikmin and the flowers along the bottom were made from an unrolled imitation crab stick. I also cut two white flowers from the crab for the top of their heads. The blue and yellow Pikmin were cut from egg sheets that I made from these directions. (I think I used 3 egg whites for the blue one, 2 yolks and 1 whole egg for the yellow.) My egg sheets looked nothing like hers, but they work OK!

Bento #7: Pikmin, 4

The flowers were all dotted with tiny circles from the yellow egg sheet, held in place with a dot of ranch. I also used a green egg sheet for the leaf on top of the blue Pikmin's head and added a few leaves on the sides. Then I filled in the rest of the open space with some strips cut from snow peas for grass.

When I unveiled Orson's special lunch he of course had no interest in eating it. My husband ended up with this one, though Orson did ask for the fruit.


Bento #9: Pikmin

Bento #9: Pikmin

A little over a week later I asked Orson what he wanted for lunch. He said he wanted a "special lunch! Like the Pikmin lunch!". Since I had made this before, it was pretty quick to throw together with rice from the freezer. This time we only had grapes on hand so I filled up a cupcake liner and had each Pikmin carry one grape. I made the bushes with edamame but was too rushed to add as many details as before. This time Orson ate every bit, making 'yummy' noises the whole time!


Supplies Used: