Monday, February 24, 2014

Bento #5: Mushroom, #6: Bear Face

I had fun talking about bentos with my mother-in-law recently. She's known about them for a long time and has a ton bookmarked. She even has a few supplies and books, but hasn't made anything with them yet. When I checked out her book collection I was surprised to see one I had bookmarked myself! I borrowed two and was very glad to have the chance to flip through them.


Kawaii Bento Boxes was first published in Japan and then translated into English, and it shows. If you are not familiar with Japanese cooking there are going to be a lot of ingredients you don't recognize, and there is usually not any information about them. I was surprised that the book seemed mostly focused on recipes rather than food decorating ideas. While there were lots of bento-friendly Japanese recipes, I'd probably pass on this one.


Yum-Yum Bento Box was written by two Japanese moms for an American audience, and I found this one a lot more useful. I felt like most of the decorations would by easy to come up with on your own (for example, make a green rice ball into a frog head, or a pink one into a pig), but this would be good inspiration when you are drawing a blank. I did notice a few small errors that might be confusing, and the pictures were lovely but too shallow in depth (things in the back of the box were blurred, even when they included a recipe for those), but those are minor complaints! It is definitely a good source for those just starting out in bento.


Bento #5: Mushroom

When my son saw the cover of that book he requested the smiling mushroom (top right), and he wanted it on noodles just like the book. When he saw his lunch he actually said, "Is this for me? Yay!", and ate it with a big smile on his face.

Bento #5: Mushroom

Top: Green peas

Middle: Orange slices. I don't normally cut them this way but I think I will from now on. So pretty!

Bottom: I used the curve of a pepperoni to create the top curve of the mushroom, then trimmed off the bottom and cut out a few holes for spots. I laid that on a slice of white cheese and cut around the shape, adding a stem. I had to get creative for the face though, because my nori face punches were way too big. I used half of the animal mouth (see the bento below) for his smile, then trimmed down the circle eyes. That was way too difficult though, so I dug out my mini hole punch for the future!

For the base I used a half pack of ramen and topped it with the mushroom and a couple of flowers cut from pepperoni. I cut a small circle in the middle of the flowers and inserted a circle of cheese so the centers would stay put.


Supplies Used:


Bento #6: Bear Face

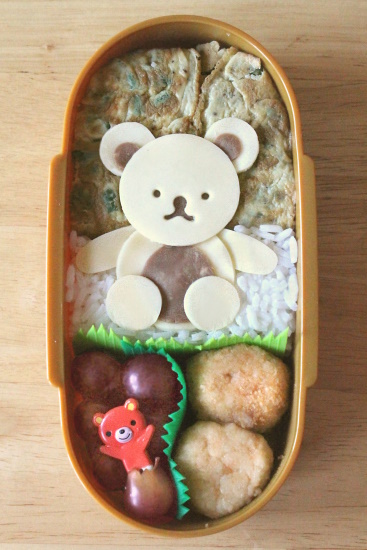
This bento also took some inspiration from that book. I liked the way they cut a meatball in half to create bear ears so I tried it out with the last of the chicken bites. The color was a little too far off (as was the snout), but not terrible. This whole box was thrown together with leftovers.

Bento #6: Bear Face

Top: My silicone cupcake liners finally arrived! I thought they were going to be  mini but they are normal cupcake size and fit great. The cup is filled with chunks of roasted butternut squash.

Middle: I filled the base with coriander rice and a small hamburger patty for the bear's head. The ears are a chicken bite cut in half and the face was created with sliced cheese and punched nori.

Bottom: Roasted green beans with a few stars cut from the squash for color.


Supplies Used:


Saturday, February 22, 2014

Basement Clean-up

In our last two apartments I had my own craft room. I was sewing full-time and definitely needed the space to work. Then I switched to the ambigrams and the room became a nursery, but I still used the massive closet to store my supplies.

When we moved into this rental house half of my craft supplies ended up in the basement and the other half in the spare room. I couldn't decide where to set things up, but soon I was pregnant and lugged everything down to the basement to make room for another nursery. I set up my two folding tables, but I couldn't really arrange anything without some more storage. (One of my shelves had fallen apart & was ditched during the move, one was re-purposed, and the previous closet had some shelving). Here is a before shot. Yikes!

Basement, before

We decided to buy two of these tall shelves with doors so we could child-lock them if needed. We figured we'd need a 3rd set, but hoped we might be able to get by with a cheaper short shelf instead.


But with lots of baby stuff to buy, they were definitely not our top priority, so it was about a year after the move before we got them. I got a bit of organizing done before the baby arrived, but was slow going after that! In the end I managed to fit everything in those two cabinets (along with two small shelves we had already), and I had it done in time to use as a wrapping station for Christmas!

Basement, after 1

Here is a shot from the other side. I've got a shelf and some boxes at the end of the table and a lot of canvases piled against the back wall.

Basement, after 2

Now that things are organized we are naturally talking about moving again, haha. We'd like to buy a house, but who knows what the year will hold. At least it should be easier to set things up at a new place now that I can take the shelving with me.

Wednesday, February 19, 2014

Bento #3: Teddy Bear, #4: Snow Day

Bento #3: Teddy Bear

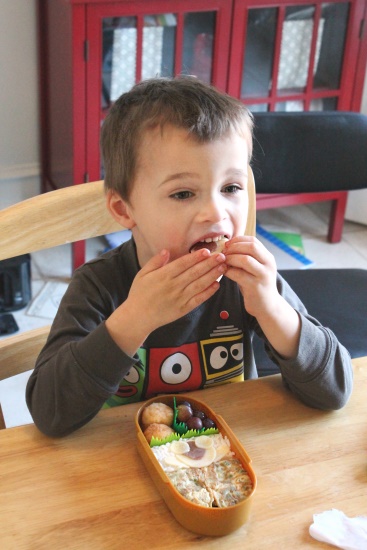
Here is the first bento Orson actually ate! He was pretty upset about the decorative toothpick, but once he removed it he happily chowed down.

Bento #3: Teddy Bear

o1-14 Eating bento

Top: The bear was cut from sliced cheese and roast beef and sits on top of a green bean & egg pancake and rice. I tried to cut the pancake into strips and roll it up, but it kind of fell apart in the box! Unfortunately everything was a similar color so the bear blends in a little too much, but he's still cute.

Bottom: Grapes on the left with a bear toothpick and chicken bites on the right.


Supplies Used:


Bento #4: Snow Day

I asked Orson for help with this one, hoping he would be more interested in the final result if he were involved. (No luck!) I asked him how we should decorate it and he said trees and people. We were waiting for our first snow storm to start that day, so at the end he also asked for some snow. I was so happy with how colorful the box turned out after I added in the touches of red apple.

Bento #4: Snow Day

Left: The background is a layer of rice topped with a layer of tofuniku (So yummy. I'll share the recipe soon). I hand cut a tree trunk from a slice of roast beef and added some edamame leaves. Everything else was cut from cheese or thinly sliced apple with shapes from the face cutter set (other than the girl's hair ties, which are a bow shape cut in half).

Right: Apple slices cut into flower shapes.


Supplies Used:


Thursday, February 13, 2014

Valentine's Day Lunch

We've been snowed in the last few days and decided to celebrate Valentine's Day a day early since we figured my husband would be back to work teaching tomorrow. Of course they decided to cancel tomorrow too, even though we're not expecting any more of the white stuff ~ oh well!

I've been itching to make some of the great things I've bookmarked on Pinterest & put together a fun lunch for everyone. My husband got the works ~

Vday Lunch, Justin

Top: Strawberry Roses - I got the idea for these here. There aren't any instructions, but the pictures are clear enough. These were surprisingly easy & quick to make, just make sure to spread the bottom petals out well. They didn't want to sit well on the plate so I cut the bottom off an apple, covered it with a cabbage leaf, and stuck them in there with some green toothpicks.

Sides: Cherry Tomato Hearts - Apparently you can take most ovals (the longer the better) and cut them on a diagonal to create hearts. I saw this done with the tips of hot dogs, rolled omelets, sushi, and more. I originally saw the tomatoes here, but ended up doing most of them with one tomato like this. The further you can cut from the top, the deeper the V of the heart will be, but if needs a little help you can also cut out a little wedge from each piece to deepen it.

Bottom: Hot Dog & Egg Hearts - I saw these lots of places & they are fun to make. Just cut a hot dog down the center, leaving it connected at one end. Bend the ends down and connect them with a toothpick, then lay it on a pan and crack an egg in the center with a sprinkle of salt and pepper. (The large eggs were threatening to overflow, so it helps if you dump out a little of the egg white first) I let the two cook on the pan for a while, but the top of the egg was not setting, so I put it on a plate and finished it off in the microwave for 1 minute until the yolk was only a little runny.

I changed things up a little for our preschooler, Orson ~

Vday Lunch, Orson

He got so mad when I tried to cut his hot dog into fun shapes before, so I arranged slices into a heart shape instead. Naturally he was ready to eat daddy's egg heart, but you never know! I filled the center with ketchup and added a strawberry rose, two tomato hearts, and a glass of pink milk (used one drop of red food coloring).

Poor Pandora just got little chunks of everything, but she loved the lunch too ~

Vday Lunch, Panda