Tuesday, November 15, 2016

Making a Pikachu Tail

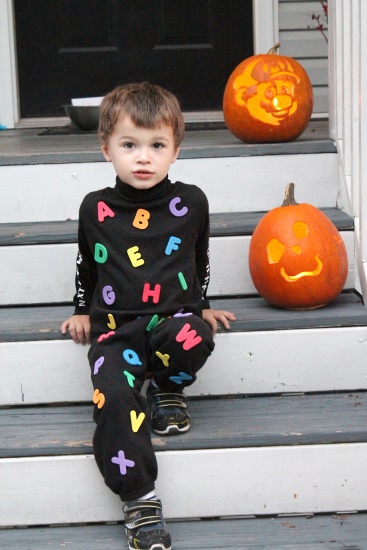
For Halloweens past, Orson has picked some crazy costume ideas - like 'the alphabet', or a pickle.

Orson, ABCs, 2 Trick or Treating '15, 4

But this year he is Pokemon crazy, and wanted to be Pikachu!

I looked around a lot, but I wasn't loving any of the pre-made Pikachu costumes. I considered adding a hat & tail to some yellow sweatshirt & pants, but I actually couldn't find yellow sweatpants anywhere! Or pretty much any yellow pants. Finally we decided to buy this cute Pikachu hoodie from Target (it was $15 at the time), and for the pants I finally found a set of Minions PJs with plain yellow fleece pants. Best of all, both the jacket & PJs will get a lot of use after Halloween!

Hoodie back, before

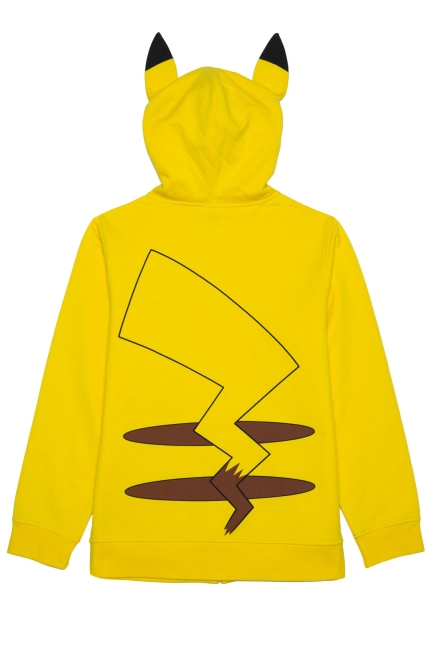
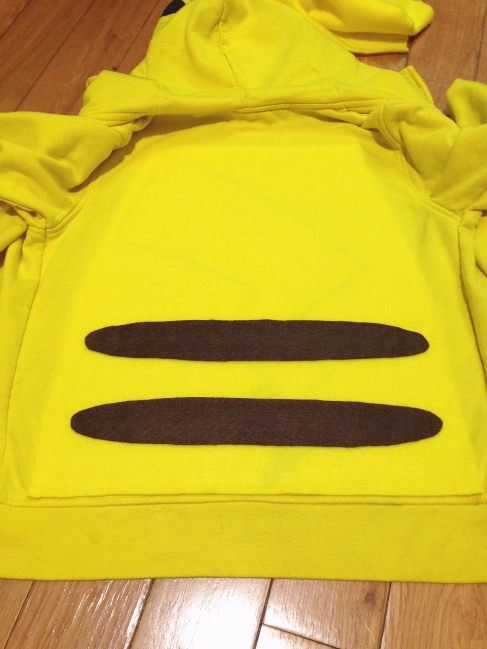
The back of the hoodie has a drawn-on tail & stripes, and before Halloween it got a lot of use as-is at Fall Festivals and Halloween parties.

Fall Festival

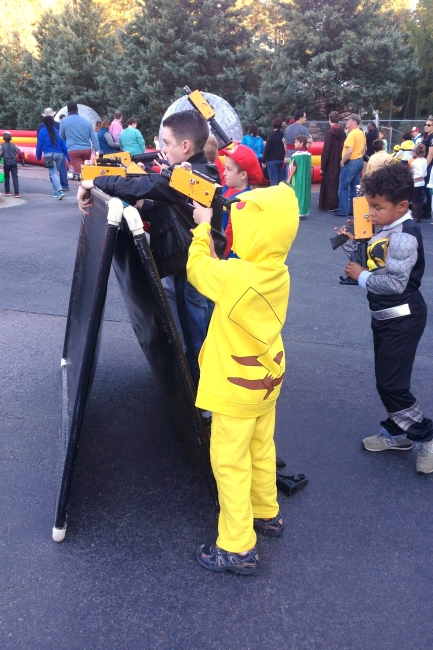
But for Halloween we both agreed that we needed a nice BIG tail! I bought some yellow fleece and some brown felt, and planned on constructing everything a week or so early. But I couldn't find any big cardboard, and I kept forgetting, and suddenly it was the *day of* Halloween and I realized I hadn't made it yet! Oops! In my rush I didn't get a chance to take a lot of nice step-by-step photos, but hopefully you can follow along!

First I wanted to cover the back of the hoodie, since it would be weird to have a big tail sitting on top of a drawn one! I cut a piece of the yellow fleece to cover the back and glued it down with Elmer's (white school glue) so that I could pull it off and wash out the glue afterward. I also added the two brown stripes back on with the brown felt.  ~

Pikachu hoodie

Then for the new tail ~ I figured out how large I wanted the tail to be, looked up some pics, and sketched it out on a big piece of cardboard. I used some scissors and a knife to cut it out. Then I glued it down on the yellow fleece and cut around it, about 1.5 inch from the cardboard. I'd planned on using hot glue for this, but it wasn't sticking very well, so I switched to Elmer's. Just like with sewing, you'll want to cut in towards an inside corner , and clip off any outside corners, then wrap the fabric around the edge & glue in place ~

Making Pikachu tail, 1

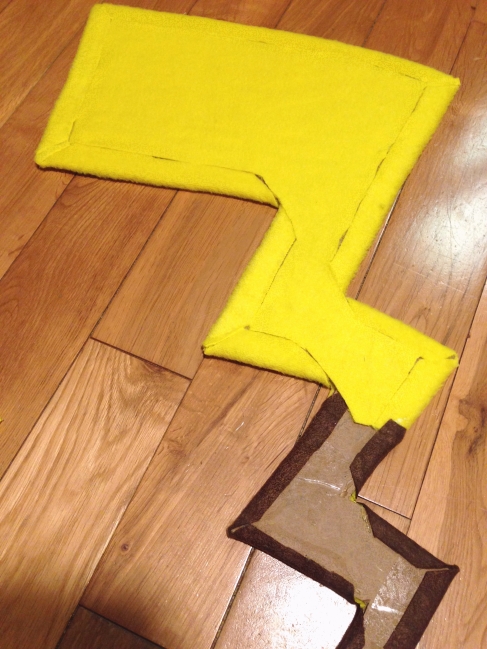
Then I cut some small zig-zags in the brown felt, and glued it to the tail in the same way. It was a little too bulky to fold over the yellow and brown fabric together, so there I cut the yellow flush with the cardboard and only folded the brown fabric over. 

I tried just covering the other side of the cardboard with the yellow fleece, but unfortunately you could clearly see the folded edge through the fabric, both the color and it's thickness. So I cut a piece of yellow to fit in between the folded edges (see above). For that, I just glued down the top corner, then just kind of peeked underneath to see where to cut, and cut & glued as I went until the area was filled. It was a very odd shape, but pretty easy to cut that way.

Making Pikachu tail, 2

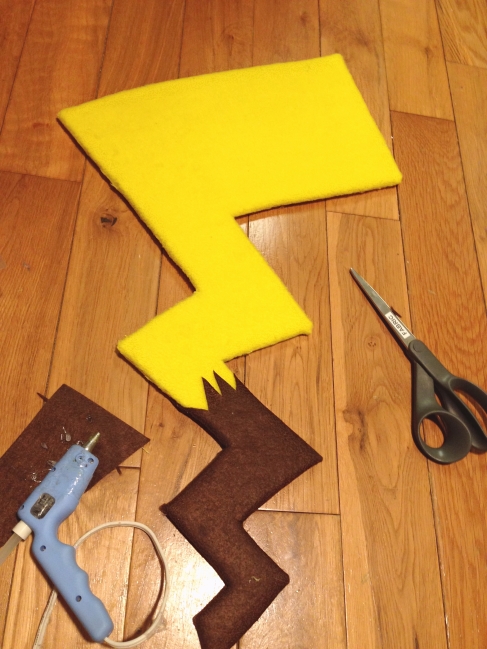
After that, I glued the exposed side down to the yellow fabric and just cut flush with the edge this time (since the edges were already wrapped with fabric), and repeated with the brown at the bottom. The hot glue worked fine for all of this, and any time I was gluing fabric-to-fabric (like the brown on yellow mentioned above). I poked a large safety pin through the top 3 points of the tail, and I was done! Orson was very happy with it ~

Finished Pikachu tail, 2

Finished Pikachu tail, 2

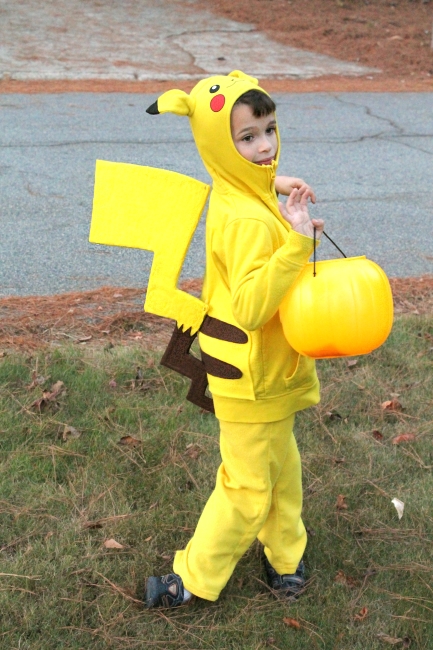
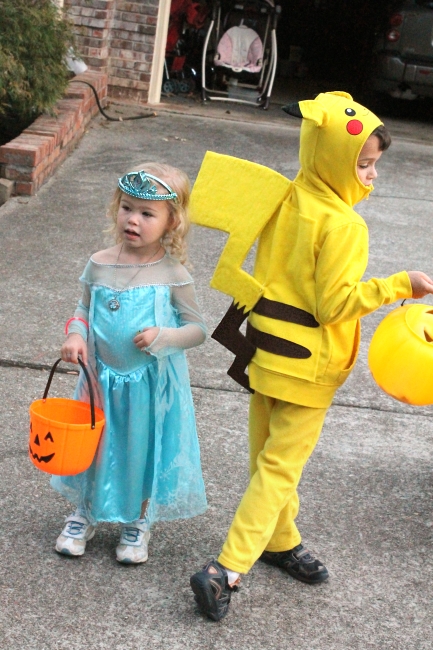
The tail flopped back & forth a bit, but stayed on well until the end of Trick-or-Treating. At the very end the pins had all come open (he was climbing & out of our wagon that night) and could have been re-pinned, but we just left the tail off for the last house. And when we were done, I propped it up on the wall in his room for a decoration!

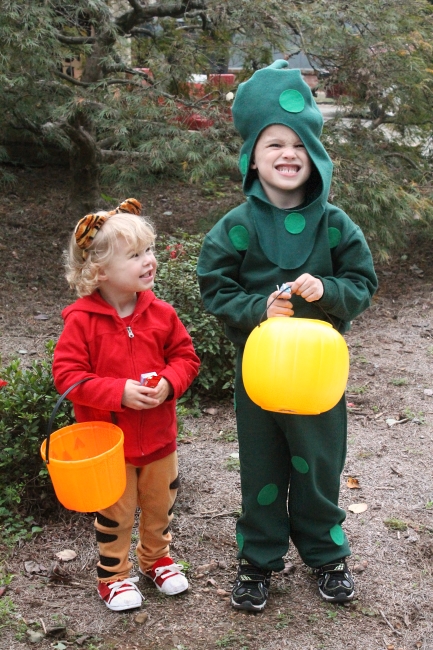
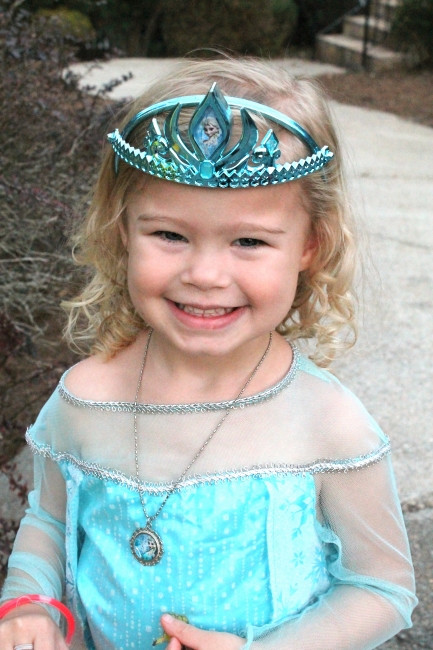
And here's a better picture of our little Elsa, since she's kind of staring off in the above pic ~ 

Elsa, close

The big tail worked out great, and definitely made it seem more like a 'costume' than just a hoodie & pants. And after Halloween, he couldn't wait to start wearing the Pikachu hoodie every day to school!

Thursday, November 10, 2016

North Georgia Fair, 2016

Every year in late September, we like to visit the N. Georgia fair with my parents. It's right around my mom's birthday, and my dad gets free passes from work, so it's become a favorite family tradition.

N Ga Fair '16, 1

N Ga Fair '16, 2

N Ga Fair '16, 3

N Ga Fair '16, 4

N Ga Fair '16, 5

N Ga Fair '16, 6

N Ga Fair '16, 7

N Ga Fair '16, 8

N Ga Fair '16, 9

N Ga Fair '16, 10

N Ga Fair '16, 11

Monday, October 17, 2016

Crispy Oven Baked Wings (and Sweet & Savory Sauce)


Crispy Oven Baked Wings

I was excited to try Our Best Bites' tip for getting crispy oven baked wings, and we were really blown away with the results! They have the same nice crunch as restaurant wings, but without all of that oil for frying. And you don't even have to worry about continously basting, just toss them in your choice of sauce afterward.


Crispy Baked Wings

4 lbs. chicken wings (separated)
2 Tbsp. baking powder
1/4 tsp. salt 

1) Move your rack to the lower middle spot and pre-heat your oven to 250 F. Line a baking sheet with aluminum foil and top with a wire rack or slotted pan. Spray with oil or non-stick spray. 

2) Pat the wings with paper towels and toss with the baking powder and salt in a large bowl. Arrange the wings skin side up on the rack in one layer and bake for 30 minutes.

3) Move the oven rack up one spot (upper middle) and increase the temperature to 425 F. Bake the wings for 50 minutes, rotating the pan halfway through. Toss finished wings with your choice of sauce and serve!


Crispy Oven Baked Wings

I like to make a few sauces (and maybe set out a few bottles of pre-made sauce) when I make wings, so everyone can choose how many they'd like of each flavor. We've tried out lots of sauce recipes, but the only one we've been wowed by so far is this Sweet & Savory sauce.


Sweet & Savory Wing Sauce

1 tsp. cornstarch
2 tsp. water

2 Tbsp. brown sugar
2 Tbsp. honey
2 Tbsp. soy sauce
2 Tbsp. ketchup
1 Tbsp. white vinegar
1 tsp. minced garlic (2 cloves)


1) In a small bowl or cup, mix the cornstarch & water. Set aside.

2) In a small pot over medium heat, mix the rest of the ingredients. Bring to a low boil, then stir in the cornstarch and cook for 3 minutes to thicken.

Sweet & Savory Wing Sauce

Thursday, September 29, 2016

September - 1 Week of Freebies

I've been having trouble finding time for my 'normal' hobbies lately, but I always seem to find time for couponing! It's been kind of my mindless-internet-time-killer lately. It's nice to have a hobby that is so obviously rewarding ~ I can often go into a store for $30 worth of stuff & spend $5. I've been buying name brand cereals for like $.30 & getting all sorts of crazy deals.

This month I was able to get a ridiculous amount of freebies (and money makers) during one week, so I thought I'd share those pics here.

First I grabbed some deals at the pharamacies ~ CVS, Rite Aid, & Walgreens.

Sept. Week of freebies, 1

Then Ibotta added a ton of mid-month bonuses ~ one was $10, which I think is the largest Ibotta bonus I've seen yet! The amount required varies by how much you use the app. I needed 24 rebates for the $10 bonus, and there were some smaller $2 & $3 bonuses that I could get at the same time. This time around I also checked my husband's app, and he only needed 10 rebates for the $10, so we bought enough to meet both goals.

Sept. Week of freebies, 2

The plastic cups & glow bracelets were money makers, so I got those rebates as many times as I could. I have a ton to hand out for Halloween now! And they pretty much paid for the rest of the groceries.

The Centrum here was from Rite Aid, but I think the rest was from Ibotta ~

Sept. Week of freebies, 3
 
Sept. Week of freebies, 4

Honestly, I could have added a ton more to these photos, but it's hard to keep track of sometimes. I know I have about twice that many cups & glow bracelets! Either way, I could tell I was getting a *lot* of good deals this month.


And for a quick update on the rebate apps (I've talked more about them here & here) - 3 months in my totals are $144 on Ibotta, $42 on Checkout 51, $43 on Saving Star, and $11 on MobiSave. I'd say the Ibotta total skews a little high, because I definitely bought a few things just to trigger the bonuses (like several times I spent $2.60 and got a $3 rebate on those plastic cups. It's not really $3 worth of savings because I wouldn't have normally bought those). But this month I did get $20 worth of bonuses! (And another $12 or so on my husband's.) If you ignore the bonuses, I'd say the Ibotta rebates are on par with Ch51 & SS.

Thursday, September 22, 2016

Hectic September


This month has been insane! We managed to avoid extracurriculars until now, but this month Orson (1st grade) started soccer ~

9-16 Orson soccer

And boy scouts ~

9-16 Orson Cub Scouts

Our little Pandora started preschool (twice a week, 4 hours) ~

9-16 Panda's 1st day of preschool

We also started a small group at our new church, and I had to prep clothes for the Fall consignment sale!

Our calendar has basically exploded with meetings upon practices upon games. And the fees for everything have been ridiculous, because there always seems to be another one popping up that we didn't know about. (I'm looking at you, Cub Scouts! Somehow that jumped from '$65 for the year' to $220+. Not cool.)

On the plus side, orders have also picked up, which is busy-in-a-good-way!

Monday, August 22, 2016

Low-cal Ranch Dressing (12 calories per Tbsp.)


I seem to be in such a slump lately! The summer put me behind on everything, and while I'm slowly getting caught up, there are still so many things to chip away at on my to-do list. Today I noticed somehow it has been a month since I've done a blog post, even though I normally try to post once a week! Ugh. Thankfully in two weeks my little one starts half-day school twice a week, so I'll have a little more free time soon.

Last year I posted two variations of a super low-calorie Ranch dressing. For both I mixed in a packet of ranch mix ~ one with a cottage cheese & milk base, and the other with a buttermilk & mayo base. Since then I've played around and created lots of variations with the buttermilk version, like my Low-cal Creamy Italian Dressing and the Low-cal Creamy Asian Peanut Dressing. I also created this from-scratch version of the Ranch dressing, using seasonings instead of a pre-made mix. This is pretty much the only Ranch I make anymore (though I do love the  Italian & Asian dressings a little more, and am more likely to mix one of those up!).

5-2 Low-cal Ranch Dressing (from scratch, 12 cal per Tbsp.)

(For those of you counting calories, I've added the amount for each ingredient so you can easily make tweaks without having to re-calculate everything. Anything marked with an asterisk* may vary a lot based on what you buy, so make sure to compare your label.)

Low-cal Ranch Dressing

1/2 cup reduced fat buttermilk (56*)
2 Tbsp. Hellman's light mayo (70)

1/2 tsp. minced garlic (0)
1/2 tsp. dried parsley (0)
1/2 tsp. dried basil (0)
1/4 tsp. onion powder (2)
1/4 tsp. black pepper (2)
1/4 tsp. salt (0)
1/4 tsp. sugar (4)


Directions -
Stir together all of the ingredients except for the buttermilk. Add the buttermilk (you may want to do 1/2 at a time) and stir until well mixed.

Makes about 3/4 cup, 12 calories per Tbsp.

Wednesday, July 27, 2016

My 1st Year of Packing Lunch

Before Orson started Pre-K, I worried about packing lunches for him everyday. I bought a lot of cute bento supplies & practiced adding a few cute touches... and made a few complex bentos, just for fun. Unfortunately Orson was not really excited about the intricate lunches, and often would not eat them. When we learned his Pre-K provided lunch, I was a little bummed, but relieved too.

The next year he started Kindergarten, and I had to prepare again. After much debate I bought a set of Easy Lunch Boxes, because I liked that they have a few divided sections but only one lid for the whole box. (My son really loves that too.) I did have a hard time finding a lunchbag to fit them however, and really had to cram it into a standard size bag. The big box also left no room to add a water bottle, and I had to search forever for something narrow to fit in there.... And then it leaked several times and soaked everything in his bookbag, so I had to hunt again! (I finally found some small bottles from apple juice that fit OK, but by the end of the year I tried putting it in his bookbag pocket instead. Of course he forgot to grab it for lunch it every time.)


Unfortunately the standard lunchbags tip the Easy Lunch Box on its side, so putting cute bento-style details are pretty much out of the question because they would be instantly up-ended. Maybe one year I can find a lunch box with a handle on the top, but for now I'm getting two young kids ready in the morning and don't know that I'd have time to try anything creative anyway!

Once I had my lunchbox/bag situation figured out, it was time to plan the food! I started by making a list of everything I could think of that Orson will eat. Then I scoured some lists of lunchbox ideas, and added new ones to my list. I was planning on having him buy lunch twice a week, so I looked at the school lunch calendar and picked out two school lunches each week that he'd like, then filled in the calendar the rest of the way with lunches I would make.

The school cafeteria is on a three week rotation of lunches, and considering there are not *that* many things a 5 year old will eat, that ended up being perfect for my lunches as well. Bringing lunch three times a week, that means I needed 9 ideas for lunches to pack. I planned the main meal and veggie, but then would add whatever fruits we had on hand for the 3rd section. I was also pretty flexible with the schedule, rearranging meals if needed, or swapping something out if I was missing an ingredient.

So, here are the 9 lunches I made throughout the year!

Grilled cheese with corn ~

Grilled cheese, apples, & corn

Pigs in a blanket with roasted kale (seaweed snacks pictured) ~ I started out buying cocktail sausages, but they are pricey and I never needed the full pack. After a few months I tried cutting up hot dogs instead, and 1/3 of a hot dog cut in half lengthwise work perfectly! I also stopped buying crescent roll dough and started thawing out 1 frozen Grand biscuit cut in 1/8ths. I hardly ever have extra kale on hand and usually ended up adding the seaweed snacks he loves instead. Kids love those things!

Pigs in a blanket, seaweek, & pineapple

Fish sticks with green peas ~ I found the little container for the ketchup next to the salad dressings at our grocery store! Perfect fit.

Fish sticks, apples, & green 
peas

Sandwich on a Stick ~ Bread, lunchmeat, cucumbers, and mini tomatoes loaded onto skewers. A fun twist on a sandwich! If you want to add cheese slices, I found that it works best to cut a hole in the cheese slice with a straw first, or else the skewer hole cracks the cheese and it falls apart. I love that you can use pretty much any leftover bread (like hamburger or hot dog rolls) for these! He won't touch the cherry tomatoes, but I can't resist adding them.

Sandwich on a stick, rice krispies, & pineapple

Mini biscuit pizzas with carrots & dip (roasted kale pictured) ~ 

Mini pizzas, apples, & roasted kale

Rice balls with spinach goma-ae (seaweed snacks pictured) ~ At the start of the year, I made sushi rolls (with cooked imitation crab), but Orson got sick one day after eating them & then was afraid to eat them after that. I switched to stuffed rice balls, which is probably the most complex lunch on the rotation, but if you have the sushi rice & filling made ahead of time and frozen, each ball only takes a few minutes. I quickly learned not to try to do it all in the morning! That goma-ae recipe is a little different than mine, but I don't have mine written up yet. It also freezes well, I just ran out!

Stuffed rice balls, seaweed, & veggie chips

PBJ & seaweed snacks

PBJ, seaweed snacks, & apples

Mini sandwiches with cukes ~ Hawaiian rolls with lunchmeat, cheese, and mayo. Later in the year he had me start adding ketchup & mustard too.

Mini sandwiches, cukes, & chips

Tofuniku with edamame ~ Another Japanese recipe my son loves! The meat is simmered in a sweet sauce then served over rice. This is another one where I make a big batch and then freeze small servings for his lunches. I always try to keep frozen rice in the freezer too, and it tastes just like fresh rice when you reheat it.

Tofuniku, edamame, & pears

These pictures were all taken at the end of the year, and I packed in a few more sweets & chips than I normally would. Orson stopped eating pears, peaches, and oranges this year, so I'm having a hard time coming up with fruits for him! 

The Easy Lunch Boxes are not leak-proof, so any time I had something liquidy, I tried to drain it off as good as I could and then tucked a paper towel along the bottom edge of the box ~ 

Paper towel to catch drips in lunchbox

This worked pretty well, but the pineapple often leaked a bit and made his lunch box smell horrible! I started throwing his lunchbag in with our towel laundry (which soak in ammonia before washing). It does a great job of killing the smell. 

This year his 3-year-old sister starts 2 day preschool and will need to bring her lunch too. Unfortunately she hardly eats anything, and her school is nut free (no PBJs), so I have no idea what I'll pack for her! It's time to pull out the calendar and start planning again!

Monday, July 18, 2016

Rebate Apps & Coupons - 1 Month of Freebies


Last month I told you about how I started using a few rebate apps, which basically give you back money after you shop when you buy certain items - kind of like a coupon you use afterward. Even better, you can use the rebates on top of sales or coupons. Over the last month I've realized sales, coupons, and rebate apps are not that amazing on their own, but if you pair them together you can get stuff super cheap, even free! I've always loved a good puzzle, so I've been having fun looking for the best combinations.


Coupons ~

I've never been very good at coupons. I always go through the newspaper (and the Kroger digital coupons) and just clip the coupons for things we often buy. But then I either leave them at home, or the generic brand is cheaper, or I get all the way up to the register & forget to use them. I'm pretty terrible at keeping up with them, but seeing how you can match them up to get much lower deals has got me super motivated to use them now!

The best coupons are usually the ones from the newspaper, but you can also find tons of printable coupons on coupons.com. (Unfortunately there is no search, but chose "Brands" from the category drop down menu & you can see the coupons for each brand.) Printable coupons are especially nice when you are just starting out & don't have a lot on hand. Now I still clip my normal coupons for stuff we buy a lot, but I also clip anything that I wouldn't mind getting for free and sort those alphabetically so I can quickly check different brands when I see a sale or rebate.

My first two weeks I had no idea what I was doing, but I did notice a few coupon/rebate 'match-ups' and got all of this for free (that's a 3 pk. of bar soap, but my husband snatched one already, haha) ~

Coupon Freebies - Week 1&2


Couponing Sites ~

After that I started looking around for sites that posted lots of match-up deal ideas. My favorite two places to look are Krazy Coupon Lady's freebies category and under $1. Souther Savers posts similar weekly list for grocery store deals here (she calls them "Top Acorn Deals" because she marks the best deals on her site with a little acorn icon). She also posts some of the top pharmacy deals here.

By week 3 I was finding lots of good freebies this way, and finally braved some of the pharmacy deals I'd been passing over before. I'll tell you about that next!

Coupon Freebies - Week 3

I couldn't resist going back for $25 of free nail polish ~

Coupon Freebies - Week 3


Pharmacies ~

I've always ignored the CVS, Rite Aid, and Walgreens flyers before, but if you look close you can find some unbelievable deals. I've found most of my freebies there! On lots of items you can earn 'bucks' or 'points', which you can either spend right away or on your next trip. They are also always running $5 off $15 type sales (that's the total before coupons), and they print out or email you similar coupons, both of which you can use together. Add some newspaper/printable coupons on top of those, and prices get crazy low. I recently found an awesome site where you can preview the pharmacy sales flyers 2-3 weeks in advance!

Two weeks ago the Proctor & Gamble coupon insert came out, and all three stores were running $10 off $30 worth of P&G stuff so you could match coupons with the sale. I got $36 worth of stuff for $8 (which is the cost of the mascara + the 20 oz., so I'm counting the rest as freebies!).

Coupon Freebies - Week 4

One problem with pharmacy deals and rebate apps is that you have to spend some money up front to get the money back later. This is rough when you are starting out! I figured out deals at both of the other pharmacies where I could have gotten another $30 worth of stuff for free, but it would have temporarily tied up $10-17 in reward bucks per store. Normally that wouldn't be a big deal, but my business has been super slow lately, so we're really having to watch what we spend.

But the big problem with pharmacies is that each of them have different reward bucks/points programs with different rules to remember, and sometimes more than one program at the same store! I'd avoided pharmacy deals before because I didn't know how they worked, and they really can be confusing! I keep a post-it with each store's guidelines written down so I can check them before I shop. If you go to either of those couponing sites I linked above, you can find info on how each pharmacy works, or I will probably do a post about them soon. If you don't want to bother dealing with the fine print, I'd stick to CVS, which is very straight forward with no weird rules.

Coupon Freebies - Week 5

Last week we were on vacation, so I didn't have much time to go shopping for deals, but I did manage to snag some nice snacks for the road trip before we left!

Coupon Freebies - Week 5

Extras ~ 

One thing you've probably noticed is that you can get tons of shampoo, body wash, and toothpaste for free. Way more than you could ever use! I've started a 'freebie box' that my friends can pick out goodies from, and I'm hoping to donate extras to a food pantry or shelter. I've also seen some crazy low prices for diapers (like $2 or even $.50 a pack!), but unfortunately we *just* potty trained our youngest. Wish I'd known about these deals 6 years ago!

Friday, July 8, 2016

Coconut Cabbage (99 calories)

Have you ever come across a recipe picture that looks so tasty, but when you glance over the ingredient list, it's not what you imagined at all? And then you decide to make the recipe you *thought* it was? I know I've done it a few times, and that is how this recipe came about.

I'm glad I gave it a try, because the coconut, onion, and cabbage work together so well, and this simple side dish comes together quickly. The perfect veggie side for an Asian meal! I wasn't expecting it to be too healthy because of the high-calorie coconut, so I was excited to see that each serving is just under 100 calories.

Coconut Cabbage, 1 (99 calories)

(For those of you counting calories, I've added the amount for each ingredient so you can easily make tweaks without having to re-calculate everything. Anything marked with an asterisk* may vary based on what you buy, so make sure to compare your label.)


Coconut Cabbage

  • 1/2 Tbsp. vegetable oil (60)
  • 1 cup onion, sliced (60)

  • 1) In a large pan or wok, heat the oil over medium-high heat. Add the onion and cook for 7 minutes, stirring occasionally.

  • 1/3 cup shredded coconut (sweetenend, 186*)
  • 1 tsp. grated ginger (1)
  • 1 tsp. minced garlic (0)

  • 2) Add the coconut, ginger, & garlic and cook for 3 minutes, stirring frequently.

  • 4 cups shredded green cabbage (80)
  • 1 Tbsp. soy sauce (10)
  • 1/4 tsp. salt (0)

  • 3) Add the cabbage, soy sauce, and salt. Cook until cabbage is wilted, about 2-3 minutes. Serves 4.

    Calories - 99 for 1/4

    Coconut Cabbage, 2 (99 calories)