Saturday, April 26, 2014

Alphabet Puzzle Fix

With the two little ones to take care of, it seems like the only time I 'craft' is when something is broken. One of the letters from Orson's alphabet puzzle was missing for months before we discovered it in one of his pants cargo pockets! It had run through the wash several times and the paper had completely come off, leaving the letter blank.

I pulled out my paints and meticulously worked to match the other lettering. I spent way too much time tweaking colors and shading, but it was a fun little project. Can you tell which one is the re-painted letter?

ABC Puzzle Fix, far

Here's a close-up...

ABC Puzzle Fix, close

It was the letter F! In person the paint job doesn't match the glossy smoothness of the other letters up close, but you'd have to investigate it pretty closely to notice any difference. Maybe this summer I'll get around to bigger things, like making a painting for each kid's room, but for now I'll celebrate the little victories!

Tuesday, April 22, 2014

Just One Cookbook

Last year I discovered the Japanese food blog Just One Cookbook and now we are constantly trying new dishes from there. I've shared Chikuzenni, Green Bean Shira-ae, Tsukemen, and there have been many more. I've got three more to share with you today!

The first two are both recipes for spinach side dishes. I don't mind spinach mixed in something if it's not overpowering, but in general I'm not a huge fan. Both of these recipes were very tasty, with strong flavors that help mask that 'spinach' flavor. I enjoyed both, as long as I didn't think too hard about the fact I was eating boiled spinach, and they definitely gave me hope for future recipes.

Spinach Ohitashi & Spinach Goma-ae

I was using up some leftover spinach, so in order to try both of these recipes I only used 55 grams of spinach for each and made one serving (1/4 of the recipe). I halved the rest of the ingredients. On the left we have Spinach Ohitashi, which is soaked in a savory dashi broth & topped with fish flakes. Doubling the broth was unnecessary here and I drained off a lot of it before serving. On the right is Spinach Goma-ae, which is tossed with ground sesame seeds and a sweet soy sauce. Doubling the sauce worked well on this one, and I bet it would be tasty with some miso added in!


I also tried making some homemade Mitarashi Dango, which Orson had spied in another cookbook and begged to make. The balls are made with two kinds of rice flour and coated with a sweet, sticky sauce.

Japanese Dango

I kind of flubbed this one ~ I was trying to halve the recipe but mixed up the amount of water & had to keep adding flour back in to get the right consistency. Then my amounts were all off and I made them too large, which was not very enjoyable to eat. I didn't even bother putting them on skewers & trying to grill them. I kept the leftovers in water, but I think I was supposed to keep the uncooked balls in water, and I ended up having to toss them.

Of course the recipe is not to blame for any of this, and I'd be willing to give them another shot in the future. I'll probably try the half recipe again though, because this makes a lot!

Thursday, April 17, 2014

Textured Dots Manicure

I've been in the mood to wear a textured polish lately so I pulled out my only bottle ~ OPI's "Tiffany Case". To make things a little more interesting I painted my middle & ring finger with a matching (unlabeled) teal polish and then created some textured polka dots with my nail dotters.

Textured Dots Manicure

When things started chipping I painted over those nails with the texture as well, since it can easily hide flaws. It was a fun manicure both ways.

Monday, April 14, 2014

Lotus Root

A week ago Justin and I celebrated our 10 year anniversary! We got a babysitter and ordered some delicious appetizers at a Japanese restaurant (Haru Ichiban), then walked a few doors down to The Melting Pot for a cheese fondue and chocolate fondue. That weekend we headed to Justin's parents' for the first half of Spring Break and even left the kids there one night! We stopped at a dine-in theater (it's been a year in a half since we've been to a theater) and then spent the night gaming with some friends who just welcomed their first little one yesterday. I can't even remember the last time we had a babysitter before this, so it was a much needed break!!

One of the Japanese appetizers we picked was a sandwich of ground meat between lotus root slices (which was then breaded & friend). Have you ever tried lotus root? We first used it when we made Chikuzenni, but I could only find it pre-sliced in a bag. The texture was similar to a water chestnut, but a little crunchier, and it had a nutty flavor. On my last trip to the Asian market I spotted these in the produce section ~

Lotus Root, 1

If it wasn't labeled I would have had no clue! Once peeled and sliced, they reveal a beautiful pattern ~

Lotus Root, 2

I was actually surprised to learn that these are the roots of a lotus flower. That sounds dumb, but there are so many oddly named foods (buffalo wings, hot dogs, cat head biscuits), I never take the name literally. But it makes so much sense ~ The holes are air pockets to keep the lotus flower afloat!

Anyway... I pulled out the mandolin and sliced them thin ~

Lotus Root, 3

I have heard of making these into chips, so I tried out the microwave method without much hope. They really wanted to burn, so I wouldn't recommend it, but the parts that survived were *really* good. I can't bring myself to deep fry, but I'll surely order them if I ever see lotus chips on a menu!

I used the rest up in a recipe I'd bookmarked for "Sauteed and Simmered Lotus". The slices were cooked in a mix of sugar & soy sauce, and while the sauce could have been a lot better, I couldn't stop nibbling on these.

Lotus Root, 4

I probably won't be making any of those recipes again, but I've definitely come to enjoy this tasty root!


Thursday, April 10, 2014

Bento #10: Farm Animals

We've been having a great Spring Break, but more about that later. Yesterday we visited the Pre-K Orson will most likely be attending next year. It's so close to us, we might even walk there occasionally! (about 15 minutes) Orson had so much fun checking out all of the rooms, toys, and posters on the walls, he did not want to leave. We can't wait!

I was surprised to learn they feed all of the kids there and you have to pay the $25 per week snack/lunch fee (unless they've got some doctor certified food issues). This does make things easier on me, and I'm not going to complain about the price too much considering this is our only cost, but I was a little sad to realize that meant no cute bento lunches for Orson! I guess I'll just have to keep making them for myself every once in a while and practice for next year.


Bento #10: Farm Animals

Here is another more elaborate bento based on one of my son's favorite video games, an iPad app called "Hay Day". I didn't bother trying to copy the exact look of the animals from the game and just created some cute farm animals instead. He was pretty excited and ate this one without a fuss.

Bento #10: Farm Animals, 1

The background is tofuniku (seasoned ground meat and tofu) over rice. I tucked some broccoli in along the bottom, filled the right side in with some asparagus stalks, and then separated the remaining areas with pretzel rod fences.
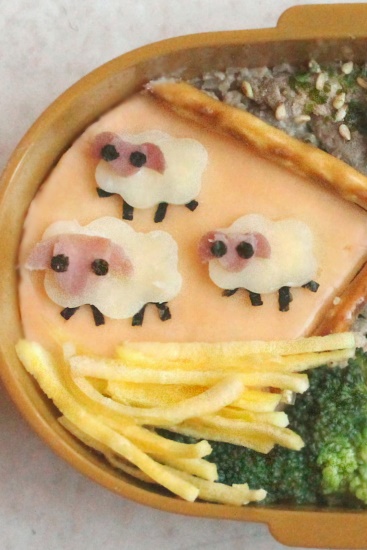
Bento #10: Farm Animals, 2

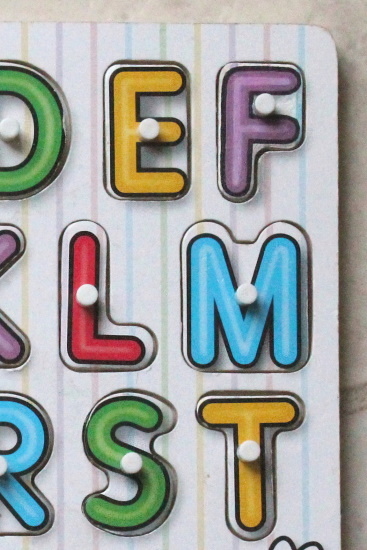
Left: I filled the background of this section with some sliced American cheese for a little color. For the sheep bodies I cut white cheese with some cloud shaped cutters (from the face set bellow), and then used ovals of ham cut in half for the heads and half circles for the ears. I punched out nori eyes with a mini hole punch and used the winking eye punch for their legs. (Everything is secured with a tiny dot of ranch dressing.)

Along the bottom I laid some 'hay' that I made by cutting narrow strips from a thin egg omelet. I also added a few of these strips in among the asparagus sprouts on the opposite side to break up the green.
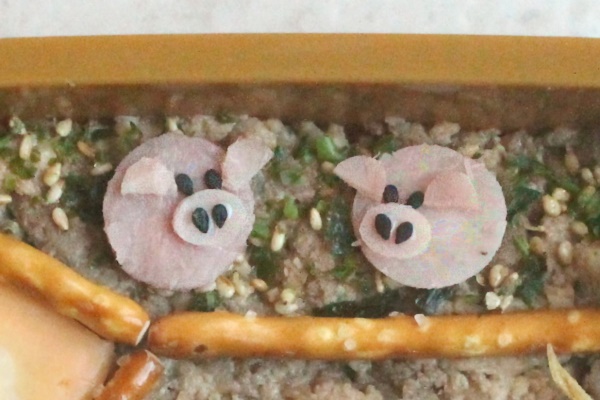
Bento #10: Farm Animals, 3

Top: I sprinkled the background of this area with a little furikake (nori & sesame). The rolly-polly pigs are ham slices cut with circles, with oval noses and half circle ears. I added eyes and nostrils with tiny black sesame seeds.
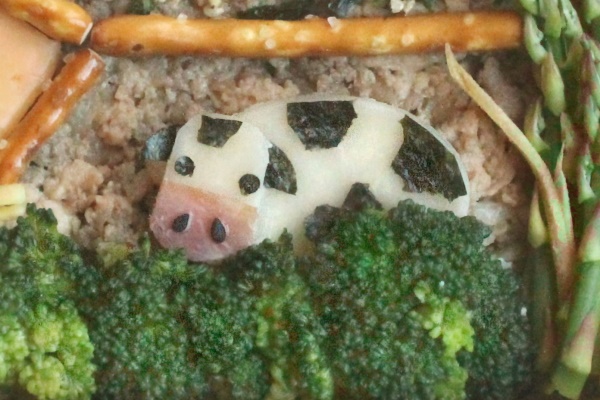
Bento #10: Farm Animals, 4

Bottom: My cow was heavily influenced by this awesome farm bento, though she was working on much larger scale. (My pigs are about the same size as the center of her sunflowers). The body is a large oval of white cheese and the head is a circle with the sides trimmed off. The eyes are nori punched with a mini hole punch and the nose is ham dotted with black sesame seeds. The ears and spots were all made from random nori scraps.

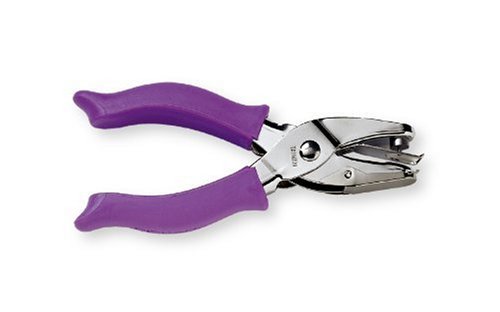
This was a fun box to put together, though it did take some time, and a lot of positioning with tweezers! Now I need to force myself to make a few simple bentos to remind myself they don't have to be so complex.


Supplies Used:


Wednesday, April 2, 2014

DIY Car Remote Fix

Recently our car remote (keychain fob) stopped unlocking the car. It was pretty bad because the locking button still worked, but if you lock the car with the remote & unlock it with the key it sets off the car alarm! (There is also no keyhole on the passenger side.) We were not eager to shell out big bucks for a new one, so I searched online and found an easy fix! A lot of this is going to vary based on your car model, but I'll show you what worked for our HHR remote.

First we're going to crack open the casing. My husband had a difficult time prying it open with knives & screwdrivers and left the edges a bit scratched up. I Googled it & found out there is a little slit at the bottom that you can easily fit a small screwdriver in. Twist & it pops right open!

DIY Car remote repair, 1

Splay out the innards. At this point it is a good idea to try the simplest solutions, just in case. We changed the battery, then I cleaned everything out with some rubbing alcohol and Q-tips and tested again with no luck.

DIY Car remote repair, 2

Since only one button was effected, the problem was mostly likely that the conductive coating on the back of the button had worn off. This tutorial had a lot of great pictures & tips. He sliced the back off the problem button, sliced the back off a new button (from a cheap calculator or remote) and glued the new backing in place. Later in the comments some people said that you could also use aluminum foil! (ETA - This did not end up working. See note below.)

You can use a mini hole punch to get the perfect sized circle. It won't punch the foil by itself though, so take a small piece of foil and tuck it inside a folded sheet of paper. Separate out your foil circle.

DIY Car remote repair, 3

The post suggested using a tiny dab of super glue to attach the foil dot, but it did not hold at all for me. I brainstormed and then grabbed some clear nail polish topcoat! I used a toothpick to apply a small dot of polish, pressed the foil dot on well, and gave it a while to dry.

DIY Car remote repair, 4

The aluminum foil fix worked like a charm!! There are also all sorts of replacement buttons, casings, and circuit boards on Amazon if another part of your fob is causing problems.

(ETA - The nail polish did not hold after all, and neither did 2 part epoxy. I ended up slicing off a button from another remote like the tutorial & secured that with some super glue. It held great!)


While I had my polish out, I figured I might as well go all high-school on the remote and personalize it a bit. I filled in the recessed area with a couple coats of Orly's "Halley's Comet" and topped it with the lovely Femme Fatale "Nightsong Grotto" and some topcoat to smooth things out. So sparkly!

DIY Car remote repair, 5