Wednesday, March 30, 2016

Office Space Makeover - Plans


At the start of March I put about 200 items into a kid's consignment sale. I've sold through this sale twice in the Fall, but this was my first time doing the Spring sale. I've learned to start early and started prepping for it back in January, just sorting through boxes occasionally or stain treating & washing clothes. Surprisingly I didn't have a ton of clothes this year, so I dove deeper and started going through all of the toys, shoes, socks, bibs, baby carriers, blankets, etc. Some of those actually sold really well, and in the end I brought back considerably less stuff and just over $200!

Normally I would put that money towards new kid clothes, but naturally I also *shopped* at the consignment sale and had already bought them both new wardrobes. My husband wanted me to spend it on myself after all of the prep work I'd done, but I had recently bought myself some clothes as well. I decided the money would be better spent on a larger item, and it didn't take long to choose... I really needed a new desk!

Desk, before

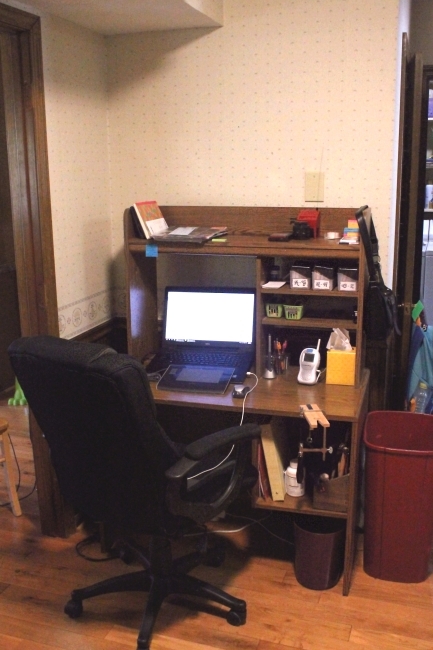
My old particle board desk was handed down to us when we were married 11 years ago. And considering I work at home (and am an internet addict), this thing has gotten a lot of use! The desk worked great in my sewing workroom, but when I switched to ambigrams & we had kids, it moved out to a more prominent spot near our living room. While the desk is functional, it's not that pretty to look at. The open shelving makes it worse, since there is a lot of clutter going on, and the supports for the upper shelving make my workspace very crowded. I can barely plug cords into my laptop! I've wanted to replace it for years, but there is always an endless supply of more important things we need for the house. Finally, the time had come!

New desk plans

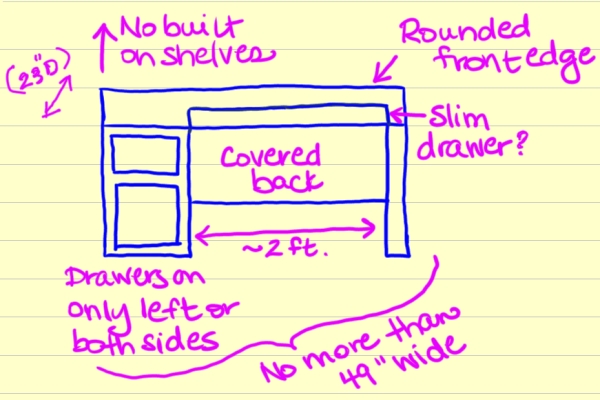
I'd previously planned out my ideal desk, and while I don't require much, past searches had shown me that it wouldn't be easy to find. My main requirements were drawers on the left side (or both sides), some leg space at least 2 feet wide (I usually sit cross legged in my chair!), no keyboard drawer above the chair, and overall not wider than my wall. Oh, and it had to have an interesting look and not be too pricey! I thought I might have to give up after I found nothing at Target, Walmart, Craigslist, or Wayfair, but I finally spotted this funky desk on Overstock (an exclusive item) ~ 


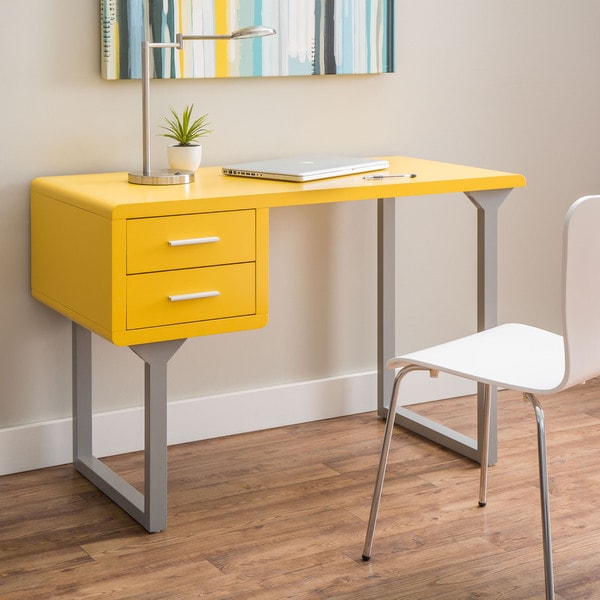
The yellow runs around $160-175, depending on the day. I used a 12% off coupon code & got it for about $155. It comes in teal and white too, which run a little pricier. I was also pretty impressed with this more traditional desk, but it looks like it's out of stock for good.

Along with a new desk, I needed to get some wall shelves to replace the attached shelves I was losing. I really love the look of 2-3 floating white shelves above a desk, like these ~


via "HGTV"

And they need to be topped with some color coordinated office supplies & deco! ~


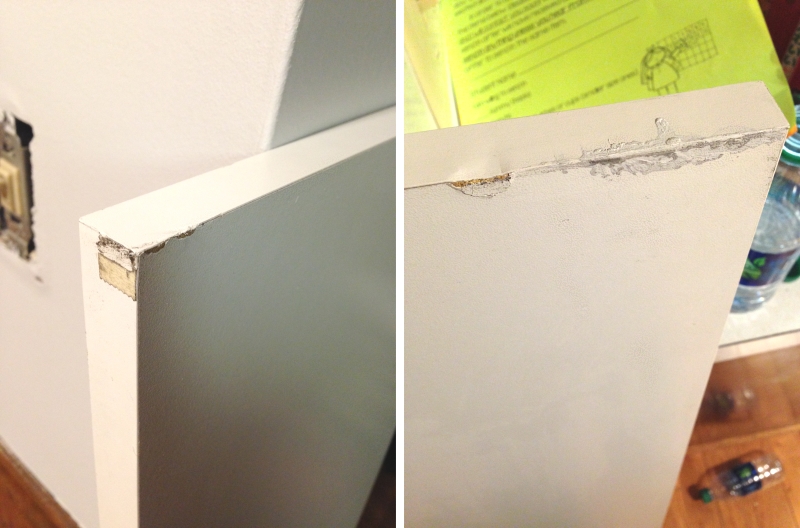
Unfortunately, all of the 48" floating shelves that I found either had terrible reviews, were crazy high priced, or both. I decided I didn't want to risk it, so I bought these white melamine shelves from Home Depot, $17 each

Edit: Do not buy shelves from HomeDepot.com!! They arrived covered in a thick layer of dust, banged up all over, and with black marks that wouldn't clean off. I ended up taking them back to the store, and found nearly identical 48" inch shelves in the store for $7.50 each! Less than half the cost! Ridiculous.

Shelves from HomeDepot.com

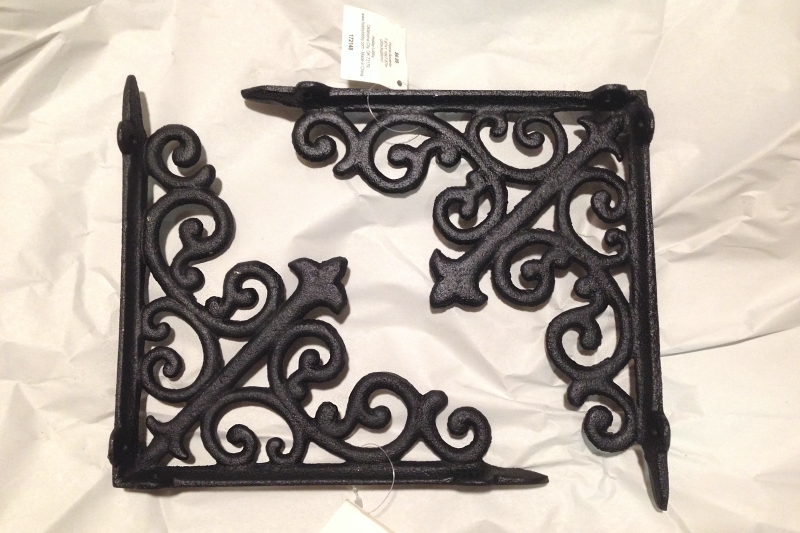
The brackets were a real challenge. I wanted something a little decorative, without breaking the bank. At first I was eyeing these wooden scrolls from Home Depot ($17 for 2), but then I realized that the scroll was cut out of a flat piece of wood & not carved with rounded edges like I was picturing. My next choice was these pretty silver art deco style brackets ($8 each) ~


But I wanted to check Hobby Lobby before buying anything. They actually had a pretty good selection of cheap, ornate metal brackets, and luckily they were 50% off that week! I chose these for $7 each, $3.50 after the sale. Score! I'm planning on painting them either yellow or silver before hanging them. 

Metal Brackets

My current desk is normally quite cluttered, and my husband was a little worried when he saw the new desk only has two small drawers. I'm pretty excited about those two drawers though, since that will finally give me a spot for my pens, Pots-its, scissors, tape & such. I realized there is not actually a lot of stuff on my shelves, but the surface of the desk accumulates papers and random things. I'm definitely going to buy a nice paper tray and basket to collect those things.


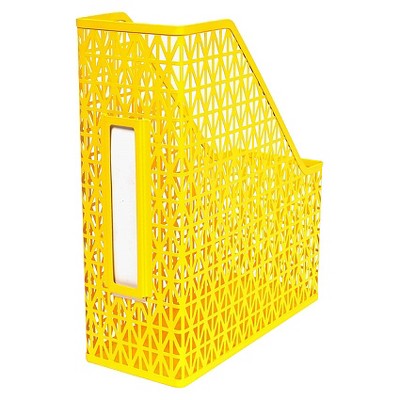
I was super in love with this bright yellow magazine file from Target for $8, and the only other similar files I could find were $20 and the wrong color (and I didn't even like the design as much). It was only in stock at two stores though, so the next day I drove 40 minutes (with my two kids) to the nearest store, which now said "limited stock". It had apparently had been put on clearance and was nowhere to be seen. I begrudgingly drove another 40 minutes to the 2nd store, where it was still "in stock", but it was missing there as well. The employees were polite, but the only help they could offer me was suggesting I walk around the entire store to check the back of every aisle where they keep their clearance. Uggh! We went home exhausted and empty handed. In the end I remembered I had two plastic gray files I bought years ago at the Target $1 section with a decent pattern that I could paint, but if I had found that metal one on clearance for $2 it would have been glorious!

After I fill the drawers, I won't have much left to put on the wall shelves at all, so I'll need some pretty decorations. I'd like to do yellow, silver, and white, but I have a lot of red/burgundy things too, so I might add orange to help tie things together. Otherwise yellow + red is gong to make me think of McDonalds! I already know from our living room that yellow decorations are hard to find, so I might have to paint the yellow and orange stuff myself.

 I'd also like to rip down the wallpaper and paint the wall gray *before* hanging the shelves, but we'll see!

Monday, March 21, 2016

Metal Sheet Jewelry Supplies


Last month I talked about how tough it was to put together a supply list for the metal necklaces I wanted to start making. This time I thought I would share which supplies I decided to buy along with some links of where to get them. The supplies you need will differ, based on what you want to make and how you want to make it, but hopefully you can find a few good items from my list.

Jewelry supply box

Luckily nearly all of my supplies fit in this handy wooden organizer. I originally bought it at Target to turn into a charging station for iPads and phones, but then it turned into a mail organizer and eventually was just holding some envelopes & stamps. I probably won't keep it crammed this full for long, but until I set up a nice work area it's doing a great job of holding everything.

I suppose the most important supply to start with are the metal sheets ~

Metal sheets - brass & copper

I quickly learned that gold and silver are *way* out of my price range. For silver you are talking at least $20 per inch, and gold is about 100 times that amount. I researched a lot of different metals and ended up buying a sheet of brass (in two colors) and copper in 22 guage thickness. They come 18" long, so I've cut them in half for easier storage. Soon I'd like to get some aluminum as well for a silver color.

My sister-in-law's boyfriend works with metal sheets and he recommended the site Monster Slayer. Honestly the site is so old school, I was a little turned off at first, but after pricing it out from at least half a dozen shops, I realized they really do have the best price for nearly everything! They don't carry every metal though, so if you want bronze or titanium, head to Rio Grande. And for aluminum you'll need to go to Metalliferous or Etsy.
My only small complaint about the shop is that I'm about 90% sure they mislabeled the yellow (far left) and red (far right) brass, and I was planning on using those samples to choose my favorite of the two and only order one color in the future. I finally took a picture and emailed them to ask, but they've recently switched the red color and she couldn't really answer for sure. I've read that red is generally the jewelers favorite, so I've decided to go with that one anyway. I won't have to worry about the mislabeling in the future, but was a little disappointed about the uncertainty.

Moving on, let's crack open that white tackle case!

Tackle box - polishing wheels & more

Case - For the organizer I stopped by Walmart's sporting area and grabbed the Plano 3500. It's a great size, but I wish it had more dividers! I did find an off brand of dividers that I think might fit.

On the lid - Center punch - You need to make a little mark on your metal before drilling or else the drill will skitter over the smooth surface. This is basically a pokey tool that you tap with a hammer to mark a dot. (I can't link to items on Monster Slayer individually, but I'll give you the item code so you can search for it.) From Monster Slayer, HT-PUN-CENT.

Top left - Jump rings & chains. Also from Monster Slayer. The have a huge selection!

Center row - "Silicone Softies" polishing wheels, four colors - I decided that I would rather polish with these wheels instead of sandpaper or polishing compounds. Whichever you use, you'll have to get varying degrees of coarseness and work your way to the finer polishers. The polishing wheels are color coded, with white being the coarsest. I ordered these from MS (search "Silicone Softies") along with 4 mandrels to fit them on (MT-MAN-SC3321E). Since the pic, I've also picked up some 240 grit sanding bands (eBay), so I have something on hand if the white is not coarse enough.

Right side - Polishing wheels and red rouge - After working your way through the polishing wheels, you finish off with some rouge (CP-ROU-RED) on a felt pad. I bought these Dremel 1/2" wheels, not realizing it was the smaller size. They are really only good for the tiniest of projects, because I've gouged my metal several times trying to polish the center of a 1" square! I found some larger 1" wheels in my husband's stash and will be mostly using those.

Bottom center - Dremel adjustable chuck - I bought this so that I could fit any tool in my Dremel, mostly with drill bits in mind. Since then I've realized all of my tools have the same shaft size, so I want to pick up this set of collets next to make tool changes even quicker. The adjustable chuck is still nice to have on hand just in case though!

Saw with lubricant

To cut the metal into intricate shapes, you'll need a jewelers saw. This one came with a bunch of saw blades too (shown later) though I hear you don't necessarily want to go with the cheap-o ones. Saw lubricant keeps your blades from overheating and prolongs their life so they won't break as often. It's also good to use on drill bits.

Bench pin

To saw, you hold your metal on top of a bench pin and the saw blade can move up & down inside of the V-shaped cut out like this. I found a small alligator spring clamp helpful to hold the metal down on the left side too, because I was getting bad hand strain trying to hold it steady. That might be something that goes away with experience though!

Metal shears, pliers, snips

If you are cutting straight lines, metal shears will make things a lot easier. Honestly I'm not liking these that much, and will probably pick up a pricey pair someone recommended. Along the bottom I've got two pairs of round nose jewelry pliers for attaching jump rings, and one pair of flush wire cutters. All three of these were from Hobby Lobby, though I've had the pink ones for years.

Bench block & hammer

After cutting the metal, you may need to hammer it flat. The bench block gives you a super hard & smooth surface to pound on. I keep this in a soft blue bag to keep it from getting scratched by the other tools, but probably don't need to bother! For the hammer I chose one with plastic on one side and rubber on the other (HA-MAL-PLRBR). One day I may also pick up a large leather one, though I do already have a large rubber one I could try too.

Needle files, drill bits, saw blades

On the left is a 10 piece needle file set, which are basically just very narrow files. I bought these thinking they would be good to get inside of drilled holes & other tight areas where the polishing wheels might not reach. On my practice piece I filed off the rough edges that the drill left on the top & bottom, but the scratches were so bad that they didn't all come out with polishing (one reason I bought the 240 grit sandpaper). In the future I'll stick to filing the sides of a piece and leave the front alone.

On the right side are the 144 saw blades that came with my saw above, and in the center are the Dremel drill bits. I wasn't planning on buying Dremel brand for these, but after testing out sizes with my husband's drill bits, I realized this was the exact size range that I wanted! Unfortunately, my Dremel was pretty miserable at actually drilling the holes, so I'll have to use my husband's gigantic drill for all of those tiny holes (unless I decide to shell out $30 or so for a smaller drill one day).

Everbrite ProtectaClear

Since the base metals can react with people's skin and sweat, I really wanted to seal my finished pieces somehow. There are a lot of options, but most have their issues. Wax needs to be reapplied and a lot of clear lacquers can get scratched and peel off over time. I eventually decided to go with Everbrite ProtectaClear based on Nancy Hamilton's recommendation. She said she ran a coated piece through her rock tumbler for hours to test it and it never did get a scratch (eventually it just got a little milky colored from all of the abuse). Nancy chooses to leave her work uncoated, but I really don't want to deal with green, grumpy customers!

In the photo you'll see the ProtectaClear came with some gloves and a foam brush. To use it you will also need some Xylene or Denatured alcohol (Home Depot) to wipe down the piece first, and a metal or glass bowl (Dollar store) to pour the PC in. I used this for the first time a few days ago and decided to dip my metal instead of brushing it on. So far I'm pleased with the results, but it's still curing so I can't really judge it yet. My only small complaint about Everbrite is actually the over zealous customer service. They have sent many emails offering information, tips, asking if I'd tried the product yet and how did it go... they are trying to be helpful, but 8 emails in one month is a little much.

Safety glasses & mask

Here's the part that I hate, but it's necessary. I can't stand wearing masks and goggles, so I tried to get an upgrade for both. These 3M Particulate masks (8511) have a valve in the front to keep the air from getting so stuffy and hot inside, which is normally my main complaint. It does seem to help, though I'm not loving the crazy tight straps. For the safety glasses, I picked something that could slide one & off so I didn't have to deal with... crazy tight straps. You win some, you lose some.


So far my supplies have cost just over $200, but that doesn't include a few things I already had on hand. The largest item would be a Dremel, which runs about $50. I really lucked out on this one! I knew my husband had a cordless Dremel I'd used years ago, but he reminded me that it was slightly broken & would only run at the fastest speed. I started researching Dremels and decided to buy a 200 model with a cord, because cord-less models (of anything) are generally much weaker. My husband searched through his workroom to get the old Dremel, and found that he also had a corded 200 model he didn't even know he had!!

Also not pictured is a drill, a block of wood for drilling into, and probably a few other small items I'm forgetting. And of course there are even more things I'd love to buy sometime soon (bracelet mandrel!). But for now, I need to focus on practicing and getting a work area set up.

Any must-have tools or great shops I'm missing? Anyone else shop at Monster Slayer?

Wednesday, March 16, 2016

Staining a Mid-Century Modern Dresser

You may remember way back in September I used  Miniwax Polyshades to darken some nightstands for our bedroom. I actually bought a dresser at the same time as those, but after my horrible experience with the Polyshades, I was hesitant to start another staining project. 


This time I made sure to read lots of reviews and chose to buy General Finishes Gel Stain in Java, satin finish. And for the topcoat, an oil based wipe-on from the same brand, Arm-R-Seal Topcoat. I bought a quart of each, but ended on only using about 1/4, so you could definitely go with smaller size.

Here is the dresser after sitting untouched in our garage for nearly a year!

Dresser, before

I read & re-read this and this tutorial, along with the back of the cans. You'll want to start by giving everything a light sanding with 120-150 grit sandpaper, just enough to rough the surface up a little. Wipe off all of the dust with a cloth.

As I was sanding, I realized there were a lot of dings and nicks in the dresser, as well as a few missing chunks. They could probably be ignored, but I decided to do things right and filled them all in with wood putty and sanded them smooth before staining. Naturally this added many hours onto my project! The worst were two sections like this, where the paneling had broken off of an edge and had to be reconstructed ~

Dresser, missing chunk

And most of the drawers had small nicks like this along the bottom edge ~

Dresser drawers, nicks

After everything is sanded and wiped clean, you'll want to stir the stain well, put on some gloves, and grab an old sock, t-shirt, or some other clean rag. The tiniest dot of stain will lightly darken the wood and cover your putty like this (stained on the right) ~

Dresser drawers, tint

I loved how smoothly it went on this way, without any trace of streaking, but after about 4 super light coats (drying 1-2 days in between) I realized I was not making much progress towards the dark, dark brown that I needed. I started dipping my hand in there a bit and slopping on a thicker coat of stain, and after 2 more coats I had that nice espresso color. I put one more thin coat on a couple of drawers that looked lighter and let it dry well for a few days before starting with the topcoat.


The topcoat went on smoothly, but I was unhappy with the light streaking I was seeing when light was reflected off the surface. This video came highly recommended, and he makes it look easy, but I tried out the type of rag that he uses and went back to a sock for the next coat. Supposedly the streaks are caused by going over the top with too much pressure, and in the end I got the best result by slopping on enough to cover the surface well, then wetting my sock/rag again with more topcoat and going over the surface as light as possible in the direction of the grain.

Dresser, sheen on top

I put on about 4 coats of the topcoat and the sheen on the drawers was fine, but the large top was giving me the most trouble. After two more coats I had one I was happy with, and I didn't mind the extra durability on the top! When the light hits from a certain angle you can still see some light streaking, but that ended up just looking like woodgrain. And honestly, it's dark enough in our bedroom that you would never be able to see that anyway!

The very top of the dresser was covered with some sort of laminate (or maybe something else, we have no idea!), but I'm happy to say the stain covered the wood and laminate wonderfully! The top is also the only spot I bothered lightly sanding between coats of stain or topcoat, just to remove any light bumps from dust that stuck on the surface.

Naturally it was very hard to photo the super dark brown, so here is one washed out shot to show the detail of the dresser ~ 

Dresser, washed out (for detail)

And a shot in our bedroom, with a few random things thrown on top. We definitely need some new knick-knacks!

Dresser, after stain

The stain and topcoat together ended up costing about $55, but I only used about 1/4 of each and have tons left over for other projects. We spent about $170 on the dresser, so we were very happy to add this retro beauty to our bedroom for less that $200. The General Finishes gel stain worked wonderfully, and the Arm-R-Seal was good, but I feel like there has to be something even better out there. In the end we were very pleased with the final results!

Saturday, March 5, 2016

Stuffed Breakfast Waffle-wiches

I kind of hate one-use kitchen items, so I'm always thrilled to see people making unusual things in a waffle maker. I've been meaning to try a recipe forever ~ I think we might have tried crisping some mashed potatoes in there years ago with little luck? These Ham, Egg, & Cheese Biscuit Wafflewiches caught my eye recently & I couldn't wait to give them a try.

Stuffed Breakfast Waffle-wiches

First, scramble 6 eggs (to make 8 waffle-wiches) in a non-stick skillet and pre-heat your waffle maker. You'll also want some Grands Flaky Layer biscuits, sliced or shredded cheese, and some sliced ham or other lunchmeat.

Separate a biscuit in half, and flatten each half a bit with your hands to stretch them out. Place them on a flat surface like your counter (or a plate or silicone baking mat) and press each with your fingers until they stretch out about 6" wide.

Waffle-wiches - sliced cheese

On one half, layer some lunchmeat, cheese, and 1/8 of the egg. If you are using sliced cheese, avoid Kraft Singles or the cheese will all melt out of the waffle and burn no matter how well you seal the edges! We learned the hard way...

Waffle-wiches - don't use Kraft singles!

We switched to shredded cheddar with no problems, but I'm sure normal sliced cheddar would work fine.

Waffle-wiches - shredded cheese

Peel up the other flattened half of the biscuit & stretch it over the top, pinching the sides shut. Poke the top with a fork a few times to let out air when waffled. 

Waffle-wiches - covered

Spray the warmed waffle maker with a little cooking spray. Peel up the whole waffle-wich and set in the middle of your waffle maker. Close the lid (as far as you can) and cook until the indicator light goes off. Meanwhile, you can start stretching the dough and prepping the next one. Cut in half and enjoy!

Stuffed Breakfast Waffle-wiches

Each waffle-wich only takes about 5 minutes to cook, but it's going to take you a while to get through all 8, so plan accordingly. If you have leftovers, they warm up well in the toaster!