Tuesday, June 25, 2013

French Dip Crescent Rolls

French Dip Crescents

Recipe here!

I've had this one typed up with a photo & nutritional info ready to go for months, but somehow it kept getting pushed to the back burner (ha!). These crescents are amazing, and pretty easy to make. We've devoured them a few times as a dinner, and I can't wait to make them for a get-together sometime & wow some friends.

The recipe is lightly adapted from Mama Loves Food, basically combining the sauce recipe with the crescent recipe to simplify things & adding a few tweaks. I hope you'll give them a try!

Wednesday, June 19, 2013

Geometric Trim For Plain Cloth Bins

We bought a red cabinet from Target a while back to add a little more storage in our kitchen. Since the front is glass, I wanted to use something to hide the kitchen tools & pantry items and add a little flair. I searched forever for some fun bins, but finally had to give up & pick up some cheap, plain black ones. As you can see though, they are pretty boring and make the inside of the cabinet look solid black. (Sorry for the terrible glass glare!)

Black Totes, 1

I decided to add a strip of geometric print fabric to each bin & found a lovely print on Amazon. One yard was more than enough to cover all four bins & I love how they turned out!

Black Totes, 2

First I cut some interfacing to the size I wanted the strip and used a glue stick to stick it on the fabric, making sure to line it up with the print. I cut the fabric a little past the interfacing, folded down the edge, and glued it again. Then I topstitched around the edge of the strip, wrapped it around the bins, and stitched along the top to hold them in place. Now we're putting that glass to good use!

Black Totes, 3

Thursday, June 13, 2013

Tree Wall-Art Tweaks

Justin's generous mother-in-law took us to Hobby Lobby to pick out some wall-art for Pandora's room shortly after she arrived. We found lots that we liked, but had trouble finding things that worked well together. Unfortunately the trip was a little too soon for me ~ I was not doing too well after walking around that giant store, so we had to cut the search short and head home. We did grab one of our favorite pieces on the way out though, and it was even on clearance for super cheap. Score!

Tree Before

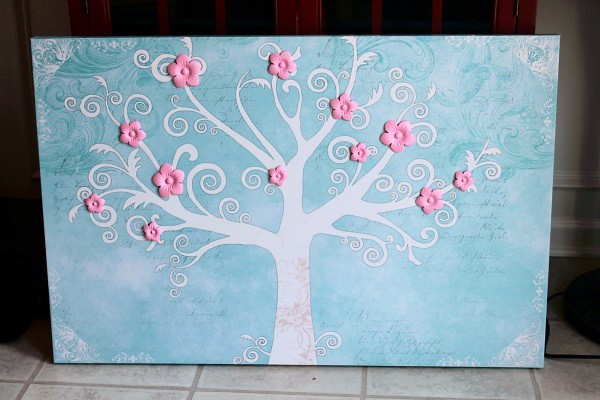
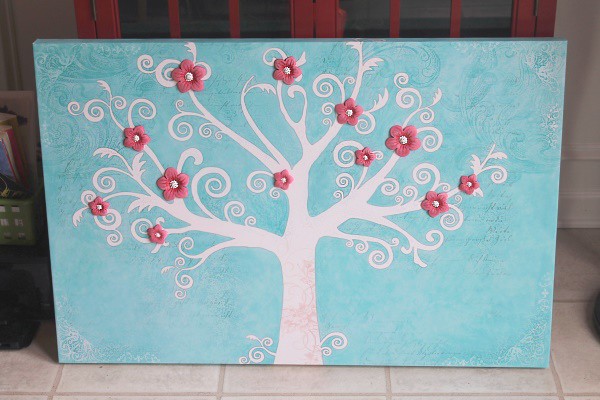
I really liked the tree, but something kept nagging at me. I realized that the colors were *slightly* off ~ My artist-eye can be a little to picky sometimes! The flowers were a light, neon pink, which I thought would look better darker and not one solid color. The background was a little too baby blue as well, and I thought teal would suit a little girl's room better. So I pulled out the paints and went to work, happy to have a crafty project to work on. Here is the result ~


Tree After

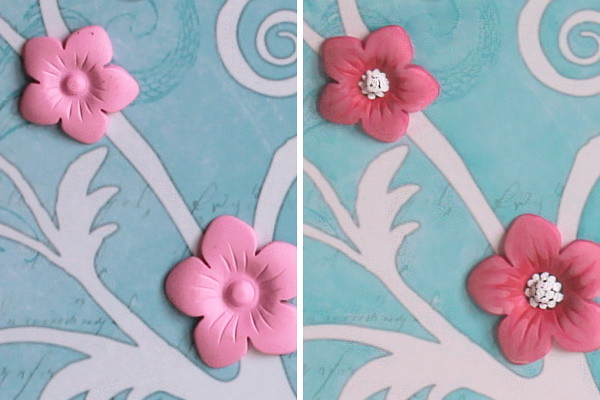
The biggest change being the flowers ~


Tree - Flower shot

I'm loving the changes, even if it did end up taking longer than I expected. And it feels nice to add a little personal touch to the nursery decorations! Now I'm considering doing a painting for Orson's room (from scratch this time) ~ we have plenty of canvases in the basement!

Saturday, June 1, 2013

Before & After

Luckily I snapped a belly shot 2 days before Pandora arrived so you can just how gigantic I got! (Here is Orson's last pic for comparison. I was induced about 2 weeks later so I did get bigger!) And just for laughs I'm including a shot from after the delivery. It was taken about a week later when my milk came in and I temporarily looked like I had a boob job! We joked that the pictures look as if someone pushed in my belly and it all ballooned out up top.

2 Days Before (Panda)1 Week After (Panda)

You can find more pics & info on the Harvling blog. Here are lots of Pandora pics and the story of her birth.

Pandora, smile