|
"Izabela" & "Boogie" Ambigram  |
"Ashley" & "Margo" Ambigram  |
|
"Gaudet" & "Devine" Ambigram  |
"Arnold" & "Overturf" Ambigram  |
|
"Jordi" & "Anne" Ambigram  |
"Jordi" & "Anne" Heart Design  |

Thursday, May 21, 2009
Ambigram Drop (& one heart)
You might notice a trend with this post. Each customer ordered two designs ~
Wednesday, May 20, 2009
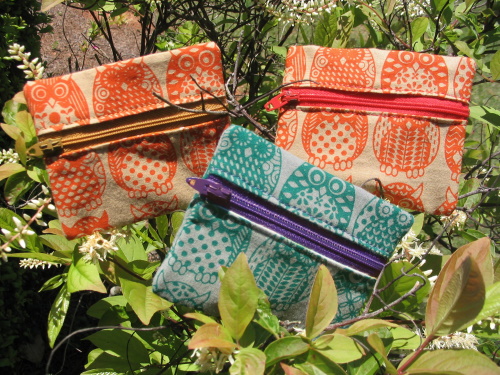
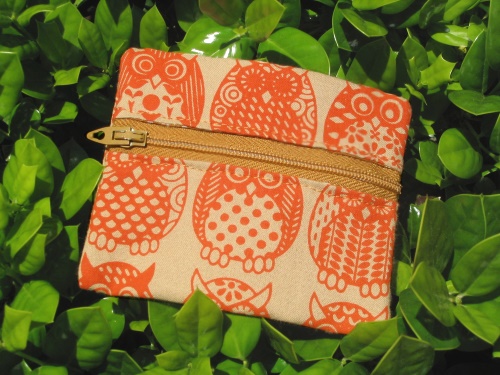
Simple Coin Pouch Tutorial
I wanted to get together a few photos of items made with my fabrics, and coin pouches seemed like the perfect way to use up those little scraps I was starting to accumulate. And, a perfect time for another tutorial!
The pattern is something I made up for this project, just a simple way to put together a small zippered pouch. It's nothing fancy, but something you can easily stitch together in about 30 minutes, and a great way to use up those small pieces of fabric. (The finished pouch is about 4" x 3.25")
Let's get started...
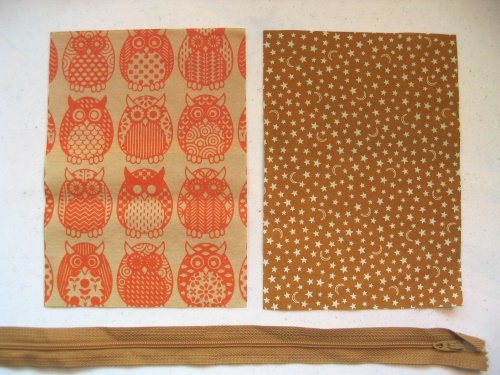
1) You'll want two 5"x7" pieces of fabric and a zipper that is at least 9" long with plastic teeth.
2) Sew the two pieces of fabric together, with right sides facing one another. Leave an open gap about 2" wide on one end and snip off the corners. (If you've ever sewed a pillow, this should sound familiar)

3) Flip the fabric right-side-out and use a chopstick or pencil to poke the corners outward. I like to push all of the seams to the edge and finger-press them nice & flat (running your nails over the seam).

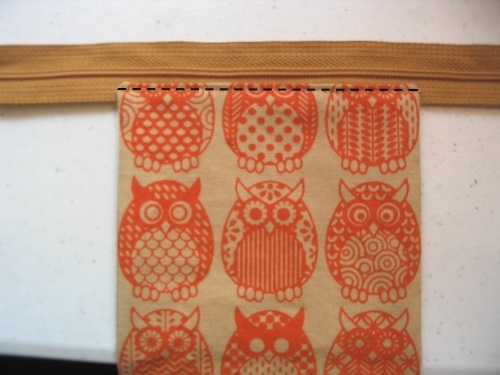
4) Pin one of the narrow ends of the fabric to the zipper, with the fabric you are using for the outside of the pouch facing the front. It should be in the middle of the zipper (but need not be exact), with the edge of the fabric about halfway between the teeth and the edge of the zipper. Top-stitch the fabric in place.
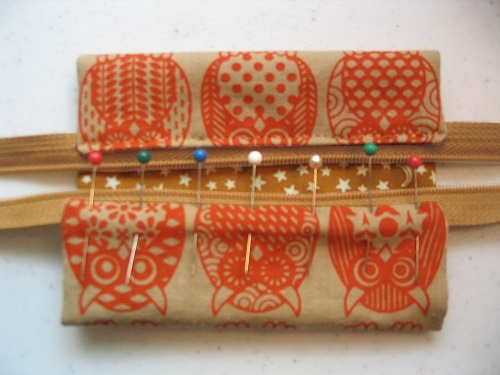
5) Wrap the fabric around the zipper and line up the other end. Pin the edges in place with the zipper closed, then unzip it past the fabric so you can get your hands in there to pin the rest. Top-stitch the fabric in place.
6) With the zipper still open, flip everything around so the lining fabric is now facing outside. Peek at the outside fabric (which is now technically inside) to make sure which side is up, then shift the zipper so the opening is about 1.5" from the top. Pin in place.

7) Top-stitch the edges, sewing several times over the teeth of the zipper. Cut off the excess zipper close to the fabric.
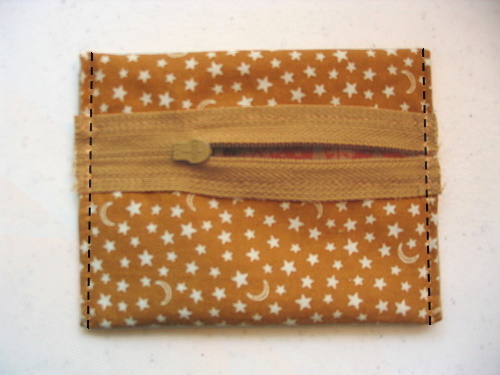
8) Turn the pouch right-side-out. I like to flatten the edge of the pouch at the zipper with some pliers to help it keep it's shape. And now you and your pouch are ready for a night out on the town!
The pattern is something I made up for this project, just a simple way to put together a small zippered pouch. It's nothing fancy, but something you can easily stitch together in about 30 minutes, and a great way to use up those small pieces of fabric. (The finished pouch is about 4" x 3.25")
Let's get started...
1) You'll want two 5"x7" pieces of fabric and a zipper that is at least 9" long with plastic teeth.
2) Sew the two pieces of fabric together, with right sides facing one another. Leave an open gap about 2" wide on one end and snip off the corners. (If you've ever sewed a pillow, this should sound familiar)
3) Flip the fabric right-side-out and use a chopstick or pencil to poke the corners outward. I like to push all of the seams to the edge and finger-press them nice & flat (running your nails over the seam).
4) Pin one of the narrow ends of the fabric to the zipper, with the fabric you are using for the outside of the pouch facing the front. It should be in the middle of the zipper (but need not be exact), with the edge of the fabric about halfway between the teeth and the edge of the zipper. Top-stitch the fabric in place.
5) Wrap the fabric around the zipper and line up the other end. Pin the edges in place with the zipper closed, then unzip it past the fabric so you can get your hands in there to pin the rest. Top-stitch the fabric in place.
6) With the zipper still open, flip everything around so the lining fabric is now facing outside. Peek at the outside fabric (which is now technically inside) to make sure which side is up, then shift the zipper so the opening is about 1.5" from the top. Pin in place.
7) Top-stitch the edges, sewing several times over the teeth of the zipper. Cut off the excess zipper close to the fabric.
8) Turn the pouch right-side-out. I like to flatten the edge of the pouch at the zipper with some pliers to help it keep it's shape. And now you and your pouch are ready for a night out on the town!
Thursday, May 14, 2009
New pattern!
I'm so excited! Yesterday I finally put the finishing touches on the paisley pattern I've been working on & off on for what... two months? I can't believe it took so long!! But, I usually end up spending my free-time at work with printing, not much time for new patterns. And as you can see, this pattern is pretty intense! (For an idea of the scale, this image is most of a yard)

Once again, I can't decide on a name. I'm kind of leaning towards "Whimsy" or "Peculiar Paisley". The second is a little too similar to the "Curious Curl" damask, but that might be a good thing. I don't mind the idea of (most of) the prints having a similar theme for their names. It makes it easier for me to come up with something, and gives them a unifying element. The names of the animal prints have their own theme, though I'm not sure if anyone has picked up on it yet. ;)
Now, this print won't be available as fabric until the summer, when we get things set up for the larger screens. Can you believe summer break is only a few weeks away?
Wednesday, May 13, 2009
Pink Flowers
My mother-in-law's garden was in full bloom for Mother's Day...
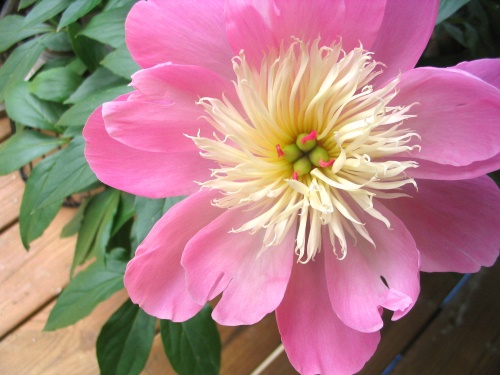

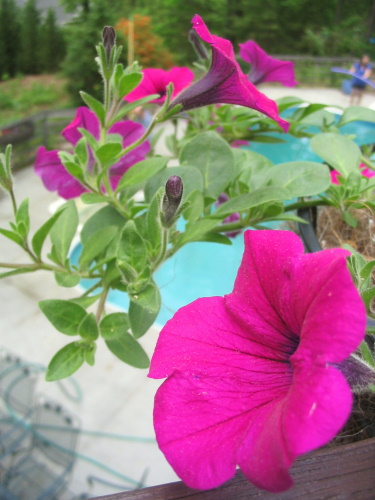
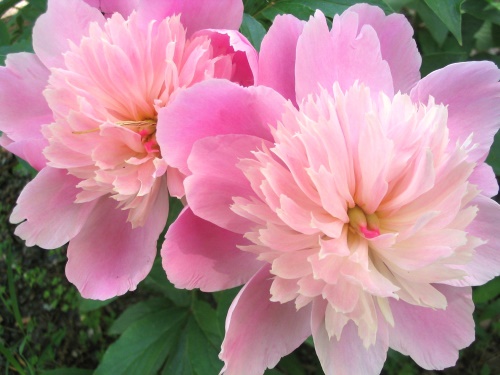
My battery ended up dying pretty quickly and I took over her Canon Rebel for the rest of the day, snapping photos until I couldn't see straight. I started to really enjoy using the manual focus for macro shots and got a lot of fun pics, but I won't be able to get my hands on those photos until our next visit.
My battery ended up dying pretty quickly and I took over her Canon Rebel for the rest of the day, snapping photos until I couldn't see straight. I started to really enjoy using the manual focus for macro shots and got a lot of fun pics, but I won't be able to get my hands on those photos until our next visit.
Tuesday, May 12, 2009
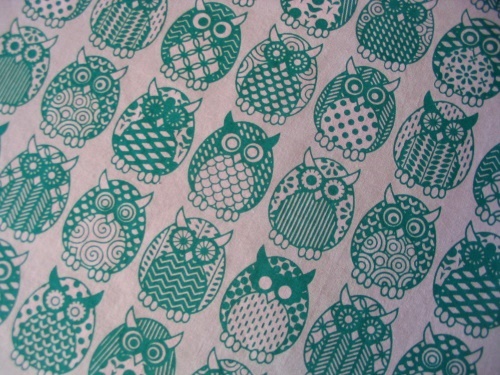
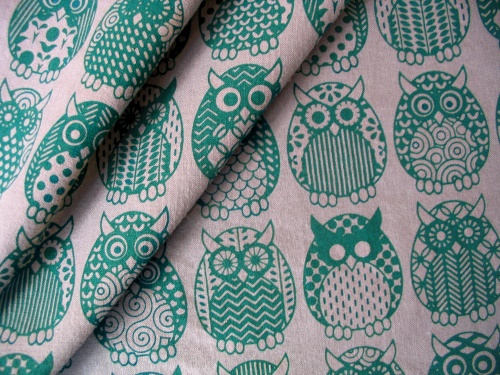
Owl Parliament - Turquoise on Slate Gray
Last week I used up the rest of the fabric for a few more owls. I had planned on using this turquoise & gray combination with the Skeleton Key print, but can't seem to print the owls fast enough.
Monday, May 11, 2009
Jason & Lucy
We went to a lovely wedding this weekend, for one of my cousins, and I took a *ton* of photos. Unfortunately, my camera is crap, and hardly anything turned out. Sure, on the little camera screen a few of them looked brilliant, and I couldn't wait to get home to see them on the computer screen.
We were busy with church and Mother's Day festivities the rest of the weekend, so I just had a chance to sit down and pull up the pics. Only a few of the outdoor shots were salvageable, and I was indoors most of the time, so all of the bride & groom photos were pathetic.

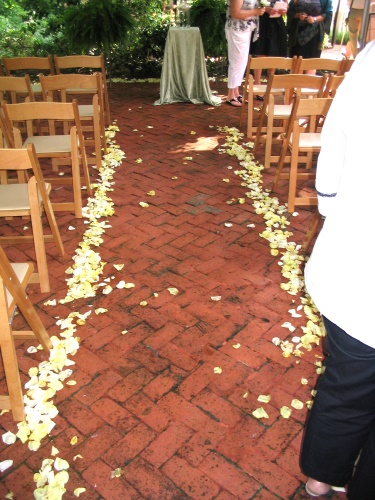

Luckily everyone was snapping pictures there, so this really was no big loss. But as I'm getting more into photography, it was quite depressing to flip through the photos & see everything turn out so badly. And blaming my camera will get me nowhere until we can afford to replace it with a newer model, which will be no time soon.
Oh well! We really did have an excellent weekend, and I hope all of you enjoyed your Mother's Day as well.
We were busy with church and Mother's Day festivities the rest of the weekend, so I just had a chance to sit down and pull up the pics. Only a few of the outdoor shots were salvageable, and I was indoors most of the time, so all of the bride & groom photos were pathetic.
Luckily everyone was snapping pictures there, so this really was no big loss. But as I'm getting more into photography, it was quite depressing to flip through the photos & see everything turn out so badly. And blaming my camera will get me nowhere until we can afford to replace it with a newer model, which will be no time soon.
Oh well! We really did have an excellent weekend, and I hope all of you enjoyed your Mother's Day as well.
Friday, May 8, 2009
Ambigram Drop (& one heart)
|
"JigGsaw" Ambigram  |
"Eva" Ambigram  |
|
"сила" Ambigram (Russian for "Strength")  |
"Darian & Dylan" Ambigram  |
|
"Kenzi" Ambigram  |
"Cambiare" & "Averefede" Ambigram (Italian for "Hope" & "Have Faith") 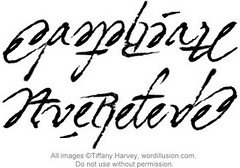 |
|
"Kari Lynn" & "Andrea" Ambigram  |
"K&H" Heart Design  |
Thursday, May 7, 2009
Wednesday, May 6, 2009
Steamy goodness
I recently realized that it has been quite a while since I posted some food shots around here. We really do cook almost every night, but a lot of it is recipes I've posted here before, or simple things that aren't really worthy of a picture/recipe. We even tried out a batch of new recipes, but nothing really excited me. I might revisit a few of those meals, but they will need a lot of tweaking before they are ready to share.
One thing we've finally got the hang of is our bamboo steamer. Line the trays with parchment paper, pop two pieces of fish on the bottom tier with a little lemon pepper, some green beans or broccoli in the top tier with a drizzle of italian dressing, and let steam for 15 minutes. A super quick & easy meal!
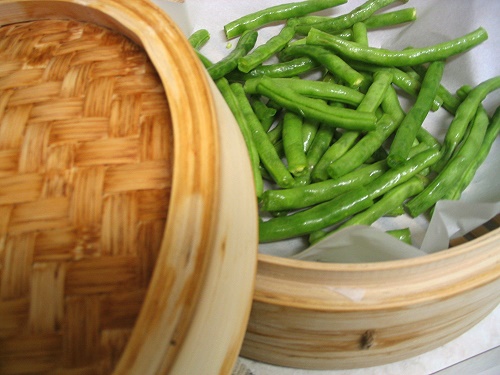
Just make sure to run the steamer for a good 2-3 hours before you use it the first time, or else the food will taste awful woody. I'm so glad to finally figure that out, and now the steamer is getting some use after years of sitting on the shelf.
One thing we've finally got the hang of is our bamboo steamer. Line the trays with parchment paper, pop two pieces of fish on the bottom tier with a little lemon pepper, some green beans or broccoli in the top tier with a drizzle of italian dressing, and let steam for 15 minutes. A super quick & easy meal!
Just make sure to run the steamer for a good 2-3 hours before you use it the first time, or else the food will taste awful woody. I'm so glad to finally figure that out, and now the steamer is getting some use after years of sitting on the shelf.
Monday, May 4, 2009
Tilt Shift Fakes
I've become a bit fascinated lately with the miniaturizing effects of the tilt-shift camera lens. Or rather, how to fake the look with photo editing software.
If you haven't heard of tilt-shift before, you've probably seen it around. I noticed some in the opening of the TV show Dollhouse, photos shown during the commercial breaks of Adult Swim (Cartoon Network), and was first introduced to the idea with these videos, which mix in time lapse to increase the 'toy' feeling even more (I love the boats, but not a big fan of the people shots).
A real tilt-shift lens is off center, giving the photo (or video) a very narrow area of focus, which mimics the look of macro photography (very close up). You can fake the look on your own photos by blurring out areas and bumping up the contrast & saturation levels to give everything an unnatural look. There are a lot of great step-by-step tutorials online.
But getting it to really look like a miniature is not so easy. I've played around with a few of my own photos, but they are not that great. I'd love to get a *lot* better at this, I've seen some really incredible work out there.

I'm even willing to spend extra time to covering up brown spots in the grass or black marks running down the road, anything to really capture the look of a miniature. But first I have to figure out how to get the focus just right. I'm probably not blurring nearly enough.
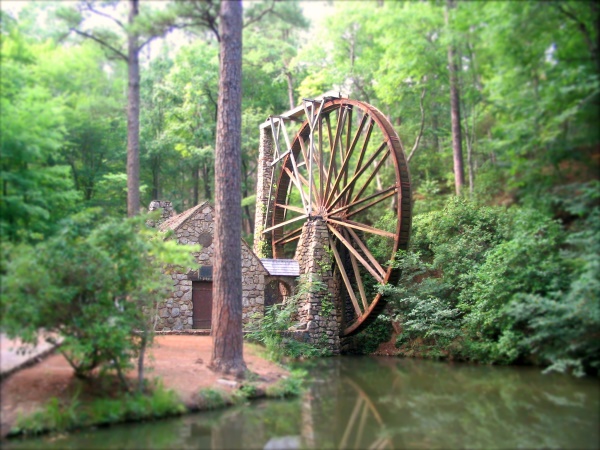
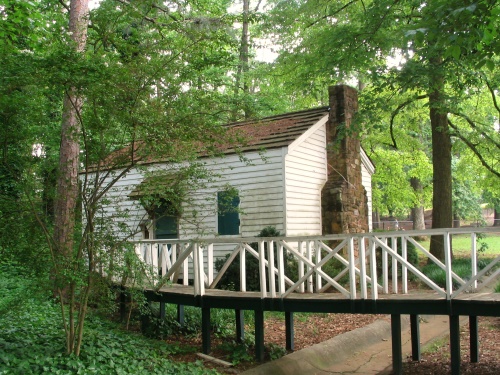
Having the right angle can really help with the illusion too. During our trip to Gatlinburg, I kept my eye out for any places that that stood a little above the rest of the buildings.

If you think you have a photo that would work well, but don't want to mess around with trying to edit it yourself, check out the tilt-shift maker website to generate the changes. Or, hey, feel free to send it to me! I could always use some more photos to practice on.
If you haven't heard of tilt-shift before, you've probably seen it around. I noticed some in the opening of the TV show Dollhouse, photos shown during the commercial breaks of Adult Swim (Cartoon Network), and was first introduced to the idea with these videos, which mix in time lapse to increase the 'toy' feeling even more (I love the boats, but not a big fan of the people shots).
A real tilt-shift lens is off center, giving the photo (or video) a very narrow area of focus, which mimics the look of macro photography (very close up). You can fake the look on your own photos by blurring out areas and bumping up the contrast & saturation levels to give everything an unnatural look. There are a lot of great step-by-step tutorials online.
But getting it to really look like a miniature is not so easy. I've played around with a few of my own photos, but they are not that great. I'd love to get a *lot* better at this, I've seen some really incredible work out there.
I'm even willing to spend extra time to covering up brown spots in the grass or black marks running down the road, anything to really capture the look of a miniature. But first I have to figure out how to get the focus just right. I'm probably not blurring nearly enough.
Having the right angle can really help with the illusion too. During our trip to Gatlinburg, I kept my eye out for any places that that stood a little above the rest of the buildings.
If you think you have a photo that would work well, but don't want to mess around with trying to edit it yourself, check out the tilt-shift maker website to generate the changes. Or, hey, feel free to send it to me! I could always use some more photos to practice on.
Let's try this again...
I'm going to attempt, once again, to use this space as a clone for my Live Journal blog. I can't see myself switching over right now, but I would love to get a few more readers, and make things easier for the people who prefer to read things over here.
I have deleted all of the entries I had posted here before, when the blog was 'ShesFullofCraft', so there wouldn't be a large gap between posts. But I will be be adding links in the sidebar to the categories I have listed at LJ so you can still go back through the archives of my blog on any particular topic.
I have deleted all of the entries I had posted here before, when the blog was 'ShesFullofCraft', so there wouldn't be a large gap between posts. But I will be be adding links in the sidebar to the categories I have listed at LJ so you can still go back through the archives of my blog on any particular topic.
Subscribe to:
Comments (Atom)