Thursday, March 29, 2012

Filing Your Stamper

I forgot to mention this last time, but this goes along with the teal spiral nails from that post...

Before stamping the nails I tried a sample stamp on paper to see how the design would look in black. It did not turn out, tons of breaks and gaps in the print. I tried again and again using different techniques - plastic & metal scrapers, pressing lighter or harder, scraping the polish from different directions - and I still could not get a good print. You can see all of the failures across the top row & the paper in the back ~

Stamping samples (before & after filing)

I started getting pretty frustrated and worried, so I searched around online and a few sites recommended filing down the surface of the stamper a bit with a nail file, I suppose to give it a little more grip. I did a little filing, wiped the stamper clean (nail polish remover), and the next prints turned out lovely & crisp! You can see the two black stamps on the bottom row (ignore the dark gray, I was trying out a polish that ended up being too thin) and the last stamp was done in the silver polish I used on the nails. Such a big difference!!

Sunday, March 25, 2012

Spiral & Houndstooth Nails

I've had a few more chances to play around with my Konad stamping plates since my previous post. I do one design a week - usually painting the base color Friday night, stamping on Saturday, and then the designs last until the next weekend.

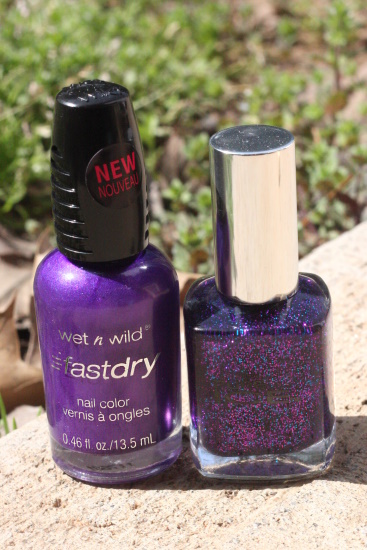
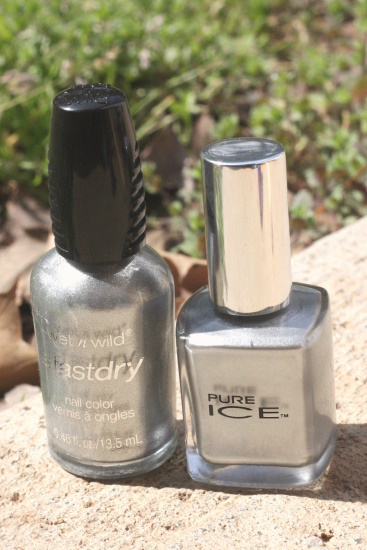
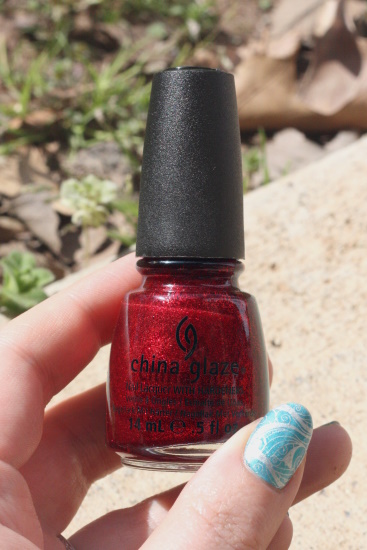
For my 2nd experiment I used Sally Hansen Hard as Nails (Xtreme Wear) in "Marine Scene" for the base color and stamped in Pure Ice "Silver Mercedes" with the spiraling pattern from the 
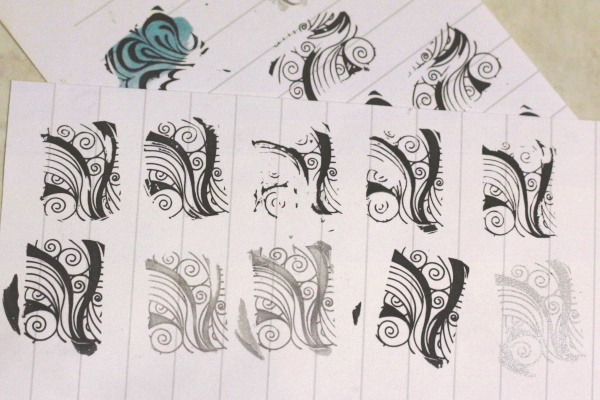
m51 plate. I had seen a picture using that pattern where each nail picked up a different part of the design. I really liked the look, so I turned the stamp in different directions for each nail - my nails were short enough to use the stamp sideways so I could use the right or left end, go horizontal or vertical, and even did a few diagonally to get a lot of variety.

Teal Spiral nails, 1

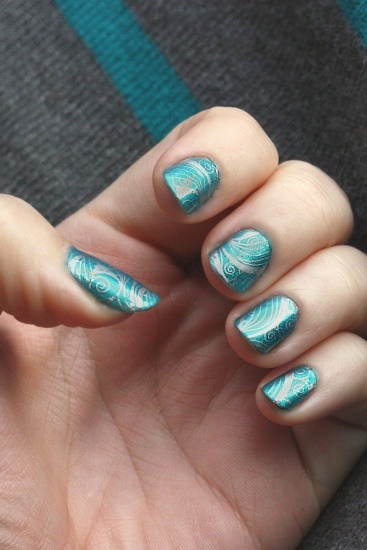
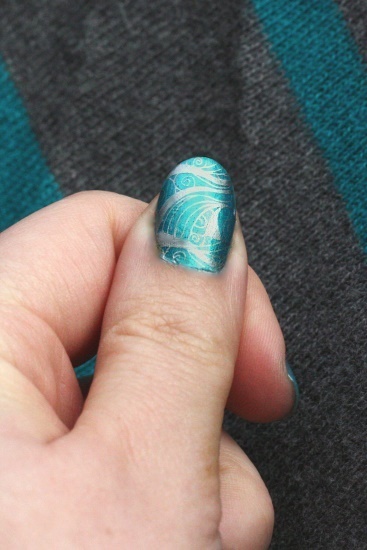
The thumbnails are always a pain. The stamps are too narrow & a fraction too short, so instead of trying to do four stamps to cover it, I like to turn the design sideways & only have to stamp twice (working from the top down. I figure the seam is better hidden at the base of the nail). Lining up the stamps in a nightmare, but I was pretty pleased with the results.

Teal Spiral nails, 2

For my next stamping I wanted to use the houndstooth print on the m63 plate in black & white. I tried to use a cheap white NYC polish (a few years old) for the base and it ended up being a battle that went on for days! It took forever to dry and needed about 4 coats, so of course the semi-dry nails kept getting bumped & had to be re-done... an endless cycle.

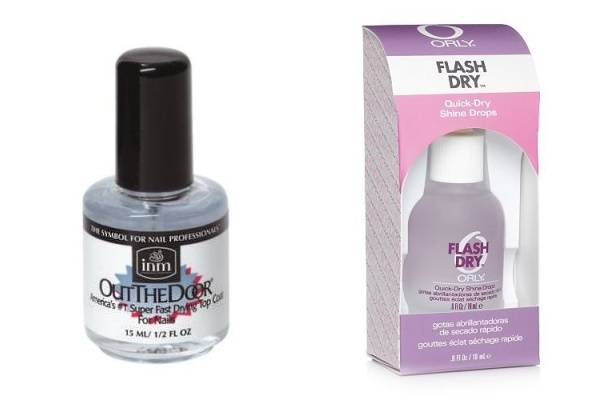
I got really fed up & started researching the fast drying drops I kept hearing mentions of on tutorial videos & nail blogs. They let you layer a few coats of polish quickly, without waiting for them to fully dry, then you put on a few drops at the end and it helps the polish speedily dry all the way through. I visited our local Sally's Beauty Supply (which had a pitiful selection) and picked up INM Out the Door fast dry topcoat and Orly Flash Dry drops.

INM Out the Door & Orly Flash Dry

I also realized at this point that it would be easier to put on a black base coat & stamp with white, since black covers easily. I used Sally Hansen Diamond Strength in "Black Diamond" (black with a faith silver sparkle), topped that with the INM topcoat and Orly drops and went to bed. The drops are actually an oil, so you are not supposed to stamp over it, but the next day I tried my luck and just washed my nails off well with soap. I stamped with Konad special white, applied more topcoat, and it worked well!

Houndstooth nails, 1

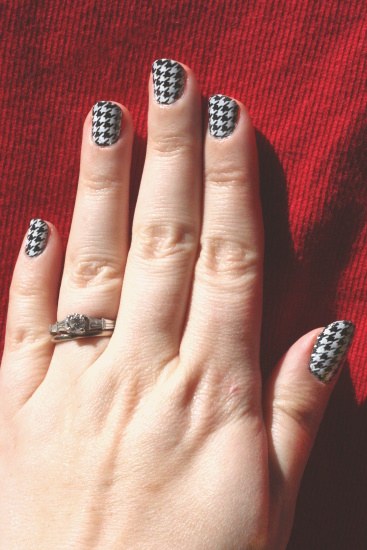
*Really* well, actually. I'm not sure if it was the new topcoat, drops, or just the combination of polishes, but this was one of the most durable manicures I've done! The next weekend I finally just removed it myself & didn't have any major chips all week.

Once again, the thumbnail was a struggle. Lining up such a detailed print was no fun & took a few tries for both nails. Since I ran the print sideways for the thumbs I had to do it for all of the nails, but that might not be possible when the rest grow a tiny bit longer (to their normal length).

Houndstooth nails, 2

I love the print - it's so pretty when you see only a few nails, but I did find it to be a little too much running across the whole hand. I think from now on I may just stamp it on the pointer & pinky as accent nails and leave the rest black (which will let me happily avoid the thumbs as well!)

Thursday, March 22, 2012

Chocolate Mint Cookies

Made these chocolate chip mint cookies for St. Patrick's Day (inspired by this post) & I think it will be a yearly thing. I'd love to add a few fun traditions like this to the small holidays.

Chocolate Mint Cookies

I just followed the recipe on the back of the chocolate chip bag (technically I made a half batch because we were low on butter) ~ just add 1 tsp. peppermint extract & a whole lot of green food coloring and they taste like soft Thin Mints! Next time I might use a sugar cookie recipe like in the link since these got so browned around the edges.

Thursday, March 15, 2012

Plush Rocketship

I came across an old project I forgot to post before ~ a stuffed rocketship that I made for little baby Orson.

Plush Rocketship

I drew up the pattern & used some of the leftover fabric from his curtains, along with some soft red fleece. There are a few windows appliqued on the sides & the fins are lined with a metallic wrapping paper for a nice crinkly noise. I would like to come back to the pattern one day, tweak it a bit & then share it, but I know that will not realistically happen any time soon.

Orson liked his curtains so much that I used the last of the fabric to make a small blanket for him, around the time that I made the rocketship. For once I had not bothered to wash the fabric beforehand and paid the price - it got quite wonky after the first wash & I never went back & ripped out the seams to fix it.

Of course Orson is not much of a baby anymore. He's running full steam ahead and nearing 2 years old!

Firetruck & hat, 1

Bounce N Beans, 3

Bounce N Beans, 6

Saturday, March 10, 2012

New Polishes

After looking through my Caboodle of polish, I realized that most of the bottles I have are left over from high school & pretty ugly. I decided it was time to stock up a little with some cheap polishes.

First I found some Wet N Wild Fast Dry polishes buy 2 get one free on eBay (3 for $8). Although that actually didn't end up going so well...

Polish, Teal & Dark Gray

I read that WNW "Teal of Fortune" was a good substitute for this gorgeous OPI polish. When it arrived it was much darker than I had imagined & pretty dull on the nail (not much sparkle), though adding a topcoat of green glitter did really help. To make up for it I ordered ORLY's "Halley's Comet", which is supposed to be identical to the OPI color, so I'll probably gift this to my sister-in-law who's a fan of the show.

I picked up the dark metallic gray at Walmart for $2, NYC's "Bowery Black". Half of my wardrobe is dark gray now ~ it's the new cat-hair-friendly-black ~ so I figured that was a good shade to get!

Polish, Purples

The WNW purple is almost worth buying just for the name, "Buffy the Violet Slayer". I know purple can be a hard color to photo sometimes, it likes to turn up as a dark blue, and so I thought that was the reason for the large range of shades that show up in a google search. Turns out they released two different versions with the same name, and this one is not as red as I would like.

Though it is a great match for the purple & blue glitter topcoat I also picked up at Walmart for $2 - Pure Ice "Cheatin". I'll probably keep the WNW, but I've got my eye on this redder purple.

Polish, Silver

The third bottle of WNW is called "Silvivor" (the TV show names crack me up!), and it is a keeper. I was hoping to use it for stamping too but read it was too thin for that so I went back to Walmart (yikes) for a $2 bottle of Pure Ice "Silver Mercedes", which was highly recommended. (I've already used it for stamping & it works great!) "Silvivor" has a lovely shimmer to it, so it looks like it will be the prettier base color.

Polish, Red Pumps

And this was my splurge bottle - a $5 bottle of China Glaze "Ruby Pumps". It's so rich & sparkly, definitely worth the extra couple of bucks. (And I hear it's good for stamping too!) I can never get cherry red to show up on the computer right ~ no matter how I edit it, it's always too orange ~ so you'll just have to imagine this as a gorgeous, deep cherry red.

So, 7 polishes for under $20? Not too bad! Now that I have a few colors I have a feeling future bottles will be a little on the spendy side ~ I have a weakness for duochromes and glitters.

What's your favorite polish color right now?

Thursday, March 8, 2012

Pinterest results from your blog/site

Want to see what people are pinning from your blog? (or other site) I found out if you put a site address in URL below it will show all the pinned results from the site. Very fun to check out! ~

http://pinterest.com/source/YOUR_SITE/

So, for example, to see what people are pinning from my main blog you'd go to http://pinterest.com/source/tiffanyharvey.livejournal.com/ (some sites would have www.) Apparently the coin pouch tutorial is much more popular than I realized, with the snowflake cutting tutorial in 2nd place. I really need to make more tutorials!! One day...

The sad thing is that you can not search your Flickr results this way, which is what I'd really like to see. You can search for *all* results from Flickr, but not for individual users.