Thursday, June 25, 2015

5:2 Chinese Hoisin Chicken Lettuce Wraps (210 calories)

I was tempted to try these 5:2 Chinese Egg Roll Wraps from Lavendar and Lovage, but I was not anxious to blow 70 calories on an egg to make one wrapper for the meal. I bought some rice paper/spring roll wrappers to test out instead, but even 30 calories sounded high if I wanted to use two. And then I realized... why not just use Romaine leaves like my Turkey & Mushroom Asian Lettuce Wraps? Using only 5 calories or so for the wrappers let me add in more chicken, more sauce, and lots of veggies! I mixed things up a little and used Hoisin sauce in place of the sweet chili sauce and the results are tasty!

5:2 Chinese Hoisin Chicken Lettuce Wraps (210 calories)

(For those of you counting calories, I've added the amount for each ingredient so you can easily make tweaks without having to re-calculate everything. Anything marked with an asterisk* may vary a lot based on what you buy, so make sure to compare your label.)

Chinese Hoisin Chicken Lettuce Wraps

4 cups savoy cabbage, shredded (78)
1/2 cup shredded carrot (26)
2 green onion, thinly sliced (10)
2 tsp. grated ginger (2)
2 tsp. minced garlic (0)

5 oz. cooked chicken, shredded or chopped (170)
1/2 tsp. Chinese 5 spice (2)
1/4 cup Hoisin sauce (120*)
3 oz. Romaine (12)


1) Heat up a large pan over medium heat. Add the savoy, carrots, green onion, ginger, and minced garlic and mix well. Cook for 5 minutes, stirring frequently.

2) Add the chicken, 5 spice, and Hoisin sauce and mix well. Cook for a minute or two to warm through.

3) Cut the Romaine leaves into 4" long pieces. You may also want to trim the widest pieces down to about 4-5" wide to make them easier to handle (some are huge!). Each person will need 5-6 pieces.

Romaine Lettuce WrapsRomaine Lettuce Wraps

To eat, spoon some of the mixture down the center of the leaf and fold in half like a taco. Serves 2.

Calories - 210 for 1/2

Tuesday, June 23, 2015

How to Shred Cabbage & Savoy vs. Napa

The other day I walked by an older woman in the grocery store who was staring at the spice section. She was on the phone, and I overheard her say, "Now I've just got to figure out what 'lime zest' is!" I quickly spoke up, realizing she was never going to be able to hunt that one down, and explained how to use a fine grater on the peel of the lime to get the zest. It really is an odd ingredient if you are not used to it!

I think at some point we've all had to do a Google search to figure out how to cut or prepare some new ingredient for a recipe! One I often think about is shredded cabbage, because I use it so often in my Asian recipes. I can just picture some poor soul pulling out a big cheese grater, grumbling as it takes forever to shred four cups worth. The name can be a little confusing, since you really just need to slice it into little strips. Here's what I do...

Shredding cabbage

Break off and discard any dirty outside leaves. Cut off a chunk to the side of the stem. This is usually a little tall, so I slice it in half for shorter shreds.

Shredding cabbage

Then slice these pieces into small strips, about 1/8-1/4". Soon you will have handfuls of shredded cabbage!

If you are going to use the whole cabbage at once, you can cut it into quarters and cut the stem out first like this. I usually only need a few cups at a time, so I like cutting off sections instead. If I need a little more I can trim off a tiny bit, or a big hunk if I need a few more cups. The remaining head stays fresh longer and takes up less space than leftover shreds would if you cut the whole thing.


Savoy vs. Napa Cabbage
Savoy via Wikia, Napa via Harvest to Table


Savoy vs. Napa Cabbage ~

Both of these cabbages have leaves that are a little thinner and more wrinkly than your standard green cabbage. I use either one in Asian dishes interchangeably. Originally I always bought napa, which you can easily shred by chopping off the bottom 1/3rd, cut in half (or quarter) lengthwise, and then slice into strips. But then I noticed our store at the time charged the same amount per pound for the savoy and napa. Since I was discarding over 1/3rd of the napa, I figured I was getting a better deal buying savoy, and I can usually find smallish ones that I can use up easier. Just grab whichever you can find, or whichever is cheaper, and you are good to go!


Here are a few recipes that use shredded cabbage ~

Very Veggie Soup
Chicken & Mushroom Chow Mein
Thai Red Curry Soup
Chicken Satay Noodle Soup

And I'll have a new recipe that uses savoy for you on Thursday!

Friday, June 19, 2015

5:2 Update - Week 22, 5 months

What a disappointing month!

The first week restaurants were definitely to blame. My husband requested we visit a breakfast buffet, because we hadn't been to one in years. But after that we were visiting family & traveling, and ended up eating out another time or two because of it. We normally only eat out once a week, and by the end of that week I had gained a pound and a half! (Even with all of the exercise & diet days)

The next two weeks I managed to lose that weight along with another pound, but this last week the scale didn't budge at all. I don't feel like I was eating really bad & did my daily exercise, so I'm not sure what happened! Actually, right now my whole body is *so sore* from my workouts this week, so perhaps I'm just loaded with muscle now, haha. After 4 whole weeks I am down a depressing .8 of a pound, but at least I dropped another 1" from the waist.

After 5 months I'm starting to feel a little burnt out & have been considering going a little easier on the diet or exercise, but not after a month like this! Ugh. Hoping for a better report next month.

Wednesday, June 17, 2015

Sushi Bar Ideas

Last month we had some friends over for a game night with make-your-own sushi. I took some pictures of our sushi station to share how we set everything up for some assembly line sushi rolling.

I laid out our ingredients along a long counter. (Obviously we weren't going fancy this time, everything's just on paper plates or kid's plates.) On the far left we have the nori, rice, seasonings, measuring cups/spoons, and rolling mats. For each roll I like to measure out 1 cup of sushi rice in a bowl and mix in 1/2 tsp. rice vinegar, 1/2 tsp. sugar, and 1/4 tsp. salt. Then you know just how much to spread on your nori! After spreading out your rice, you can move down the counter to add your fillings and toppings.

Sushi bar

Here are the different plates. First the veggies ~  carrots, mushrooms, green onions, cucumbers, and avacados ~

Sushi bar, veggies

Then the seafood ~ crab strips, shrimp, some assorted seafood mix, and then I added some strips of cream cheese here since there was room ~

Sushi bar, seafood

We like to throw in some untraditional ingredients for fun experiments! Here we have bacon, some leftover ham, and pepperoni. We actually had some shredded pork in the freezer, but I thought that would be overboard! ~

Sushi bar, pork

And then the crunch! On the bottom are some tempura flakes we made, then we have some Doritos and pork rinds on top ~

Sushi bar, crunch

And finally, sauces and toppings. Sriracha, eel sauce, white and black sesame seeds, and some spicy mayo (1 Tbsp. mayonnaise, 1 tsp. Sriracha) ~

Sushi bar, toppings

I put a cutting board, knife, and wet towel over by the sink for people to slice up their rolls. They turned out great!

Sushi bar, rolled

This time we learned that the pepperoni and nacho cheese chips don't go so great with the nori, but they might be good with a soy wrapper (or no wrapper). I have used plain kettle chips and French onions for some good crunch in the past, but whatever you use needs to be eaten quick before it gets soft. Hmm... maybe next time I'll try pretzel sticks? Either way, bacon was definitely a winner and will be at all of our sushi bars in the future! Sounds like it's time for another sushi night.

Monday, June 15, 2015

Cantonese Claypot Rice

Cantonese Claypot Rice, 1

I tried another recipe from Soy and Pepper and this stuff is amazing! This is a simpler, at-home version of the Claypot rice served by street vendors in Malaysia. Savory, meaty rice with a hint of heat ~ this is perfect Asian comfort food! I ditched the rice maker from her recipe and mixed this one up on the stove.

The original recipe adds in the traditional Chinese sausage and salted fish as well, but if you aren't familiar with these already I'd leave them out. I hunted down the Chinese sausage and hesitantly forked over $5 for the pack of 10 thin sausages (about as wide as your thumb). And while they were pretty tasty, you hardly notice the occasional slice mixed in the rice, yet they add 50 calories per serving! I'll use up the pack I have, but kind of wish I hadn't bought them and left them out of the recipe below.

Cantonese Claypot Rice, 2

(For those of you counting calories, I've added the amount for each ingredient so you can easily make tweaks without having to re-calculate everything. Anything marked with an asterisk* may vary a lot based on what you buy, so make sure to compare your label.)

Cantonese Claypot Rice 

1 tbsp soy sauce (10)
1 tbsp sake (20)
1/2 tsp sugar (8)
Dash of white pepper (0)
4 chicken thighs, cut into bite-sized pieces (328)

1) Mix the soy sauce, sake, sugar, and pepper. Marinate the chicken pieces and set aside for 30 minutes (or longer).


3 cups water (0)
1.5 cup rice (900)

2) In a medium pot, mix the water and rice and bring to a boil over high heat. Reduce the heat to low, cover, and cook for 15 minutes. Remove from heat.


4.5 Tbsp. soy sauce (45)
3 Tbsp. oyster sauce (75*)
1.5 Tbsp. dark sweet soy sauce (90*, see substitute at end)
1/2 Tbsp. sesame oil (65)
1/2 tsp. chilli oil (20)

3) In a small bowl or cup, mix the soy sauce, oyster sauce, dark sweet soy sauce, sesame oil, and chili oil. Set aside. (Slice the green onions and mushrooms while you wait.)


1 tsp. sesame oil (43)
2 green onions, sliced thinly (10)
8 oz. fresh mushrooms, sliced thinly (50)

4) When the chicken and rice are ready, heat a wok or large pan over medium high heat and add the oil. Add the marinated chicken and mushrooms. Cook for a few minutes until the chicken is just cooked through. Add the cooked rice, pour in the sauce, add the green onion slices, and mix well. Serves 4.

Calories - 416 for 1/4

Cantonese Claypot Rice, 3

Dark sweet soy sauce (or Kecap Manis) is a thick, sweet, molasses-y soy sauce. I'd highly recommend picking up a bottle of this tasty sauce, but if you can't get ahold of it, you can mix equal parts soy sauce and brown sugar, then simmer it until it thickens to resemble maple syrup. (Since there is so little in this recipe, I'd probably just add the 1.5 Tbsp. of soy sauce and brown sugar and not bother thickening it first.)

Friday, June 12, 2015

Beginners Nail Stamping Kit & Instructions

Last Thanksgiving the whole Harvey family got together and I brought my nail stamping supplies. I stamped designs on my 3 nieces' nails, and they were so excited about it that I put together a stamping kit as a gift for them. These supplies and directions are great for anyone starting out with nail stamping, so I wanted to share them here for anyone interested in making a kit as a gift for a friend, or just for yourself! First, the supplies...

Beginners Nail Stamping Kit

Nail stamping plates ~
There are a lot of brands out there, and a lot of variety in quality and price. For good, cheap plates, I recommend anything from Bundle Monster, Cheeky, or the Born Pretty Store brand. For this kit I got the Bundle Monster 2012 Collection, which has 25 plates (6 images per plate) for about $20. (I actually wanted to buy this Cheeky set, since the girls liked mine so much, but it wasn't going to arrive in time.)

By the way, if you have any plates that you know you won't use any of the images from, I've had good luck selling them on eBay. Sometimes I will buy a set, sell a few of the plates, and completely cover the cost of the set!
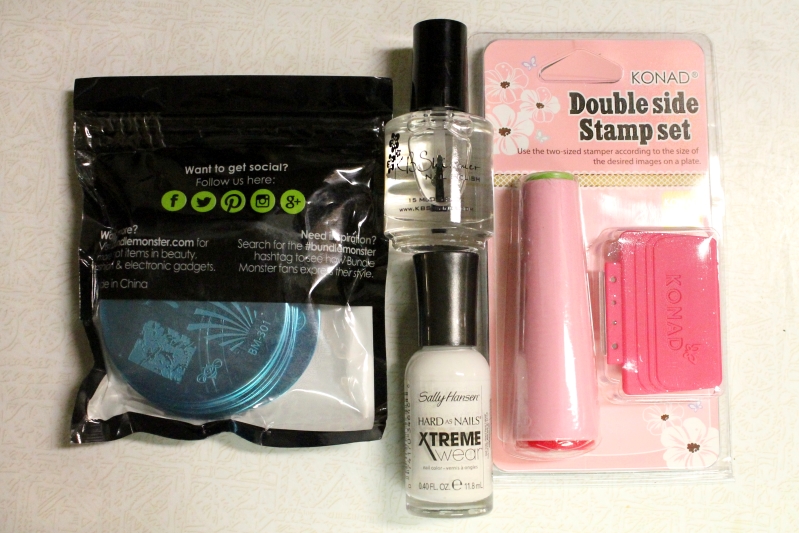

Top coat ~
For a general, quick drying top coat, I recommend INM "Out the Door". You can find it at most beauty supply stores and some drug stores for about $5. Anyone who paints their nails at all definitely needs a good fast drying top coat. They make the whole process so much easier!!

After stamping, you can use any top coat over the stamp, but you have to brush it on very lightly (and try not to brush over the area many times) or it will smear the art. Sometimes, no matter how gentle I am, it still smears a little and messes up my hard work! After a while I discovered a top coat that will not smear your nail art - KBShimmer "Clearly on Top". With shipping it's a little pricey, so you may want to order more than one bottle at a time to help lower the cost. I like to use a cheaper brand under the stamping and save this stuff to use on top. I only included this top coat in the kit, but would recommend getting both if you can.


Stamping polish ~
Most polishes will not work for stamping, but there are a lot that will. If a polish is thick enough to cover your nail with one thin coat, then it might work for stamping too. Fast drying polishes often work well, and you can always do a test stamp on paper to test one. For this kit I bought Sally Hansen X-treme Wear in white, but my top choice is Pure Ice "Silver Mercedes" (or "Silver Star") since it is only $2 if you can find it. To find more polishes that will work, you can do a good search for stamped nails, or here is a good comparison post that features some cheap brands (Sally Hansen, Wet N Wild, Sinful Colors, & Kleancolor).


Stamper and Scraper ~
For the kit I bought the Konad double stamper & scraper, which is what I use. I've also heard good things about some of the stampers on Born Pretty Store, and you can even use a credit card as a scraper, but I find I get a cleaner print with the metal one (though it does scratch up the plates a little). Use a nail file to buff the rubber ends of the stamper before you use it the first time.


In the kit I printed out a copy of the directions below, which talk about the other few supplies you will need (Q-tips, nail polish remover, and paper towels). It really helps to see someone stamp before trying it yourself, so make sure to check out some YouTube tutorials if you haven't seen it done before.


Directions ~

1) Paint your nails like normal with a base color, then top with a fast drying top coat (like INM "Out the Door" or KBShimmer "Clearly on Top") and let dry.

2) Gather your stamping supplies ~ your stamper & scraper, the stamping plate with the design you want to use, and a stamping polish. (Before you use your stamper the first time, buff the rubber with a nail file to rough it up a bit & you will get a much cleaner print.)

You will also need Q-tips, nail polish remover, and paper towels for clean-up between nails. (Remove the blue film from the front of your plate if you have not used it before.) Fold a paper towel and place your stamping plate on top.

3) Scrape & stamp ~ Working quickly, dab a line of stamping polish across the top of the design and then use your scraper to pull it across the design & fill the engraved design with polish (scrape a few times if needed). Press the stamper down onto the design, and see if you picked up a clear print. If so, stamp it on your nail by rolling from one side to the other. (If not, clean it off and try again.)

4) Clean-up ~ Using the Q-tips, clean your stamper and plate with nail polish remover in between stamps, rubbing hard to clean out any tiny lines. If the image did not stamp well on your nail, you can also lightly clean off the stamp with nail polish remover and try again (thanks to the top coat, it won't remover your base color).

5) Finishing ~ Stamp as many nails as you wish, then clean the stamp off your skin with a Q-tip. Top the stamping with KBShimmer "Clearly on Top" and let dry. (If you use a different top coat, apply very lightly to keep from smearing the stamp, and try not to brush many times.)


It can take a little practice to get the hang of it, so don’t worry if you have trouble at first. You may want to try it out on paper before you do your nails. You can also do a search on YouTube for “nail stamping tutorial” and there are lots of great videos to show you the steps and give tips. Happy stamping!


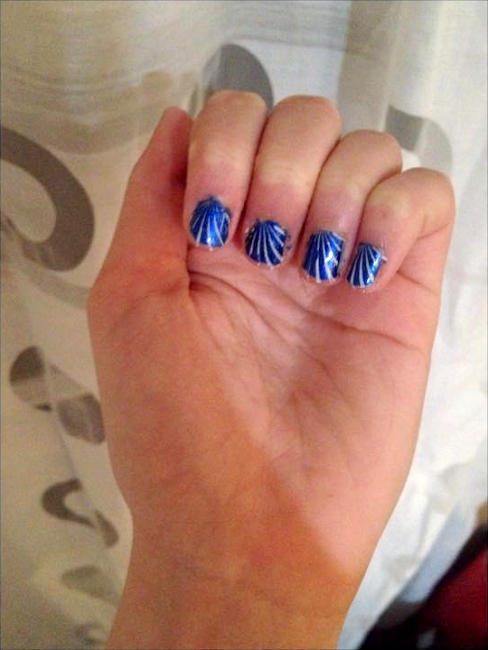
A few days after giving them the kit, they sent me a picture of their stamping. Pretty good for their first time! I'm so glad they were able to get it to work so well.

Niece Nail Stamping

Wednesday, June 10, 2015

5:2 Very Veggie Soup (104 calories)

This big bowl of soup is so low in calories, it's been on regular rotation around here for diet days. I started with this popular recipe for "Magic" veggie soup, but ended up heavily adapting it. (The calories for that one ended up being quite a bit higher when I calculated it. And it made way too much, about 20 cups!) I was also having trouble with a few things not cooking well enough, so I chopped the veggies a little smaller last time and everything cooked and mixed together better.

Very Veggie Soup (104 calories)

(For those of you counting calories, I've added the amount for each ingredient so you can easily make tweaks without having to re-calculate everything. Anything marked with an asterisk* may vary a lot based on what you buy, so make sure to compare your label.)


Very Veggie Soup 

1 cup carrot, diced (65)
1 cup fresh (or frozen) trimmed green beans, cut into 1" pieces (20)
1/2 cup onion, diced (30)
1/2 Tbsp. (3 cloves) minced garlic (0)

5 cups water (0)
3 cups shredded cabbage (60)
8 oz. fresh mushrooms, chopped (50)
1 can diced tomatoes (don't drain, 88*)
1 cup zucchini, diced (20)
1/4 cup corn (38)

2 Tbsp. tomato paste (30*)
3 tsp./cubes chicken or vegetable bouillon (15*)
1 tsp. Italian seasoning (0)


1) In a large pot (6 qt.) add the carrots, green beans, onions, and garlic. Saute over medium heat for 5 minutes, stirring occasionally.

2) Add the remaining ingredients and bring to a boil over high heat. Reduce to a simmer, cover, and cook for 45 minutes - 1 hour, until vegetables are tender. Makes 4 servings, about 2 cups each.

Calories - 104 for 1/4

Very Veggie Soup (104 calories)


Monday, June 8, 2015

Simple & Moist Shredded (or Chopped) Chicken

I try to always keep some shredded chicken on hand in the freezer. It makes for such quick and easy salads, casseroles, and soups. I also like to use it in my diet meals so that I don't have to worry about adding any extra oil or sauce to keep the meat from sticking to the pan. I find myself using it more and more in our recipes!

For years that meant buying a rotisserie chicken and shredding it. When I found out our local farmer's market had them for only $4 each I was in heaven... until I realized they only carry them around dinner time. I normally do my grocery shopping and errands early, and was getting tired of having to make an extra trip just to pick one up! Since they also carry cheap chicken breasts, I started thinking it would probably be a lot easier to just cook and shred those instead.

And then I found this post describing Ina Garten's simple technique for pre-cooking chicken by roasting bone-in chicken breasts. The skin is left on during cooking to trap in the moisture, and removing it reveals wonderfully moist breast meat! While the original technique has you coat the skin with oil, salt, and pepper, I found it unnecessary since you remove it in the end.

Roasted Chicken

For easy, moist shredded chicken...

1) Buy bone-in, skin-on chicken breasts - The skin keeps the chicken moist, so try to get breasts that have most of the skin intact. I was able to get a little over 6 cups of shredded chicken from 4 lbs. of breasts (about $5 at our store), so you'll get about 1.5 cups per pound.

2) Lay the breasts skin side up on a roasting sheet and stretch the skin to cover as much of the top as you can. Bake at 350 F for 45 minutes.

3) Let the chicken rest for 15-30 minutes after baking so the juices can settle into the meat. And so you don't burn your hands trying to shred it!

4) Discard the bones and skin and shred or chop the breast meat. (I guess I do a combination of the two. I like to rip off a few strips and then use kitchen scissors to snip smaller pieces.) If you are not using it right away, you can freeze the meat in tupperwares or freezer bags.

Simple, Moist Shredded Chicken

Now that I've tried this method, I don't think I'll ever go back to shredding rotisseries! We often ended up with dry, overcooked meat that had spent too much time under the heating lamps. They were always so messy, leaving my hands covered in grease and seasonings, and lots of gelatinous goo if you shred them cold! Yuck. The bone-in breasts are much cleaner, have only one bone that is easy to remove, and you end up with all healthy white meat. Cooking the breasts this way requires very little effort, and ends up being so much better all around!

Wednesday, June 3, 2015

5:2 Cabbage Pad Thai (210 calories)

Whenever we go to a Thai restaurant, I almost always order Pad Thai. There are so many delicious dishes on the menu, but we eat Thai so seldom, I've got to get those savory noodles while I can! Naturally I was intrigued when I saw a low-calorie Pad Thai using shredded cabbage instead of noodles, and after combining & tweaking a few recipes I had a 200 calorie version of my own.

I actually make a pretty mean Pad Thai at home using the Taste of Thai sauce packets (with the recipe on the back.) I've tried making my own sauce countless times, both Americanized & authentic versions, but haven't come across anything I'm happy with. This sauce is not authentic, but it is tasty! I also used it as another chance to sub in some PB2 in place of peanut butter with nice results, but you can leave it out if you don't have any.

This recipe makes so much, my husband's only complaint about the meal was that it might be too much food, haha. It's really piled up on the plate! You could easily split it 3 ways instead, or 4 for a smaller 100 calorie snack. But I was happy to chow down!

Cabbage Pad Thai, 1  (210 calories)


Cabbage Pad Thai

(For those of you counting calories, I've added the amount for each ingredient so you can easily make tweaks without having to re-calculate everything. Anything marked with an asterisk* may vary based on what you buy, so make sure to compare your label.)

14 oz. bag coleslaw mix (or 7 cups shredded cabbage, 115*)
8 oz. mushrooms, chopped (50)

2 Tbsp soy sauce (20)
1 Tbsp. brown sugar (45)
1 Tbsp. ketchup (20*)
1 Tbsp. PB2 (23)
1 tsp. grated ginger (1)
1 tsp. minced garlic (0)
1/2 tsp. Sriracha hot sauce (3)

4 oz. cooked, chopped chicken (136)
1/2 green onion, thinly sliced (3)
1/2 lime, cut into wedges (4)


1) Heat a wok or large pan over medium heat. Add the coleslaw mix and cook for 7 minutes, stirring occasionally. Add the mushrooms to the pan and cook for 3 minutes.

2) Meanwhile, in a small bowl or cup, mix the soy sauce, brown sugar, ketchup, PB2, ginger, garlic and Sriracha.

3) Add the sauce to the wok and stir well to combine. Stir in the chicken and heat through. Divide into two bowls and garnish with the green onions and lime wedges. Serves 2-3.

Calories - 210 for 1/2, 140 for 1/3

Cabbage Pad Thai, 2 (210 calories)

Monday, June 1, 2015

Super Low-cal Ranch Dressing, 2 ways (12-14.5 calories per Tbsp.)

So, a few weeks ago I posted this Super Low-calorie Ranch Dressing, which is a delicious dressing with only about 11 calories per Tbsp. But I've been doing some more experimenting since then, and I think we've got a new favorite! Both dressings have their pros and cons though, so I wanted to share a little about both of them so you can choose. First, the original dressing, with one change ~

Lite Ranch Dressing (11.5 calories per Tbsp.)


Super Low-cal Ranch Dressing - Cottage Cheese & Milk Version

16 oz. (2 cups) low-fat cottage cheese (360) (check the label, your calories may vary.)
1/2 cup + 2 Tbsp. skim milk (50, 5 per Tbsp.)
1 pack Hidden Valley ranch mix (2 Tbsp. + 2 tsp., 78)
2 Tbsp. parmesan cheese (76) 

Add the cottage cheese and milk to your blender (or a bowl, if using an imersion blender). Sprinkle the ranch mix and parmesan cheese over the top and blend until smooth. The dressing will thicken in the fridge.

Calories - 12 calories per Tbsp. (Makes 46 2/3 Tbsp.)

Variations - Shortly after posting the original recipe, I tried replacing the water with skim milk, and the results were much creamier, though it only added 1 calorie per Tbsp. Definitely worth the increase! If you replace the milk with water, or leave out the Parmesan or the ranch mix (to add your own seasoning mix), each of those options will drop the total down 1 calorie per Tbsp.


Pros - This dressing is lower calorie and very thick & creamy! This is the way to go if you want to make a dip. You can use it as is, or leave out 2 Tbsp. milk to make it even thicker (add 1/2 calorie).

Cons - The Ranch mix doesn't taste as good in this base and has an odd herb-y taste. It is also a little more complicated to make, since you have to blend the cottage cheese.


5:2 Giant Salad with Ranch Dressing (103 calories)


Super Low-cal Ranch Dressing - Buttermilk & Mayo Version

1 3/4 cups reduced fat buttermilk (210, 7.5 per Tbsp.) (check the label, your calories may vary.)
1/2 cup Hellman's light mayo (280)
1 pack Hidden Valley ranch mix (2 Tbsp. + 2 tsp., 78)

Use a fork to mix 3/4 cup buttermilk with the light mayo. Once well blended, stir in the other cup of milk and the ranch mix.

Calories - 14.5 calories per Tbsp. (Makes 38 2/3 Tbsp.)

Tips - It's hard to find a small buttermilk, but I found out you can freeze the leftovers! I found this recipe here, and she said Hellman's was definitely better in the dressing than the other light mayos she tried, but I haven't compared any myself.

Variations - Leaving out the ranch mix to add your own seasonings will drop the calories by 1 per Tbsp.


Pros - Both my husband and I choose this one as the better tasting dressing, and it was much closer to the taste of the full-fat 90 calorie bottled Ranch dressing. This dressing is easier to make, since you just stir a few things together.

Cons - The dressing is thin, so it's not as good as a dip (and not easy to thicken without bumping up the calories). It's also a little higher in calories, and pricier to start out with (though you can use the ingredients for multiple batches).


5:2 Giant Salad with Ranch Dressing (103 calories)


Overall, if you are only using 2 Tbsp. in your salad, you're probably not going to notice much of a difference in taste. But in the future I think we'll be using the buttermilk version because it is so simple to make, a little better tasting, and only adds a negligible 5 calories per salad.

Here you can find a few flavor variations that Skinny Kitchen (who posted the buttermilk version) came up with, like Creamy Italian, Blue Cheese, and more. We tried the Creamy Italian and it was delicious! I've got a whole list of flavors I want to try with the buttermilk & mayo base & will be share the successful ones with you.