Wednesday, February 27, 2013

Wednesday Manicure: Rainbow Brite Sprite Nails & Tutorial

I did a very fun manicure this week! Hopefully you 80's girls will recognize this little guy ~

Rainbow Brite Sprite Nails

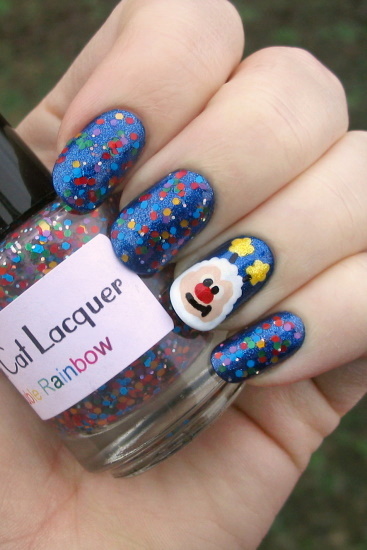
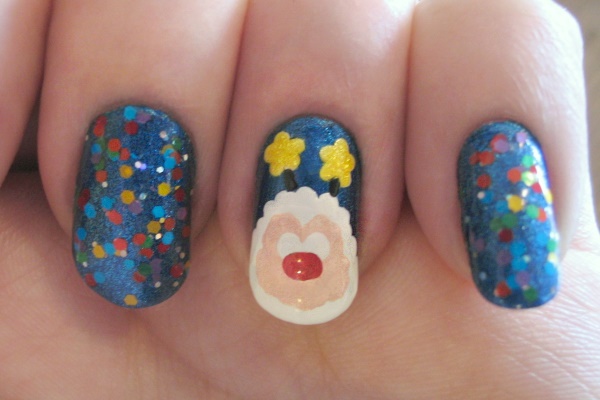
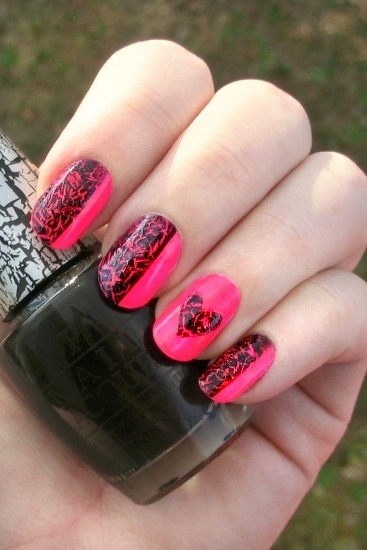
It's Twink the Sprite from Rainbow Brite!

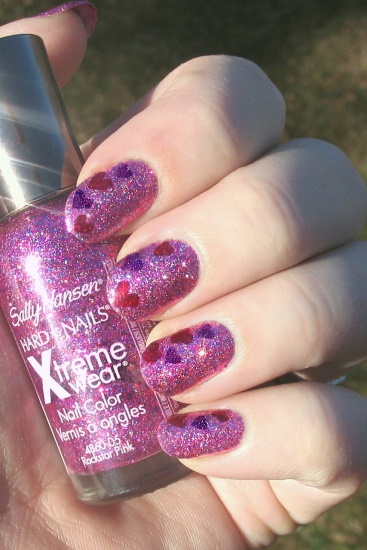
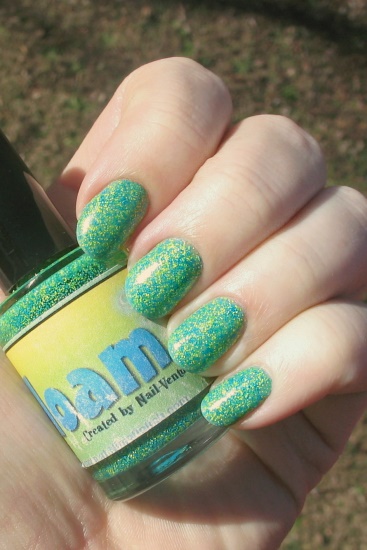
The glitter topcoat you see in the picture was the inspiration for the manicure. I fell for this "Rainbow Brite" polish when I saw the swatches on ThePolishAholic. I've been wanting to try some matte glitters & the colors really did scream 'Rainbow Brite', a childhood favorite, so it was added on my very short wishlist.

The polish has since changed names to "Double Rainbow" (I'm sure we can all guess why!), and you can see the colors are much more vibrant than in my picture. I'm not really sure about the matte glitter, everything but the blue seems shiny to me? The polish also had a chemically smell, but it applied easily & is a lovely topper!

While thinking of Rainbow Brite, I realized that the Sprites from the show could easily be created with a nail dotter. I tested it out on a nail wheel & then took step-by-step photos for a tutorial!

For this manicure you will need ~

Sprite Nail Tutorial, Supplies

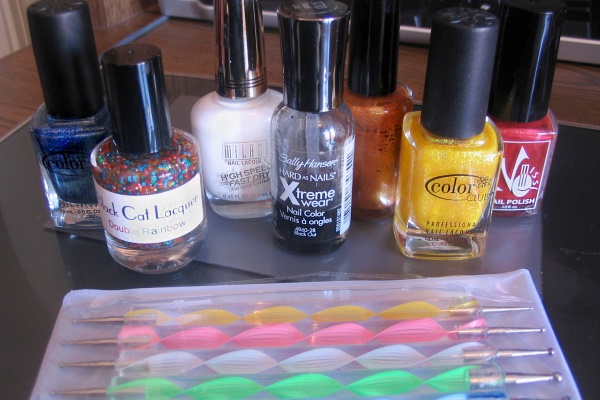
Nail dotters and polish in blue, a rainbow colored glitter topcoat, white, black, khaki/flesh colored (or some sort of brown), yellow, and red. The exact shade does not matter that much, but pictured above is Color Club "Cold Metal", Black Cat Lacquer "Double Rainbow", Milani "White on the Spot", Sally Hansen Xtreme Wear "Black Out", an unlabeled coppery polish, Color Club "Daisy Does It", and No Miss "Palmdale Paprika".

For the nail dotters I'll be referring to the sizes as XS, S, M, L, and XL. We'll be using XS-L.


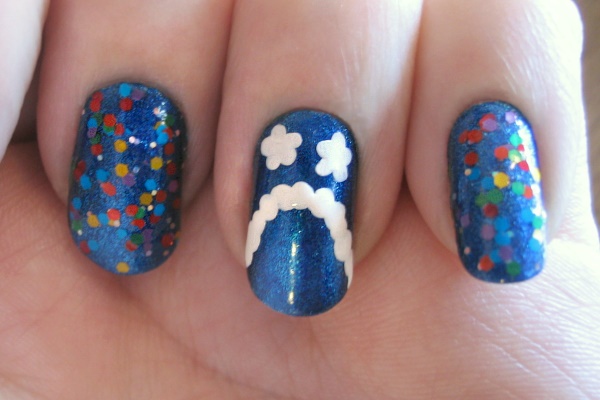
1) Paint your nails with a blue base coat on all nails (and clean up edges). Add your rainbow glitter to all but the ring fingers. Coat everything with a fast drying top coat & let dry for a while.

2) On the ring fingers ~ Yellows tend to be a bit transparent, so we're going to lay down some white first for the stars. Use the S dotter to draw two tiny white stars at the top of the nail. (Dot the point of each star and then drag in towards the center) Use the L dotter and create a row of dots curving down.

Sprite Nail Tutorial, 1

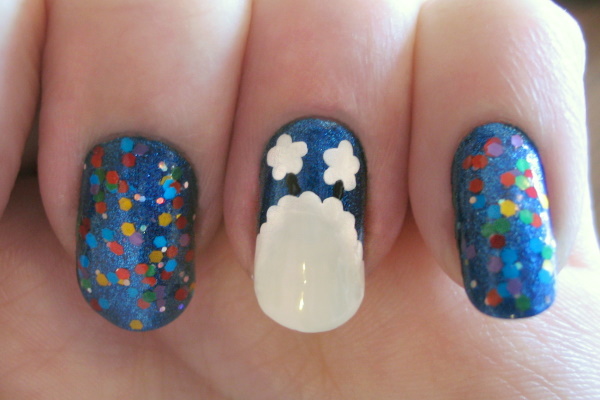
3) Using the XS dotter (or a small striping brush/toothpick), draw a thin black line from each star to the curved line. Fill in the area below the dotted curve with a coat of white & let dry for a minute. Add a second coat (or more) as needed and let dry all the way through.

Sprite Nail Tutorial, 2

4) I did not have a good khaki/flesh color for his face, so I mixed a coppery color and white half & half and it was perfect! With the L dotter, add the khaki color to create the face shape ~ two humps at the top and extended on the sides for the cheeks. With the S dotter, go over the stars with your yellow & let it all dry.

Sprite Nail Tutorial, 3

5) With the M dotter, add two white dots for the eyes. With the L dotter, move back & forth to create an oval shape underneath for the nose (let dry).

Sprite Nail Tutorial, 4

6) With the S dotter, add black pupils to the eyes. Then, using the XS dotter, finish it off by drawing on the mouth. Let this all dry for a while before applying your fast drying topcoat to keep it from smearing.

Sprite Nail Tutorial, 5

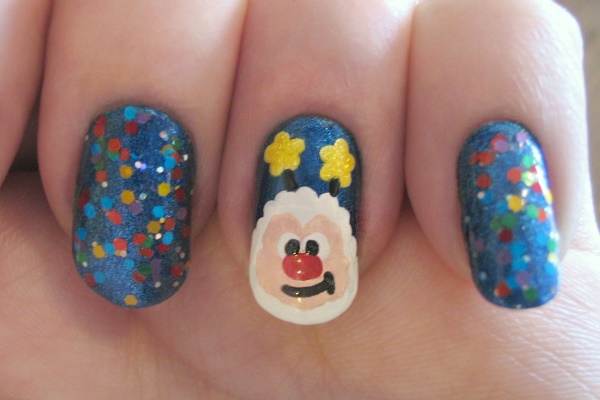
The sprite turned out so cute on my left hand! My right hand looked a little wonkier, but it's definitely doable with your 'off hand'. I hope you'll give this a try!

Monday, February 25, 2013

Monday: Getting Things Done

This was a really productive week! I finally got around to a lot of organizing that needed to be done (of course there's always more to do!). This week I....

♦ Tackled the bookshelf in the kitchen. First I just straightened up the shelf of my Japanese books, where there was a lot of stuff stacked up on top of the books (photos to frame & hang, a giant coloring sticker book, etc.). I also removed the Japanese children's books & put them with Orson's books since they were not really helpful for language study but fun to look at. Here is the after shot (click on the pic if you want to see notes about what everything is).

Japanese Shelf

♦ Later I confronted the shelf where we've been sticking Orson's craft supplies & other toys he uses in the kitchen (like bubbles & jigsaw puzzles). I've been picking up new craft stuff and there was way too much for that tiny area!

Craft Shelf, before

I cleaned off some junk that was on the the top of the bookshelf (seen in the first pic) and moved the wok & steamer up there to make more room. The Dollar Tree has lots of small totes/containers 3 or 4 for $1, so I always keep some of those on hand for organizing things. It looks a lot nicer with everything sorted out ~

Craft Shelf, after

Ideally I would have the craft stuff in something with high sides & dividers, more like this, to reduce some of the visual clutter, but this will work for now! Here is the whole shelf, if you were curious (there are notes on the last two pics too) ~

Kitchen Bookshelf

I also....

♦ Labeled some of totes in the kitchen cabinets (spices, mix packets, etc.).

♦ Popped open two mystery moving boxes in our bedroom, re-taped & labeled them & moved them to the basement storage.

♦ Went through my necklaces & sorted them into "wear" or "play". It is all just cheap-o jewelry I bought in high school or college crammed into a tupperware (pencil box?), and Orson loves to open it up & play with them ~ they get very tangled! For now I just put the stuff I might want to wear in a ziplock so Orson can't tangle them up with the rest.

♦ Went through my make-up drawer & threw out a bunch of stuff.

♦ Followed this blog post for cleaning stinky towels. We don't have any problems with our towels, but the washcloths I use to clean the kitchen often sit around damp for a long time & have been smelling mildewy, even when clean. I think it worked well! (I wish I had not thrown in the dish towels we use for drying though. I don't think they were stinky, and they got very linty for some reason)

♦ Made some octopus crafts & food for Orson

♦ Taped up some TP rolls like this for marbles & pom poms. It did entertain him, but not for very long.

♦ Took a *giant* pile of plastic bags in for recycling, like a whole cart full. I'm so glad we got the new re-usable tote bags!

♦ Went through 4 more boxes of baby clothes to sort out anything that might be neutral enough for the baby girl. Then I went through the whole pile of neutral clothes (a hamper & box, overflowing) with Justin to see if I had pulled out anything too boyish. Anything borderline will probably just be worn around the house, but he did pull out a few shirts that were mostly blue. The boy clothes are sorted by size in labeled boxes that will be taped up & stored in the basement. I thought I was done... then I remembered the boxes in Orson's closet!

♦ Mixed this multipurpose cleaner (the "Cure-All") yesterday, but haven't had a chance to test it yet. I'll report back next week! I mixed something like the "Blessing in a Bottle" before & it works great. After comparing prices I want to try a few more of these concoctions.

Sunday, February 24, 2013

Sunday: Recent Recipes

This week we made...

Pad Thai (2 dinners) - I missed this so much! I really need to figure out how to make a good sauce though (this stuff is a little pricey). You can also find the noodles as an Asian mart for much cheaper!

► Bratwurst with Pan-fried Cabbage

► Toasted Sandwiches (lunchmeat) with Veggies & Dip - For the dip I use 16 oz. sour cream, Knorr's Vegetable Soup mix (not Spring Vegetables!), toss in about 1/4 cup of Parmesan and a sprinkling of Garlic powder.


And one new recipe...

Penne Rosa with Shrimp

Penne Rosa with Shrimp (2 dinners, pictured above) - When I stirred in the final ingredients for this recipe I was a little disappointed. The sauce was rather thin & looked nothing like the creamy tomato sauce I was expecting from the photos. The taste was good, but a little mild. So I doubled the yogurt & marinara, and once I mixed that in the dish looked & tasted a lot more like we expected! (the photo was before this step)

With that change the recipe was definitely a winner (we also only needed 1 tomato to reach her 1/2 cup estimate). The best part, it only took about 15 minutes to throw together! This ended up making 4 large servings. Next time I would't mind a little more shrimp, but a full pound might be too much.

Saturday, February 23, 2013

Octopi & Mountain Climbing

Orson is finally old enough to enjoy crafting and cute food! Thursday Orson was interested in some toilet paper rolls that I recently put aside for crafts, so I thought it was a good time to make an octopus like I saw here.

I told him to color the roll all over with markers, but he only added a few scribbles (and he normally loves to color!). I added the legs anyway to get him more excited ~ you just cut about halfway up on two sides, then repeat halfway between those cuts two more times to make 8 legs, wrapping them around your finger to curl them up. I also popped on some google eyes, which he hadn't seen yet, and he loved the octopus but constantly wanted to pull those eyes off! I'm sure we'll make more of these in the future.

TP Roll Octopus

At lunch I was thinking of making him a hot dog, and remembered those could make an easy octopus too! I basically made them like this, but used half a hot dog for each octopi. I knew the legs would separate if you boil them, but was happy to see it worked well in the microwave too!

Hot Dog Octopi

I cut in some faces too, but those ended up a little creepy looking! You could draw faces on with ketchup, a food marker, or cut tiny pieces of food to form the shapes.


Yesterday Orson watched a show that involved climbing a mountain and was very excited about it. He laid his blanket over the back of the couch and pretended to climb that, so I went and got a long jumprope & ran it down the stairs & we had fun climbing up & down that. For lunch I cut a grilled cheese in half diagonally and then laid them on a plate to form mountains. He wouldn't eat his green beans, so I laid them along the bottom to form grass & threw on a few Cheerio flowers. (I still had to take away a mountain and make him eat the beans before he could have it) Orson also wanted some people climbing the mountains, so I added a few raisins. I'll have to take a pic next time!

Friday, February 22, 2013

Keeping a Functional To-Do List, pt. 2

This is the second half of my "To-Do List" post, where I wanted to share more about how I arrange my lists. Part 1 covers some general tips and can be found here. You'll want to keep #3 from that post in mind when reading below, "Find What Works for You". There is no 'rule' on how to create your list, but hopefully sharing what I do will give you some ideas!

 Keeping a Functional To-Do List

I keep my list on Google Drive (previously called Google Docs), which is basically an online Word Doc I can access and edit anywhere. I prefer keeping an electronic version so I can move things around as needed, and I can always delete a finished task & easily see what is left to do.  

Today ~ At the top of the page are things that need to be done today. I have a short list that repeats every day ~ things like take pills, 12:00 - Orson’s nap, 1:00ish - Check mail, etc. I like to break my list into a few sections for general times of the day (morning, mid-day, evening) to help me focus on what needs to be done right away.

I use a text expander program (FastFox) to paste that in everyday but you could always copy & paste it from somewhere else. If you prefer to hand write your list, you may want to keep a separate file for each day of the week and just print as needed.  

Days of the Week ~ I also have a few tasks for each day of the week. Some tasks are obvious (Tuesday night we need to take out the trash), but this is also a great place to mark down things that you’d like to do regularly to keep them from getting out of hand. For example, Wednesday I file new work orders away into my database. Thursday I go through webpages that I recently bookmarked and file some away, delete some, Pin some, etc. (I never seem to make it all the way through the list, but it keeps the list whittled down!)  

In the future ~ Anything that needs to be done on a definite date or way in the future gets marked on my calendar (Google Calendar). Need to change your filter every three months? Write it on there. Maybe you want to put away some of your child’s toys for a few months so they’ll seem new later. Write down a reminder so you don’t end up with a box forgotten in the garage.  

Week by Week ~ Below the "to-do" today section, I have the next week or two roughly planned out. On Monday I write out the days for the following week and copy any info off of my calendar. My orders are due one week after payment, so I mark those down as they come in during the week. This is just a quick summary so I can see what is coming up, only a few items per day. In the morning I cut the current day from that list, paste it at the top of the page, and then I add in the "Today" and "Day of the Week" tasks mentioned above.  

Other Lists ~ I do keep a “Projects” list (mentioned in part 1), though I know I don’t make very good use of it. (Since it is stuff I want to do sometime in the future, so it usually gets skimmed over quickly & ignored) I also have some random lists in Google Drive like books to read, things we want to buy for the house, or blog posts I’m working on. I don't want that type of stuff clogging up my main list, but I can pull it up to reference whenever needed.


So what about you? Do you keep random to-do lists, or have a bigger system? I know writing down & sorting everything like this has really helped keep me and my family on track ~ suddenly I'm the 'responsible' one in the family, hah!

Wednesday, February 20, 2013

Wednesday Manicure: Neon Crackle Heart

This was a fun manicure to create, but it required a lot of layering!

First, to make your neon polish really pop, you want to lay down down a base of white polish. For this I used 2 coats of Milani "White on the Spot". Then I added about 3 coats of Sinful Colors "Pink" for my neon (great name) ~ not the best polish, but I didn’t want to spend much on a color I’d wear so seldomly. I covered this with topcoat and let everything dry for a while.

Neon Crackle Heart Manicure

For the ring finger I followed this tutorial to add a heart, though I folded the tape in half & cut out a heart instead of using a hole punch. I filled the heart in with OPI “Black Shatter”, but did not brush it on like normal. A while back I saw a girl use many colors of crackle polish for a manicure, painting tiny brushstrokes in various directions all over the nail. I thought that would be fun to test with one color, and it definitely did mix up the crackle pattern a little. (The crackle would normally look a little more like this.) For a nice crackle you'll also want to use a thin coat.

For the rest of the nails I blocked off a section of my nail with Scotch tape & filled in the rest of the nail with the same crackle technique. From afar this looked a little too much like leopard print for me, but it was pretty fun and I got a ton of compliments!


And apparently I've been a bad influence on our little boy! He colored his nails with marker & then came over to me saying "Take picture", haha ~

O's Nails

Monday, February 18, 2013

Monday: Getting Things Done

This week I...

Orson V-day '13 Cards

♦ Got Orson to make Valentine's Day cards for his grandparents. I got the idea to make a heart stamp with a toilet paper roll from this blog, but it didn't work so well for us. It was hard to make a full heart with the stamp, so I had to help with most of those, then Orson made some partial prints & smeared things around. Then I cut out a few construction paper hearts and he glued them on. Not too bad!

♦ Tried 2 new recipes.

♦ Used Goo-Gone to get the label gunk off Orson's "I Spy" bottle and a jar I keep pens in.

♦ Removed the labels from the new recycling bin & our trash can (one of those needed Goo-Gone, but the rest came off smoothly).

♦ Made a heart garland for Valentine's.

♦ Tried a new Japanese restaurant, about 30 minutes away (also for V-day). We tried a few new foods there too ~ jellyfish and pork belly!

♦ Searched all through the moving boxes full of craft supplies & finally found a mail sorter that had been used for shipping supplies. I had been planning on buying a new one for our current mail, but I realized the old one wasn't being used & would at least work for now! (This took a spot in the kitchen, clearing off the table by the front door)

♦ While searching for the mail sorter I finally found my missing label maker! I labelled a few containers on my desk and re-labeled some of our cords ~

Labeling plugs

Whenever a new cord comes in the house, I stick a label on it! We have too many old cords that we have no idea what they go to. I had been using some white paper labels and then covering them with tape (to water/stain-proof them), but realized these would work even better! Normally I just write the item the cord is for, but for phones and game systems I've started adding our names as well in case we leave them at someone's house where there were a lot of visitors.

♦ Bought new batteries & tested the baby swing we bought from Craigslist. Works great!

♦ Finally remembered to use the re-usable grocery bags we bought a week or two. We used to be in the habit of taking them every trip, but our old bags started falling apart & we went months without any. It's sad to see how quickly those plastic bags accumulate!!

♦ Re-took the pictures of eBay items (15+ items).

♦ Created a comparison list for cable/satellite & internet costs from the local companies. I really want to drop the TV now that I watch everything online but Justin is reluctant. Know anywhere we can get local channels only? We are trying to cut back costs for next year when I am not working.

♦ Started carrying stuff from the nursery to the basement... Our future nursery (2nd floor) is loaded with sewing & office stuff and I've been really dreading moving it into the basement. After carrying stuff back & forth a few times beofre, I knew how exhausting it was going to be to try to do it all at once. I took a tip from my recent To-Do List post and realized I should break up the task to make it seem more manageable! Currently the goal is just to make one trip a day. It will take a week or two to empty the room, but moving everything will take little effort at all.

Sunday, February 17, 2013

Sunday: Recent Recipes

Last week we made ~

► Potstickers with Miso Green Beans & Rice - Frozen potstickers, roasted green beans tossed with Walnut Miso Dressing, and white rice.

And tried 2 new recipes ~

White Chicken Chili

White Chicken Chili (2+ dinners, pictured above) - Years ago there was a lady at our church famous for her White Chicken Chili. She brought the recipe in for us one day, but when we followed it, it was horrible! ~ nothing like hers. I figured it was time to attempt a new recipe, and while it’s been so long that I don’t really remember what hers tasted like, I think the new one was even better!

This chili has a rich & creamy broth that really sets it apart. Other than chopping up 2 onions and shredding the chicken, there is not much work to do. The recipe does have a lot of odd ingredient ranges (3-6 cups of broth?) so I wanted to mention that we used 4 cups of water & 3 bouillon cubes, 3 cans of beans, and stirred in 2 cups of cheese and ¼ cup of sour cream at the end (did not need to add any extra at the table). It was a little too liquidy, so next time we will only use 3 cups of water (2 bouillon). This made enough for about 6 large servings (we had 2 dinners and some lunches).


Mini Meatloafs, pan

Mini Meatloafs, plate

Mini BBQ Meatloafs (in a muffin tin) with Baked Potatoes (2+ dinners, pictured above) - Neither of us are huge meatloaf fans, but we really enjoyed these! Justin dropped a ball of the mixture into each tin and they came out more like giant meatballs than mini meatloafs (you could probably flatten them in the tin to create more of a muffin shape, but I wouldn’t bother). This recipe made a *ton* ~ about 21 ‘meatloafs’! We only wanted about 3 each for dinner, so there were lots leftover for lunches too.

Naturally we did make a few changes ~ we used a little more meat (it was packaged 2.25 lb.), pureed a can of diced tomatoes instead of using salsa, and in place of “grill seasoning” we used 1 Tbsp. minced garlic, 1 tsp. dried oregano, and ½ tsp. each of salt, pepper, and dried sage. Next time I think we’ll used 1 lb. ground beef and 1 lb. sausage, and I’ll make sure the veggies get minced up nice & small (there were a few too many large chunks this time).

Friday, February 15, 2013

Keeping a Functional To-Do List, pt. 1

I’ve always kept to-do lists, but not particularly good ones. I would scratch down a few ideas on various, unorganized bits of paper, usually ending up with leftover tasks that never got finished. Meanwhile I often had a never-ending list running through my head ~ “Ok, I really need to do this first, then that. Don’t forget to call mom this afternoon. We need eggs. Tomorrow I *have* to remember to...”, and so on. Not helpful at night when you are trying to fall asleep!

Years ago I saw a recommendation for the book “Getting Things Done: The Art of Stress Free Productivity”, and wrote down the title somewhere. Luckily I saw it on a friend’s bookshelf shortly afterward and promptly borrowed it. The book focuses on creating organized to-do lists, and while I couldn’t relate to some of the business oriented topics (setting up a list of contacts you need to call, for example), I was able to pull a lot of good ideas from it. Here are some of the main things I learned ~

Keeping a Functional To-Do List

1) Write Down (almost) Everything

When you get that list out of your head and on paper, it can really clear your mind and reduce stress. Once it is on the list, you don’t need to worry about it anymore, and you don’t have to keep reminding yourself. You may have to use the list for a while before you fully start to trust it, but once you have a good system going I think you'll notice a difference!

I write down almost everything that I need to do, nearly to the point where it is embarrassing, but it has helped so much. While I don’t put every daily task on the list (like brushing my teeth), if it’s something I have trouble remembering it goes on there. For instance, while doing laundry I used to have a lot of trouble remembering to get the clothes out of the washer & into the dryer, or out of the dryer & put away. I’ve learned that is something I have to put on my list if I actually want it to get done.

2) Break Down Large Tasks

Big projects can be daunting. If you write down something like “Plan birthday party” or “Re-organize front closet” on your to-do list, chances are that is going to sit ignored on the list for a long time. Instead, think of the first step that you need to do to start the project and write that down. Maybe you need to call your mom to get someone’s phone number, pick a color scheme, or buy a set of invitations. That sounds a lot more manageable than trying to do the whole thing at once! And usually the hardest part is just getting started.

 Once you complete that first step, add the next one to your list. Keep a separate list of big “Projects” that you refer back to about once a week so that nothing is forgotten, but try to keep them off your normal to-do list.

3) Find What Works for You (and change as needed)

This is my own addition, and maybe a bit obvious, but worth mentioning. Perhaps one master list works the best for you, or maybe you need to divide it up into different categories (work, home, hobby, etc.). Can you keep up with a list better online, or do you prefer to write it down in an agenda? Organize it the way that makes the most sense to you now, but don’t be afraid to switch things up later on as you realize what actually works and what doesn’t. I don’t follow all of the recommendations from the book, and my current list definitely looks a lot different from when I started!

Next week I will finish up by talking more about how I actually organize my list(s) and what type of tasks I put on there, so check back on Friday!

EDIT: You can find part 2 here

Thursday, February 14, 2013

Super Easy Heart Garland

Happy Valentine's Day!

Today I whipped up this quick heart garland, made from strips of construction paper. Here is an awesome tutorial, which I wish I'd looked at again before making these ~ I was working from the top down & this would have been even easier!

Super Easy Heart Garland

Tomorrow night we'll be going out for a semi-nice dinner, but otherwise all of our money right now is being saved for this ~


We are getting close and I am so excited!! What do you think of the red color? I've had a ton of orders the last two weeks, working until bed a few nights, but it's so much easier to deal with those busy days knowing the money is going towards this.

Wednesday, February 13, 2013

Wednesday Manicure: "Rockstar Pink" with Hearts

This week was supposed to be our first week of church Small Group (it got cancelled), so with the idea of meeting lots of new people I thought I might go a little conservative with my nails ~ pink! I decided to wear my new Sally Hansen Xtreme Wear “Rockstar Pink”, and once I realized this was also the week of Valentine’s Day, tiny hearts seemed like the perfect accent.

Rockstar Pink with Hearts Nails

“Rockstar Pink” is a wonder collection of tiny glitter ~ mostly in pink, with accents of purple, blue, red, and silver. Very sparkly & fun! I had my eyes on this one for a while, and once I read that it was the perfect ingredient for a special franken-polish I wanted to make, I had to grab a bottle. The hearts were easy to add with a few small nail dotters ~ just make two dots side by side & work down to connect them with a point underneath. For those I used Color Club “Wild at Heart” (purple) and China Glaze “Ruby Pumps” (red).

I'm not sure why they put this polish in the Xtreme Wear line though. With so much glitter I was expecting this one to be rather brittle, and even with a ton of topcoat on it did get a few chips early on (they were easy to patch up). By day 5 I lost a few large chunks & was ready to remove it.

Monday, February 11, 2013

Monday: Getting Things Done

Getting Things Done - Trying to to tackle all of my long ignored 'to-do's, clutter tucked in the corner, untried Pins, and new tasks I'd normally put off. Forcing myself to get up & do it already!

Last week I...

♦ Researched paper crafts to do with toddlers but could not find much! Orson was very excited to make a bunny recently, so I ended up cutting out a bunch of squares, triangles, and circles, and let him play with a glue stick. Eventually I drew some figures made from shapes he could match up and he was thrilled, demanding a whole set of family & friends (with kitty shirts).

Orson Shapes Family

♦ Tried 3 new recipes

♦ Went through the medicine boxes in our bathroom - There are no medicine cabinets in our new house, so everything is still sitting in 2 moving boxes. Messy, and we were a little worried about Orson getting into something. I went through the boxes, threw out several ancient pill bottles, and sorted everything into large labeled ziplocks (Pain Relief, Dental Care, etc.), and was able to combine it into one box. Eventually we want to buy a cabinet to add storage, but that's low priority for now.

♦ Reading a lot of books lately, about 1-2 a week. Granted, most of them have been chosen from this list & are young adult novels, but still! I need to find a good list of adult sci-fi/fantasy recommendations.

♦ Made paper & oil hearts inspired by this post. Only the first couple got the 'stained glass' effect, because soon Orson was determined to fill in every inch! I tried to make patterns on a few but the oil bled over time & it wasn't noticeable. Orson happily filled these in for about 2 hours & would have kept going! They look great in the window.

Paper & Oil Hearts

♦ Got a new trash can to use for recycling in the kitchen - replacing a tacky cardboard box!

♦ Bought a baby doll for Orson - We've been saying he needed one since before Christmas, and he's been especially interested in the new stroller & swing. Practice for his future baby sister!

♦ Sorted through 2 boxes of Orson's baby clothes - Pulled out anything that was gender neutral enough to use for the baby & made sure to box his back up by proper size (some were shoved in the wrong boxes before). Still more to do!

♦ Tried to buy gum paste to make these mints, but could only found a $9 bag. Never mind!! Looks like I'll be making the gum paste myself if I want to try these.

Sunday, February 10, 2013

Sunday: Recent Recipes

Last week we enjoyed a few simple meals (frozen Superbowl snacks, rotisserie chicken with salads) and tried several new recipes as well.

Mashed Cauliflower (and fish)

► Breaded Fish with Mashed Cauliflower - I've wanted to try mashed cauliflower for a while, but sadly was not a big fan. Not bad, but I kind of had to force myself to eat it. Definitely willing to try it again though, in case this was just a dud! (The fish was coasted in bread crumbs & herbs & baked)

Chicken Parmesan Bake

Chicken Parmesan Bake with Roasted Kale (2 dinners) - Excuse the terrible pic (casseroles are hard to photo!), but this was delicious! And easy to make. The only problem we had was finding garlic croutons, they were all garlic & cheddar. I ended up finding some in the 'Texas Toast' variety, but they were not ideal because of their extra large size.

The recipe is in a video, so I thought I would type out the directions for you here (ingredients are listed below the video) ~

Preheat your oven to 350 F. In a 9x13 casserole dish spread the olive oil & garlic to coat the bottom, then sprinkle with red pepper flakes (optional). Lay the chicken breasts in the pan, trying not to overlap, and pour the sauce over the top. Sprinkle with basil, then top with 4 oz. Mozzarella & 2 oz. Parmesan. Top with croutons then the other half of the cheese. Bake 30 minutes, uncovered (may need longer for larger breasts).

► Asian Chicken Salad (for lunches) - I made a simpler version of the salad from this week and enjoyed it a lot more. 1.5 cups savoy (shredded), 1.5 cups chicken (cooked & shredded), 1/4 cup sunflower seeds, and 1/4 cup matchstick carrots. One day I tossed some with my Savory Miso Dressing and the rest of the Chow Mein noodles, the next day I used cooked Ramen noodles and a mix of soy sauce, honey, & sesame oil. Both were delicious!


On Saturday we had some friends over for a snack-y board game night. We made ~

Teriyaki Wings

Teriyaki Chicken Wings - We haven't made these in a long time, and I regret it. So good, and simple to make. Definitely line your pan with foil because the sugary sauce will be a mess by the end!

► Parmesan Garlic Wings - For these I used 1 lb. of wings, brushed with melted butter (optional). Then I mixed 3 Tbsp. grated Parmesan, 1 tsp. minced garlic, 1/2 tsp. Italian seasoning, and a dash of salt. I sprinkled some over the wings and baked like the recipe above, rotating & sprinkling them with more of the seasoning at the 10 minute intervals.

Sopapilla Cheesecake - This was a new recipe for us, and a big hit with everyone. The blogger said she preferred these room temperature, but they were *way* better heated up in the microwave for a few seconds (too long and the cheese will start to run). We all found the name a little odd, so I'll have to come up with something new in the future.

We also made some veggies & dip and our friends brought cheesy bread with herbed butter and hash brown casserole. We happily munched all night!

Barnes' Hashbrown Casserole

Saturday, February 9, 2013

6 months!

Today I am at 6 months, finally! The first 5 months rushed past, probably because of the holidays, but last month felt like it would never end.

6 months (baby #2)

Here is my 6 months pictures from the last pregnancy. I definitely look like I was carrying it lower last time (with a boy) and higher this time (with a girl). Either the angle is too different or else there is some truth to the wives tale!

By the way, I am very proud that I've gained less than 15 lbs. so far! I am determined not to gain 60 like I did last time, it will probably be closer to 30 with this one. (Not that I've been doing much work to keep it off, but I know I'm eating less this time & Orson keeps me semi-active.) My hips are killing me, but otherwise I'm doing good!

Friday, February 8, 2013

DIY Storage for Nail Stamping Plates

There are a lot of great nail stamping sets that come with 20+ plates for a cheap price (I recommend Bundle Monster, Red Angel, or Cheeky brand), but the plastic bags they come in are not the most ideal storage solution. After looking around online I found that you can easily make a nice holder out of a 4x6 photo album!

Here's what I started with. Not very fancy, but I liked how thin the cover is, and I can always replace that paper or add a label if I end up with multiple books ~

Nail stamping plate holder, 1

All you need to do is sew down the center of the page to create 2 pockets. I used a ruler to mark the center line and stopped about 1" before the end of the plastic sleeve (so there was more room at the opening & less risk of tearing). You can see the stitched line clearer on the top page.

Nail stamping plate holder, 2

I really wanted some clear samples above the plates so I can flip through the images quickly, and it also helps show where to put the plates back when you are done. I got the samples from the promotional images for the plates & shrank things down to fit, slipping each sample into the pocket with the plate. It took a while to get the sizing right, but I think it was worth the effort.

Nail stamping plate holder, 3

Other Options ~
Not a sewer? Kyoti has a great tutorial on how to make the dividers with tape. The plates also supposedly fit well into the plastic protector sheets for baseball cards (to be stored in a binder), or you may be able to find a business card holder with large enough pockets. My latest set of plates came in its own cute box which I was happy to use for stoage.

Thursday, February 7, 2013

Ambigrams & Other Tattoo Designs

I used to post all of the ambigrams that I create for work on my blog, but soon there were way too many to share. I do still post them all on Flickr though, and currently add new ones about once a month. I thought it would be fun to post a couple of favorites here whenever I put up a new batch.

From January I think my favorite ambigram was this simple design of "Emily" ~

"Emily" Ambigram

And here is a (non-ambigram) design that was fun to work on. I haven't made anything like it before! "Taeanu", "Jasia", "Rikki-Lee", & "TaKeeta" Tree Design ~

"Taeanu", "Jasia", "Rikki-Lee", & "Takeeta" Tree Design

Wednesday, February 6, 2013

Wednesday Manicure: Floam

I had a little money from Christmas & could pick one nail polish off my wishlist. After some debating I decided to buy "Floam" by Nail-Venturous because I really don't have anything like it!

"Floam" is made up of tiny blue & yellow matte glitter particles, which are basically little specks of color (that are not shiny). The mix of the two colors gives the polish a fun static-y kind of look that is quite unique. For some great close-up pics check out The Polish Aholic.

"Floam" Nail Polish

When I first tried Floam I was a little disappointed. After 3-4 coats I could still nee my nail through the glitter, in spite of other people claiming they only needed 2 for full coverage. I cleaned everything off and started testing a few blues on my nail wheel to use as base colors, but almost all of my polishes are are shimmery. My favorite base was an ancient turquoise cream polish ("Turbulent Blue", brand unknown) which looked great with 2-3 coats of Floam on top. I've been wearing it a week now with no chips!

You may recognize the name "Floam" from this stuff, which inspired the polish. I never had any myself, but definitely remember it from my childhood! The original polish creator does not make Floam anymore, but it is now carried by Ninja Polish (when you can find it in stock). I was able to find this older bottle on a blog sale.

Monday, February 4, 2013

Monday: Getting Things Done

Last week I....

♦ Finished removing the labels from tupperwares using pure acetone. You can see how nicely it comes off!

Acetone + Tupperware

♦ Hung a 2nd camera up in Orson room (so we can spy from 2 views until the baby comes)

♦ Started tracking the water I drink daily to make sure I'm getting enough

♦ Steamed the newly hung curtains (above bath)

♦ Hemmed the last curtain (to go above toilet)

♦ Used this idea to make Frozen Yogurt Drops! I just used a spoon to make blobs on waxed paper and it worked great. Orson was a *big* fan & I'm sure we'll be doing this a lot in the summer.

♦ Went through my lotion & body spray drawer & threw out 3 things (should have done more!). I also rinsed out 2 nearly empty travel bottles to use for lotion later.

♦ Used this idea to make my own Air Wick re-fills! I used 1/3 warming oil & 2/3 water, but I made a mistake ~ I pulled the wick out of the opening (and poured through the hole) and the wicks unraveled & started falling apart. I was able to twist them & squeeze them back in the hole, but now I see that they are not going to work since the wick does not reach the bottom of the bottle anymore.

Air Wick DIY Refills

Next time I will remove the plastic top (leaving the wick inside), and the larger opening will also make the bottles a lot easier to fill. I may also wear gloves, because I could not seem to fully wash the oil from my fingers (I could smell & taste it for days. Yuck!). I really don't want to spend $3-5 a month on re-fills though, so I'm hoping to get this to work! It will be fun to mix my own scents too.

♦ Ordered Orson's 2011 photo book! (Time to start on 2012)

♦ Bought a new stroller/car seat set and swing from Craigslist. It was a great deal ~ I basically got the swing for free!

♦ Used my small casserole dishes again

♦ Took pictures of items to list on eBay (about 15 things)

♦ And if you look around you may notice that I totally changed the layout of my blog! I was not a fan of the previous beige & orange colors, but used them to match the header. This time I went for something clean & simple. I created a new banner, re-coded the blog to match (LiveJournal and Blogger), and made all sorts of tweaks like adding buttons for feed readers & Pinterest (on Blogger). LiveJournal did it's best to make every single change unbearable.

Sunday, February 3, 2013

Sunday: Recent Recipes

Not too adventurous last week! We made...

Chicken Pot Pies

Chicken Pot Pies (pictured above, doubled for 2 dinners) - I made these as an excuse to use my tiny casseroles again, they are so pretty! They did turn out a little too brown (I should have reduced the time a little bit with the smaller sizes), and too peppery (realized the recipe had too much in it, it's been updated!), but otherwise tasty!

Doritos Casserole - This one is good, but I feel like it could be even better? Either way it's an easy & yummy dish.

Mein Fun (for lunches) - I made this again with some changes & it was so much better! I cooked the noodles in the microwave, which I think I prefer for such a delicate noodle (which can easily overcook on the stove), and I added more sauce & more cabbage. Next time I have a few ideas for how to make the preparation easier, but it's getting close!

Saturday, February 2, 2013

My Ambigrams, on Screen!

Way back in mid-2011 I was contacted by a make-up artist to create an ambigram for a movie! It was very exciting ~ The ambigram would be worn as a tattoo by Julianne Moore in the small, independent movie What Maisie Knew. She got a 'tattoo' of "Maisie Elizabeth", her daughters name in the movie, and I'm guessing she found the site because of this Maisie ambigram I had done before.

"Maisie Elizabeth" Ambigram Circle

I didn't want to say much about it online until I had more info about the movie release or some screenshots or something, and all I knew is the movie was supposed to come out in 2012. Throughout the year I'd check back, never really finding more info, other than the fact it was shown at some film festivals.

After scouring the internet for pictures, the best shot I was able to find was this one of Julianne out on the town with her tattoos still on. You can see the circle on her left wrist.


At the beginning of 2012 I was contacted by the same artist to create a design for the Showtime show The Big C. The 'tattoo' would be for the main character, and part of the plotline, but after some sketching we found that the people in charge wanted something very simple and I suggested that the C from their logo would be their best bet.

There was another design though, this time for a side character I never got the name for. We created an ambigram cross with the word "Life" (I'm not allowed to show it without permission, so you'll just have to imagine it). We don't have Showtime, so I searched around online for some pictures or info, but without a character name all I was able to find was one small screenshot that *might* be it.

The other day I found that image and started searching again, checking Netflix & Hulu for old episodes. Luckily Showtime had the first episode of season 3 on their site and I found our guy ~ Kirby! 'Arm'ed with a name, I found descriptions of his episodes and screenshots here. These bar shots are a little dark, but you can make out the cross on his arm (episode 3.1 and 3.2) ~

The Big C, 5

The Big C, 19

It looks like they kept the ambigram but changed the end caps of the cross. I'll probably be buying those two episodes soon to see the cross on a bigger screen!